This is tricky. Azure PaaS (Platform as Service) SQL Database has master database only. If programmer is taking any advantage of MSDB databases or synonymous, it will not work there directly.
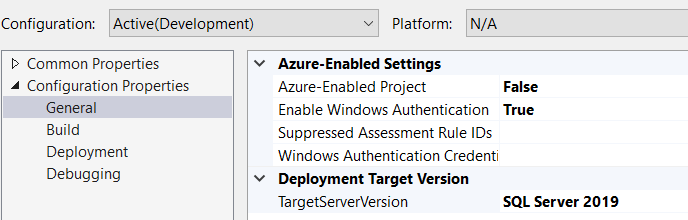
Use Deploy Database to Microsoft Azure SQL Database
The simple method to restore to Azure SQL Database is;
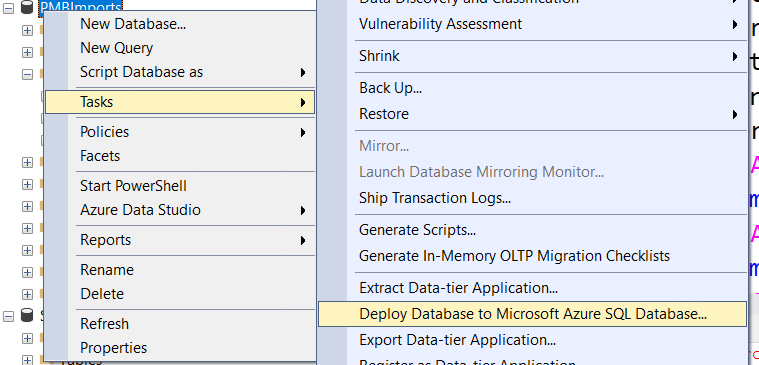
This will create a new database on Azure SQL Server. You can rename it to your actual database.
Migrate to Azure SQL by restoring from Database
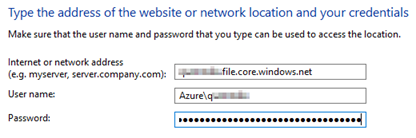
This method requires Azure storage account.
Create a blob storage. Upload database backup. From SQL Management Studio, right-click to [YourLOCALDatabase] and open Tasks>Export Data-tier Application. You can export your database to Azure Blob Storage on this wizard. After backup, connect your Azure SQL Server from SQL Management Studio. Go to your [YourREMOTEDatabase], right-click Databases folder from treeview and go to Import Data-tier Application. Choose your backup file from Blob Storage and enjoy!
This will create a new database on Azure SQL Server. You can rename it to your actual database.
Use Azure Data Migration Assistant Tool
This is unlike other methods mentioned above. This is the most efficient tool for migration databases to Azure SQL. This gives you a chance to select individual objects (tables, stored procedures, views, functions etc). Here is the link;
https://www.microsoft.com/en-us/download/details.aspx?id=53595
This does not create a new database but copy schema and data to existing database.
Use 3dr party tool
3rd party tools can be used to backup/restore Azure SQL database. Here is the list;
The tool allows us to create azure backup on local/remote. We can restore those backups on local/remote machine. I have a schedule job on my local that run everyday 10:00AM to create full backup in Azure blob container “myContainer”.
This tool also allows you to backup on your local computer.
Other methods that can be used with Azure SQL Database;
- SQL Server Import and Export Wizard
- Simple process
- Works even with old SQL Server / SSMS
- Can export data into different file formats
- Only data is imported, all other objects will be lost
- Requires SQL Server Management Studio
- Manual procedure
Use if you need to move data from Azure to a specific destination (e.g. your old SQL Server) or in a particular format (e.g. flat file) with SQL Server Management Studio tools
- SSIS Tools
- Can export data into different file formats
- Can be run unattended/automatically
- Only data is imported, all other objects will be lost
Similar to SQL Server Import and Export Wizard, but enables automatic process
- Export a Data-tier Application using SSMS
- Creates the most exact copy of the database
- Simple user interface
- Requires the latest DAC library installed
- Creates a specific BACPAC file
- Manual procedure
Use when you need to create BACPAC file with SQL Server Management Studio tools
- SqlPackage utility
- Creates the most exact copy of the database
- Can be run unattended/automatically
- Requires the latest DAC library installed
- Creates a specific BACPAC file
Use if you need to create BACPAC file from a command line
- BCP utility
- Can export data into different file formats
- Can be run unattended/automatically
- Only data is imported, all other objects will be lost
- Imports only one table at a time
Use if you need to save data from one or several tables in a readable format
- SqlBackupAndFtp
- Simple UI
- Can create scheduled backups
- Doesn’t require DAC library installed
- Creates a specific BACPAC file
Use when you need to perform automatic backups into BACPAC file regularly
- From Azure Portal
- Everything online, no software installation required
- Creates a specific BACPAC file
- Azure storage account is required
Suitable if you only have a browser
Use AzCopy
This tool can be used to transfer data between storage accounts. Here is the link;
https://adamtheautomator.com/azcopy-setup/
Azure Storage Explorer
This is a GUI that can be used to move files between storage accounts and premises. Here is the link;
https://azure.microsoft.com/en-us/features/storage-explorer/