To increase disk size, first we need to see disk status;
df -h
If it’s a VM, make sure VM has allocated enough space before performing next actions.
Here’s the list of steps for a simple scenario where you have two partitions, /dev/sda1 is an ext4 partition the OS is booted from and /dev/sdb2 is swap. For this exercise we want to remove the swap partition an extend /dev/sda1 to the whole disk.
As always, make sure you have a backup of your data – since we’re going to modify the partition table there’s a chance to lose all your data if you make a typo, for example.
Run sudo fdisk /dev/sda
use p to list the partitions. Make note of the start cylinder of /dev/sda1
use d to delete first the swap partition (2) and then the /dev/sda1 partition. This is very scary but is actually harmless as the data is not written to the disk until you write the changes to the disk.
use n to create a new primary partition. Make sure its start cylinder is exactly the same as the old /dev/sda1 used to have. For the end cylinder agree with the default choice, which is to make the partition to span the whole disk.
use a to toggle the bootable flag on the new /dev/sda1
review your changes, make a deep breath and use w to write the new partition table to disk. You’ll get a message telling that the kernel couldn’t re-read the partition table because the device is busy, but that’s ok.
Reboot with sudo reboot. When the system boots, you’ll have a smaller filesystem living inside a larger partition.
The next magic command is resize2fs. Run sudo resize2fs /dev/sda1 – this form will default to making the filesystem to take all available space on the partition.
That’s it, we’ve just resized a partition on which Ubuntu is installed, without booting from an external drive.
# Pihole-FTL.db
# stop Pihole service
sudo service pihole-FTL stop
cp /etc/pihole/pihole-FTL.db /srv/pihole-data
chown pihole:pihole pihole-FTL.db
# rm /etc/pihole/pihole-FTL.db
# create link in /etc/pihole
ln -s /srv/pihole-db/pihole-FTL.db pihole-FTL.db
# change owner/group of symlinks
sudo chown -h pihole:pihole pihole-FTL.db

# start the service
sudo service pihole-FTL start
# check service status
# systemctl status pihole-FTL
Open browser, navigate to a site and see if pihole-FTL works.
Pihole-FTL started working. Let’s move others;
# gravity.db
sudo service pihole-FTL stop
cp /etc/pihole/gravity.db /srv/pihole-db
ls -l /srv/pihole-db
chown pihole:pihole /srv/pihole-db/gravity.db
rm /etc/pihole/gravity.db
# create symlink in /etc/pihole
ln -s /srv/pihole-db/gravity.db gravity.db
# change owner/group of symlinks
sudo chown -h pihole:pihole gravity.db

# verify
sudo service pihole-FTL start

# macvendor.db
sudo service pihole-FTL stop
cp /etc/pihole/macvendor.db /srv/pihole-db
ls -l /srv/pihole-db

chown pihole:pihole /srv/pihole-db/macvendor.db
rm /etc/pihole/macvendor.db
# create symlink in /etc/pihole
ln -s /srv/pihole-db/macvendor.db macvendor.db
sudo chown -h pihole:pihole macvendor.db
# verify
sudo service pihole-FTL start

# list.1.raw.githubusercontent.com.domains
sudo service pihole-FTL stop
cp /etc/pihole/list.1.raw.githubusercontent.com.domains /srv/pihole-db
ls -l /srv/pihole-db

rm /etc/pihole/list.1.raw.githubusercontent.com.domains
# create symlink in /etc/pihole
ln -s /srv/pihole-db/list.1.raw.githubusercontent.com.domains list.1.raw.githubusercontent.com.domains
# verify
sudo service pihole-FTL start
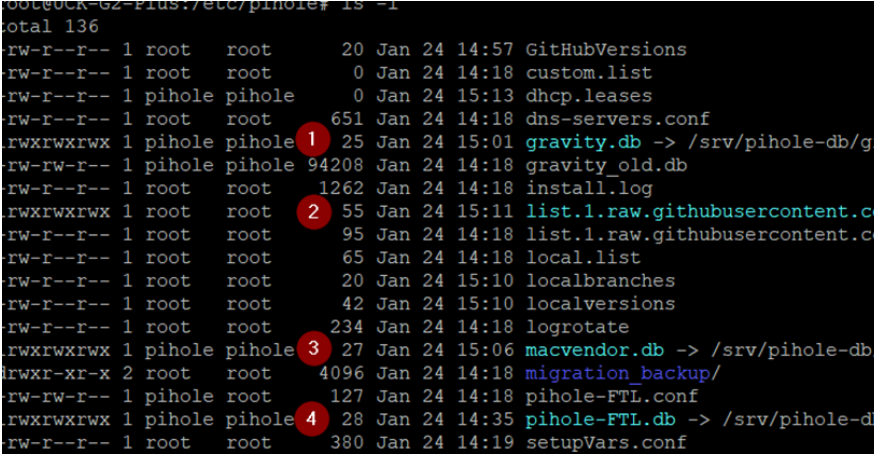
Make sure you have changed owner and group of sym(Symbolic) links of these databases.
server:
    # If no logfile is specified, syslog is used
    # logfile: "/var/log/unbound/unbound.log"
    verbosity: 0

    interface: 127.0.0.1
    port: 5335
    do-ip4: yes
    do-udp: yes
    do-tcp: yes

    # May be set to yes if you have IPv6 connectivity
    do-ip6: no

    # You want to leave this to no unless you have *native* IPv6. With 6to4 and
    # Terredo tunnels your web browser should favor IPv4 for the same reasons
    prefer-ip6: no

    # Use this only when you downloaded the list of primary root servers!
    # If you use the default dns-root-data package, unbound will find it automatically
    #root-hints: "/var/lib/unbound/root.hints"

    # Trust glue only if it is within the server's authority
    harden-glue: yes

    # Require DNSSEC data for trust-anchored zones, if such data is absent, the zone becomes BOGUS
    harden-dnssec-stripped: yes

    # Don't use Capitalization randomization as it known to cause DNSSEC issues sometimes
    # see https://discourse.pi-hole.net/t/unbound-stubby-or-dnscrypt-proxy/9378 for further details
    use-caps-for-id: no

    # Reduce EDNS reassembly buffer size.
    # IP fragmentation is unreliable on the Internet today, and can cause
    # transmission failures when large DNS messages are sent via UDP. Even
    # when fragmentation does work, it may not be secure; it is theoretically
    # possible to spoof parts of a fragmented DNS message, without easy
    # detection at the receiving end. Recently, there was an excellent study
    # >>> Defragmenting DNS - Determining the optimal maximum UDP response size for DNS <<<
    # by Axel Koolhaas, and Tjeerd Slokker (https://indico.dns-oarc.net/event/36/contributions/776/)
    # in collaboration with NLnet Labs explored DNS using real world data from the
    # the RIPE Atlas probes and the researchers suggested different values for
    # IPv4 and IPv6 and in different scenarios. They advise that servers should
    # be configured to limit DNS messages sent over UDP to a size that will not
    # trigger fragmentation on typical network links. DNS servers can switch
    # from UDP to TCP when a DNS response is too big to fit in this limited
    # buffer size. This value has also been suggested in DNS Flag Day 2020.
    edns-buffer-size: 1232

    # Perform prefetching of close to expired message cache entries
    # This only applies to domains that have been frequently queried
    prefetch: yes

    # One thread should be sufficient, can be increased on beefy machines. In reality for most users running on small networks or on a single machine, it should be unnecessary to seek performance enhancement by increasing num-threads above 1.
    num-threads: 1

    # Ensure kernel buffer is large enough to not lose messages in traffic spikes
    so-rcvbuf: 1m

    # Ensure privacy of local IP ranges
    private-address: 192.168.0.0/16
    private-address: 169.254.0.0/16
    private-address: 172.16.0.0/12
    private-address: 10.0.0.0/8
    private-address: fd00::/8
    private-address: fe80::/10
save file CTRL+X.
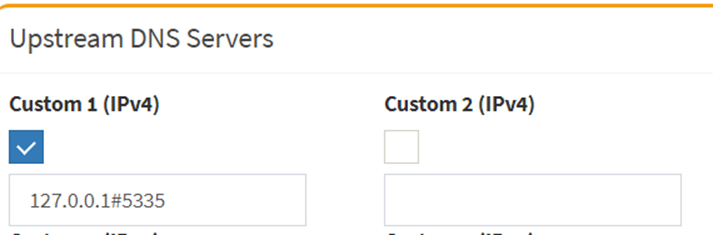
Start local recursive server and test that it’s operational;
sudo service unbound restart
dig pi-hole.net @127.0.0.1 -p 5335
The first query may be quite slow, but subsequent queries, also to other domains under the same TLD, should be fairly quick.
You should also consider adding
edns-packet-max=1232
to a config file like /etc/dnsmasq.d/99-edns.conf to signal FTL to adhere to this limit.
This is not a good idea but sometime you need it for testing.
By default, the SSH server denies password-based login for root. In /etc/ssh/sshd_config, if the following line exists, possibly commented out (with a # in front):
PermitRootLogin without-password
Then change it to the following, uncommenting if needed (remove the # in front):
PermitRootLogin yes
And restart SSH:
sudo service ssh restart
Or, you can use SSH keys. If you don’t have one, create one using ssh-keygen (stick to the default for the key, and skip the password if you feel like it). Then do sudo -s (or whatever your preferred method of becoming root is), and add an SSH key to /root/.ssh/authorized_keys:
Edit /etc/apt/sources.list and paste following text.
deb http://deb.debian.org/debian/ stretch main contrib non-free
deb http://deb.debian.org/debian/ stretch-updates main contrib non-free
deb http://deb.debian.org/debian/ stretch-backports main
deb http://security.debian.org/ stretch/updates main contrib non-free
Remove all files from /etc/apt/sources.list.d
You might see this file after upgrade.
You will get the stretch based release candidate from ubiquiti.
Now were going to run through all the commands below. You will get some prompts about updating components, and restarting services, answer yes to these.
If you want to upgrade packages, go through these commands;