The settings for controlling comments in WordPress is available under Settings > Discussion. Please note that this is the manual method of preventing/combating spam and is usually the most effective when you have a few comments every day. However, if you have over 1000 daily comments, it is more feasible to use an antispam plugin.
Let’s discuss certain ways to use these default WordPress settings to prevent spam. We will discuss one section at a time.
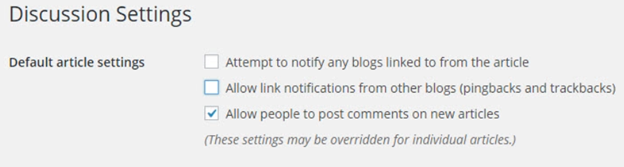
Default Article Settings
Simply disable trackbacks and pingbacks to save yourself from half the spam traffic. Only allow people to post comments on new articles.
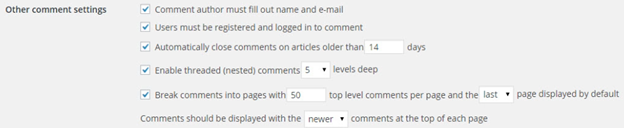
Other Comment Settings
It is almost always necessary for the comment author to enter his name/email before commenting. WordPress enables this by default. If you require users to log in before leaving comments then this will cut down on a significant amount of spam This step might be a turn off for few legit readers who want to leave a comment but don’t want to sign in. Therefore you must carefully analyze before enabling this feature.
You should disable comments on posts older than 90 days in a fairly active blog. However, if you keep updating articles, make sure to change the published date so that the 90 days boundary doesn’t overlap. Keep Threaded comments to the default or increase it if required.
E-mail Me Whenever
You can use this feature if you don’t get thousands of comments on your posts. You will get email notifications for every comment that pops up and you can mark it spam right away cutting down on a section of spam comments.
Before a Comment Appears
Allowing readers who have previously left a comment, to leave a comment again without requiring any approval, will help you cut down the legit comments in the moderation queue. You’ll only have to focus on the remainder of users, mostly of which will be spam.
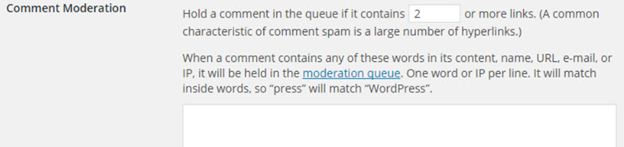
Comment Moderation
I suggest you use a value of 2. This ideally allows guest bloggers to leave at most one outgoing link (link bait) in their comment. Building an effective comment moderation blacklist is a very time-consuming process, with equally beneficial payoffs. However, you can leverage this setting as an effective profanity filter. Simply add the profane words to the list and all such comments will be added to the moderation queue.
Comment Blacklist
Comment Blacklist is stricter version of the Comment Moderation Blacklist, where if a comment contains a blacklisted word, it is sent to the spam queue, instead of the moderation queue. The benefit – saves your time.
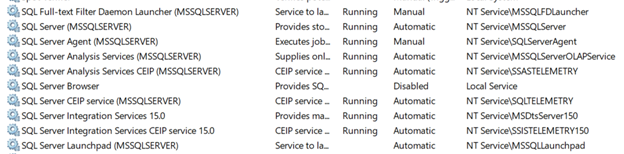
By default, SQL Server services run under these accounts;
Sometimes administrator might have changed these service accounts to window accounts for management reasons. To get them back to default accounts, right click on service and change them to NT Service\[Account Name] where [Account Name] is above listed account without any password. Windows know how to setup the password.
We would like to create a windows proxy account so that we can use it inside SQL server. The intent is to use this account to read/write from windows file system.
I am using my local laptop for this demo but you can use a domain account. The only difference would be to change [ComputerName]\[AccountName] to [DomainName[\[AccountName].
You might have received this user from your domain administrator. If not then create a Windows user “SQLService” on your local computer and make him member of “Users” group only.
Next Open SIMS -> Security -> Login -> New Login.
Server Role -> public.
User Mapping -> msdb -> db_ssisoperator, public
User Mapping -> SSISDB -> ssis admin, public
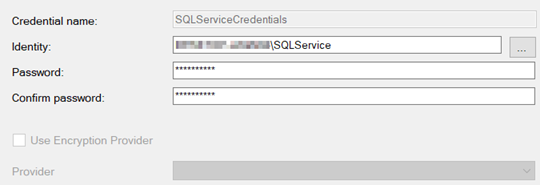
Next Security -> Credentials -> New Credentials
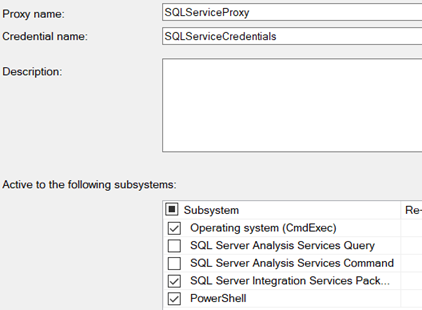
Next SQL Server Agent -> Proxies -> SSIS Package Execution -> New Proxy
I have selected “Operating system (CmdExec) and “PowerShell” additional subsystems. You might not need these.
Under Principals, Select your windows service account;
Deploy your integration service packages. You will be able to see them under SSISDB->[Folder Name]\[Project Name]. Run your package. It will successeded because you are running them under your security context;
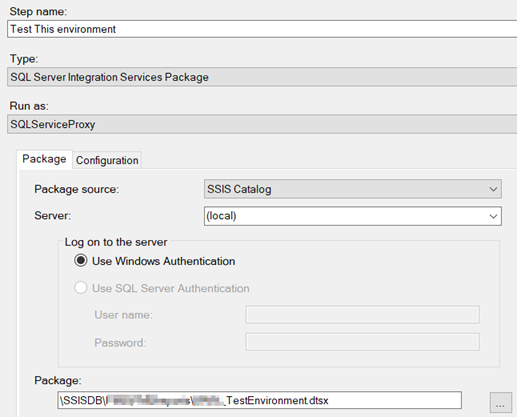
Create a job with a job step in SQL Server Agent. Make sure to change the context “Run as: SQLServiceProxy”;
When you run the job, it will fail. The reason, its running under the context of SQLService account. Connections within integration services are made with integrated security not SQL server.
Since we will be using SQL Login so I am going to change SSIS connection string in environment variables.
Now when you run the package, it will succeed.
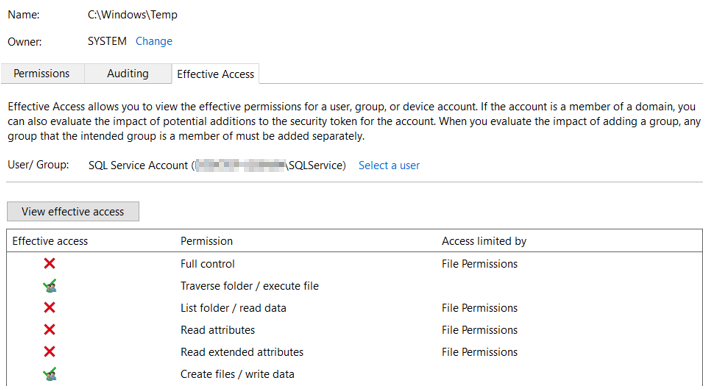
Its time to check file system access. Open c:\windows\temp folder and see effective permission of SQLService account;
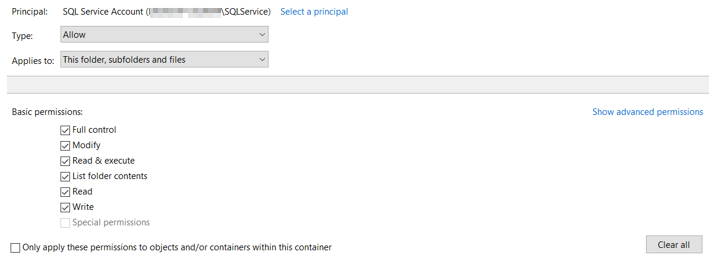
Grant full permission on this folder;
Script tasks require access to this folder for .NET framework and other temporary operations.
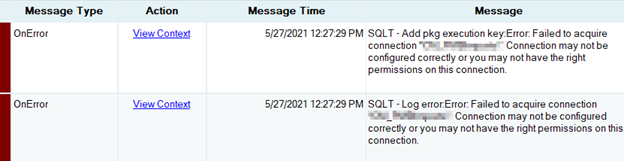
Still if you get this error;
The cause, SQLService windows account is not part of “Distributed COM Users” group on the machine where SSIS is installed. Add SQLService account to this windows group. You can read more about this here;
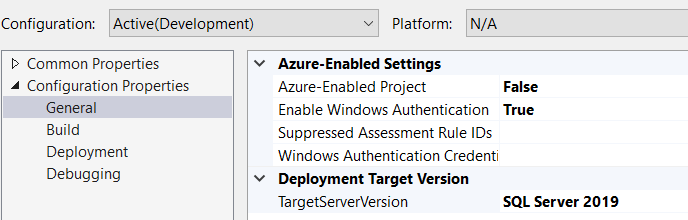
If the package fails again on server and you see this error in windows event viewer;
Make sure your SSIS project is targeting correct SQL Server Version. Right Click on your SSIS project -> Properties;
Deploy your project.
For SQL Server 2019 you need to set “False” for Azure-Enabled Project. As of this writing Azure-Enabled Project works with SQL Server 2017 only.
Run the package and everything should be Green now (hopefully :). We are done.
The above setup will work if we are reading/writing files in a domain controller environment or on a single server.
Setting up Azure Storage for reading/writing files
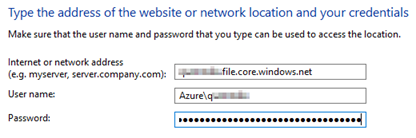
Service accounts are normally not interactive accounts. If we are using Azure Storage for reading/writing files with SAS then we would need to save Azure credentials in Credential Manager. To get to Credential Manager we need to login on server with our service account that will make it interactive.
Follow these steps;
Login to server with [servername]\SQLService account. If you are doing RDP, make sure this account is member of “Remote Desktop users” user’s group. Search for credential manager.
Remove this account from “Remote Desktop users”. Run agent, still fails.
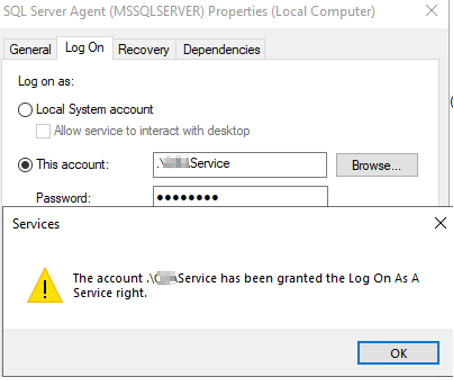
Try to Run SQL Server Agent under windows service account;
This time this started working. This is an alternative approach. We are using service account to run SQL Server agent. If this is the case then we don’t need to setup credentials and proxy accounts in SQL Server.
What happened behind the scene. Windows service account is granted “Log on as service permission” by windows. We can verify this following “Enable service log on through a local group policy” section below.
If we want to revert to “NT Service\SqlServerAgent” as service account, simply change your service account from windows service to SqlServerAgent and it would still work.
Follow this to allow an account “Login as service” permission manually if required;
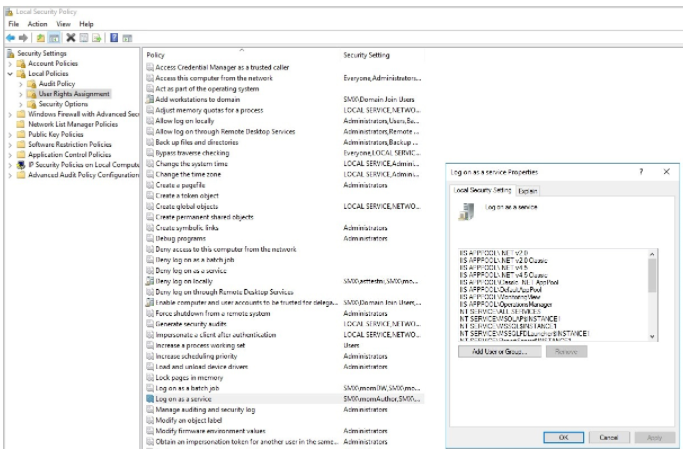
Enable service log on through a local group policy
Follow these steps:
Sign in with administrator privileges to the computer from which you want to provide Log on as Service permission to accounts.
Go to Administrative Tools, click Local Security Policy.
Expand Local Policy, click User Rights Assignment. In the right pane, right-click Log on as a service and select Properties.
Click Add User or Group option to add the new user.
In the Select Users or Groups dialogue, find the user you wish to add and click OK.
Click OK in the Log on as a service Properties to save the changes.
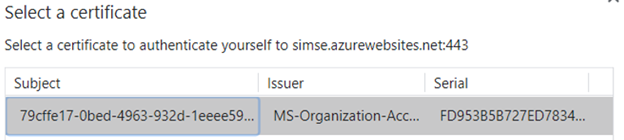
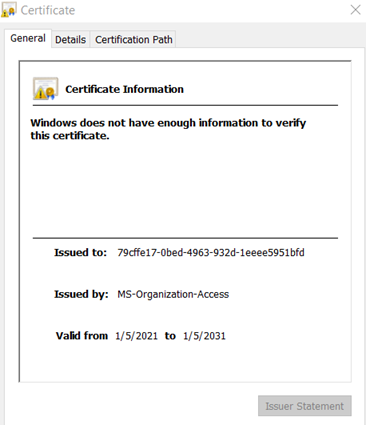
When we enable client certificate on Azure web site, this is the window that pops up in the browser when user try to connect to app;
When user click on Certificate information, he get following window;
Where is this certificate? How did I got this? Our environment is not AD joined. The certificate seems to be issued by AD domain server “MS-Organization-Access”.
The problem started when one of my developer asked me that he is not able to connect to App. The browser doesn’t show any certificate and he keep getting this error;
Error 403: Forbidden: Client Certificate Required
Apple clients are getting the same error.
We are not using any code to manipulate or validate certificates. It’s merely a setting thing in Azure.
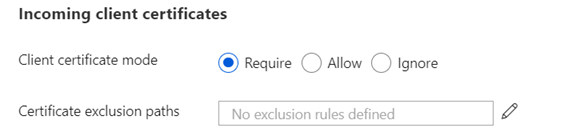
Eventually, switch the mode of incoming client certificates to Allow so that my team can connect to Apps in Azure.
What are the differences between “Allow” and “Require” for Client certificate modes in App Service general settings?
All paths should not require client certificate, just /secure one require client certificate
• Ignore: This setting does not accept client certificates if presented. • Accept: Select this setting if you want to accept client certificates (if it’s presented) but will also continue with connections where the client doesn’t present one. • Require: Select this option to require that certificates verify client identity.
For the exclusion path the document does mention -‘To allow certain paths to remain open for anonymous access. If we add /public to the path, anything under /public path for the application would not request a client certificate.
Compliance
There are 6 standards that are applicable to this policy:
Azure File Storage is an easy and active service. We can access it programmatically and through UI. This article is focused on Azure DevOps Release pipeline and Release deployment to Azure File Storage. We can use Azure Storage Explorer (UI) to move builds around different environment or locations.
I am assuming that you already have crated a project and build pipeline.
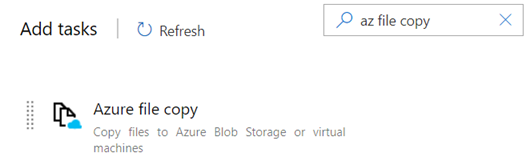
Azure DevOps already offers a task to release the code to Azure storage. This task is Azure file copy.
The difference between Azure Blob is [https] storage and Azure File [smb] storage. We don’t have any default task to release the code to Azure File Share.
What should we do then? Azure CLI can be used to copy files to Azure File storage. Here is the task that can be used;
To keep things simpler, I am not using YAML. I will be using simple UI.
Build a Release Pipeline
Click on “Release -> New Pipeline -> Empty” as show below;
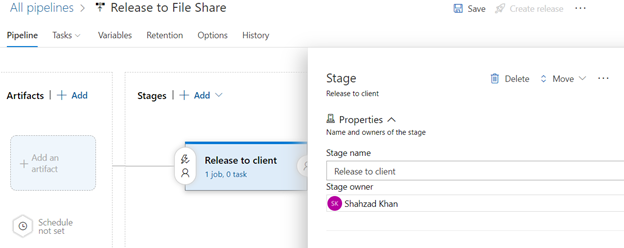
Rename pipeline to a meaningful name “Release to File share”.
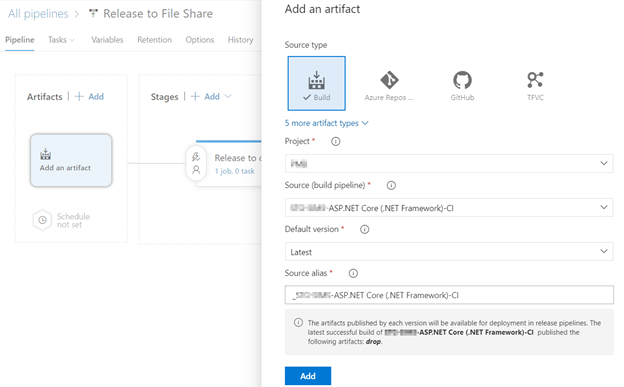
Map incoming build output as input to release pipeline. Click on “Add an Artifact” option in Artifacts box and select the source type as Build. It will list the latest build automatically. Select this option as show below;
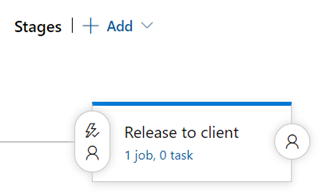
Save your changes. Under the stages in the second box ,you should see text like “1 job, 0 task”.
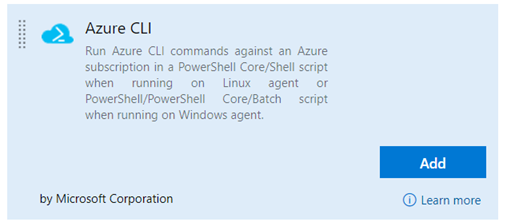
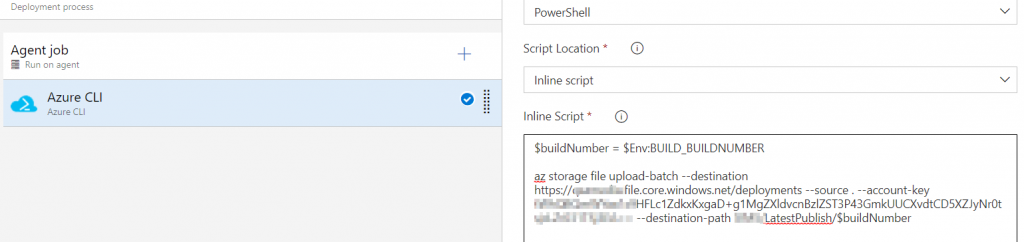
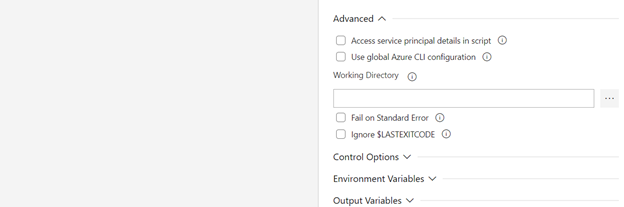
Click on it. Click on “+” sign against Agent job tile. Select Azure CLI from the task and click on Add. Here is how it looks;
This is the PowerShell inline script;
$buildNumber = $Env:BUILD_BUILDNUMBER

az storage file upload-batch --destination https://[share name].file.core.windows.net/deployments --source . --account-key [share first key] --destination-path LatestPublish/$buildNumber
Create a release. Open Azure Storage Explorer, Navigate to your share and LatestPublish folder. Here is the build output;
The build is deployed with the last build number. Inside build number we can see build alias at drop location that we have defined in build pipeline. If you run the release pipeline again, it will overwrite the contents of file share.
This is the first attempt. We can optimize this process by introducing variables for builds, builds number etc.
declare @DB sysname = 'MyDB';
select * from msdb.dbo.restorehistory where destination_database_name = @DB;
To view all databases;
WITH LastRestores AS
(
SELECT
    DatabaseName = [d].[name] ,
    [d].[create_date] ,
    [d].[compatibility_level] ,
    [d].[collation_name] ,
    r.*,
    RowNum = ROW_NUMBER() OVER (PARTITION BY d.Name ORDER BY r.[restore_date] DESC)
FROM master.sys.databases d
LEFT OUTER JOIN msdb.dbo.[restorehistory] r ON r.[destination_database_name] = d.Name
)
SELECT *
FROM [LastRestores]
WHERE [RowNum] = 1