One of my developer started getting Git Credential Manager for windows popup and received Authentication failure message. The work around was;
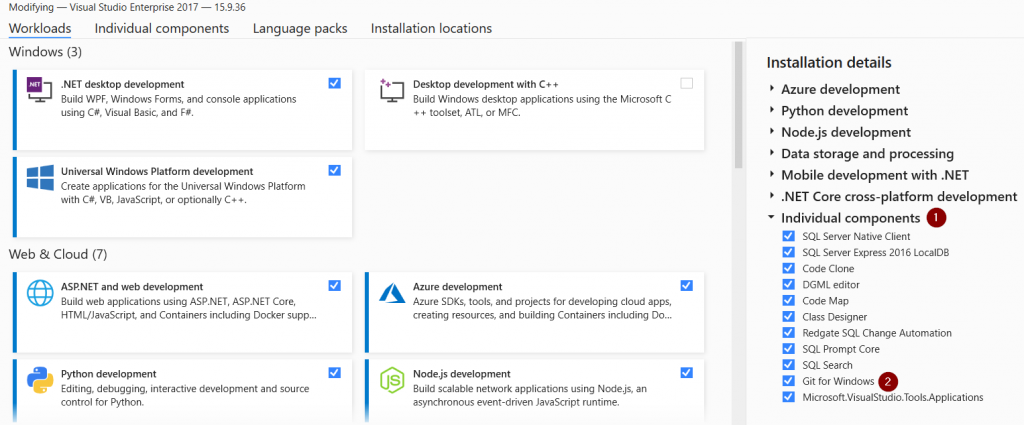
Check the Git for Windows in the Tools – Get Tools and Features…), go to “Individual Item” tab, check “Git for Windows”, and click “Modify”. Then it will ask you to update vs2017 to latest version, for example 15.9.36.
Click on Manage Branches. Select main branch. Select Sync to sync your local branch.
Everything looks good. Move on with creating a new branch.
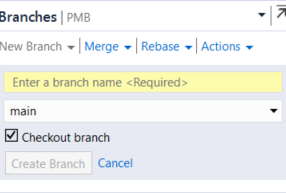
Click on Manage Branch and New Branch.
Your view would be changed to newly created branch.
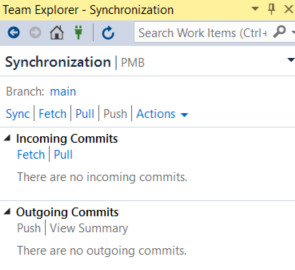
Start work. Change something in about.cshtml page, Save and commit; If that’s all you need to work on then push your local branch to remote. Click on Home icon; Click Sync.
You can see there are no incoming changes on this branch. there are outgoing changes that you have made. There is a message that’s telling you that this branch does not exists on remote server.
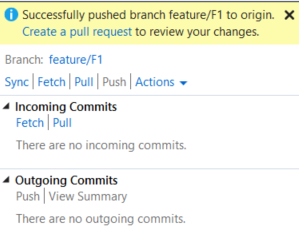
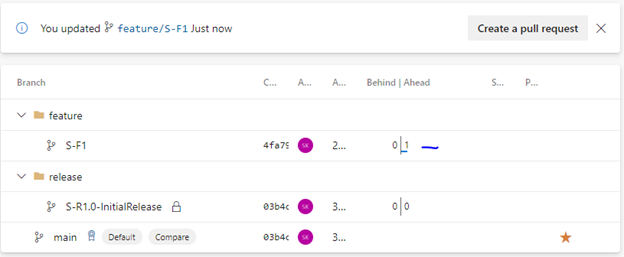
Click Push. You will see this view;
Click on “Create a pull request”. Create/Approve and complete your pull request on Azure DevOps UI. Your branches view would be;
Your merge is completed. Do a sync here.
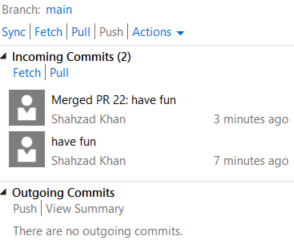
Switch to main branch. do a sync here. You will see this;
There are two commits went into main branch. first one is the pull request merge and second one is the change you made. Click on Sync. It will pull remote commits to your local.
Your main branch is up to date for your next branch work.
I am working with a small team (2-4 developers). We are new to Azure DevOps. We would like to start simple with this technology.
We are supporting a code base that’s is working for a single office. Client would like to enhance the code base to support multiple offices. Client doesn’t want to re-write the whole application but would like to extend single office code base to support multiple offices.
Design
There are two challenges here;
The first challenge is that team is new to Azure DevOps. What could be the best simplistic approach to follow?
We decided to go with “Basic process” template. All work items can be grouped under Epic, Issues and Tasks. There is a simple kabana dashboard that show work progress.
For merging through pull request, we decided to go with “Merge (No Fast Forward)” method. This method will persist commits in staging branch and re-create those commits in main branch. This is verbose though.
We decided that there should be just two roles, Administrator and Developers. Administrator is responsible for release management and root level branches and Developers can create / merge feature and bug fixes.
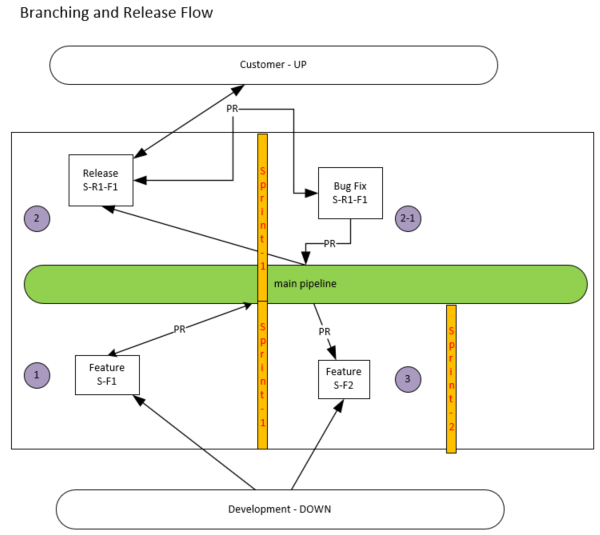
For repo structure, we agreed to use this structure;
main <–> feature
main –> release
release <–> bugfix –> main
The second challenge is that client is not interested in code re-write for now. How do we keep a single repository and support two main branches?
We would go with a single repository, for example HOO. Ideally a single repository should have one main branch but to support our specific situation, we would create a separate long running branch from our main branch.
Since single office code base will be supported on regular basis so all new work will be merged into main default branch via pull request.
Multiple office code base branch can be worked on by creating branches from it. Those branches will be merged back into multiple code office branch. This approach will help us to rebase/merge/cherry pick features from main branch into multiple office branch.
For the sake of simplicity, we refer S as single branch and M as Multiple office branch.
Open Visual Studio, Check the Git for Windows in the Tools – Get Tools and Features…), go to “Individual Item” tab, check “Git for Windows”, and click “Modify”. Then it will ask you to update vs2017 to latest version, for example 15.9.36.
3. Single office code repo is created
If you don’t have a repository in a project, refer to this article;
I am going to take very simple approach to demonstrate this flow from branching to release to bugfix and merging everything back into main.
I will be using a single about.cshtml page. I am going to make first commit by adding this line of code;
<p>Democracy died in darkness</p>
I will release this code to client by creating a branch from main.
While customer is working with my first relese, I will add another line of code and commit my changes to main.
<p>Tell me and I forget. Teach me and I remember. Involve me and I learn</p>
Customer feedback comes with a bugfix correction in my first release;
<p> Democracy dies in darkness – Light up the darkness </p>
So far, I have made two commits into main branch. I need to fix a bug, make a release and port my bug fix back into main. At the end of this exercise,
I need to make sure that first commit is replaced, second commit should stay in my main branch.
I need to make sure that release has code fixed and my second commit should not go with release;
# Task-1 – Create folder structure and assign permissions
Run the following commands in the Developer Command Prompt, under Start > Visual Studio > Developer Command Prompt. Each command is preceded with an explanation of what it’s doing. If you don’t have a personal access token cached (for example by signing in to the Azure DevOps Services web portal) you’ll be prompted to login.
First, block the Create Branch permission at the repository root for the project’s contributors.
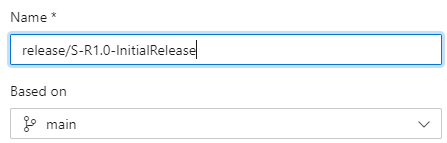
Administrator will create an initial release branch of Single office from main in release folder; This branch would be locked.
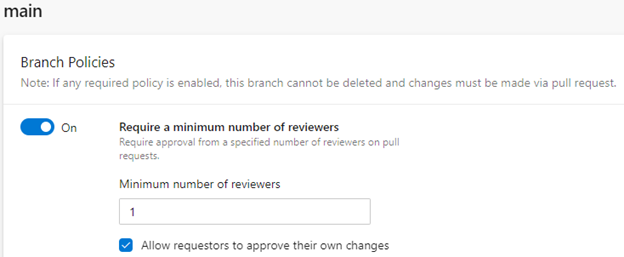
Administrator will create a branch policy so that all merges go through pull request. Since it’s a small team so requestor is allowed to approve its own request. This will be done through GUI.
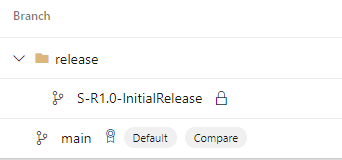
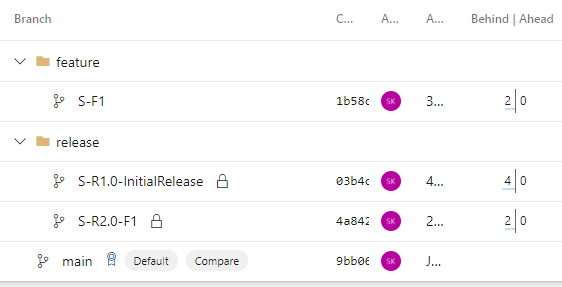
Our final branch structure on root level is;
You can see an icon right in front of main, this shows branch policies are applied on our main line. You can also see a lock in front of our release branch. This will prevent code changes and commits.
All branches are on the same level with main. There are 0|0 commits behind and ahead.
# Task-2 – Clone / Start Over repository on developer machine
Go to you local drive and create a folder for example, C:\Dev
git clone <repo link from Azure DevOps>
This will clone your repo in C:\Dev folder. By default, it will get code from default branch, main. Switch to your repo directory.
git fetch
This will get latest code from the branch
git status
This will show you what branch you are on and the status of your branch. Usually this would be your default main branch.
# Task-3 – Development flow – Create first feature (Role = Developer)
The developer is going to add first line of code by creating a feature branch to work;
Go to you local drive folder, C:\Dev
This is where you have cloned your repository in Task #2.
git checkout master
git pull
git status
This will show you the last branch you were on.
git branch feature/S-F1
This will create a new branch on your local.
git checkout feature/S-F1
switch to new branch
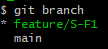
git branch
git fetch
get latest from remote. Though this branch is not pushed to remote but it’s a good practice to use this command.
Open visual studio. If you don’t see your branch in the lower right corner then click and select feature branch. Add a paragraph to About.cshtml file.
<p>Democracy died in darkness</p>
run application. If everything looks good, save all and return to the command prompt.
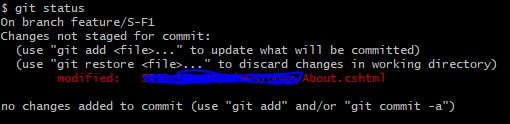
git status
this will show you the status of your branch and changes;
git add .
This will add the file name that has changes into it.
git commit -m”Starting simple with Azure DevOps and Git added”
Add a description for your commit.
git push origin feature/S-F1
This will push our local branch to remote branch.
view your local commits that has not been pushed to remote
git log origin/master..HEAD
you can also view the diff of your local stagged and remote branch using this;
git diff origin/main..HEAD
if you want to see all the changes you made in a feature branch before submitting a PR, using command line you can do this:
git checkout main
git merge <branch-name> –no-commit –no-ff
git merge feature/s-reset –no-commit –no-ff
Look at Changes in Team Explorer to see all the changes you made in a branch before submitting a PR.
Click on Abort. main branch is not affected by your changes.
If you look at Azure DevOps UI, you will see that this branch is 1 commit ahead of main branch.
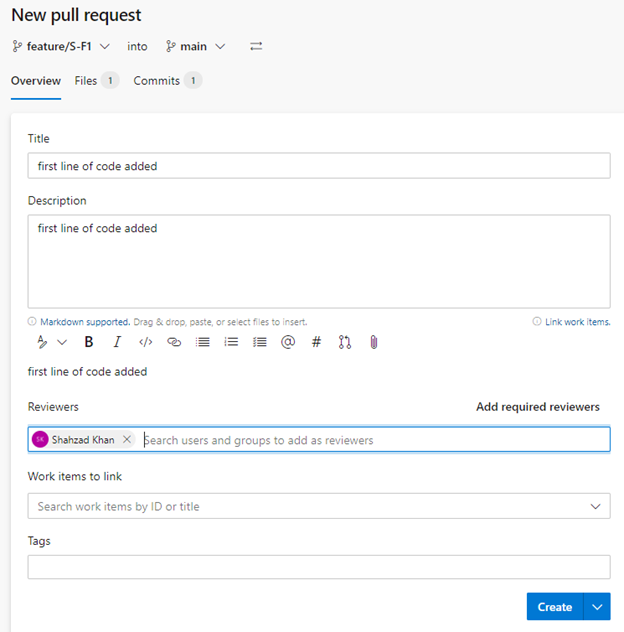
“Create a pull request” flow
Fill up the form that shows up. Remember to add reviewer and add yourself. click Create button;
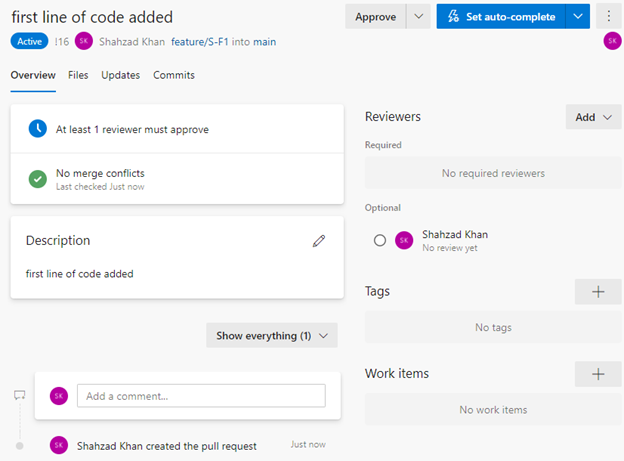
You will see this next page once create is completed;
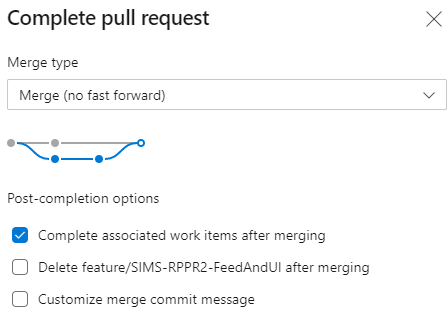
Move optional reviewer to Required. Click on Approve. After approve, you will see complete button right beside it. Click on complete.
Uncheck “Delete feature/branch name” after merging to preserve branch.
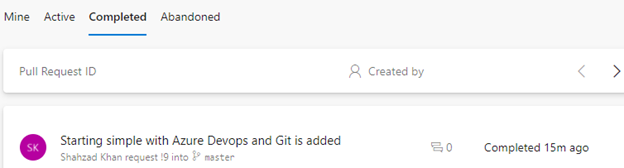
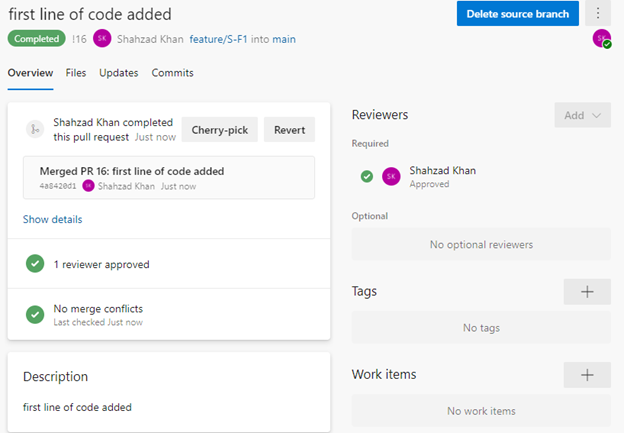
Click on Pull Requests and Completed link. You will see this;
Merge is complete. This would be the complete page;
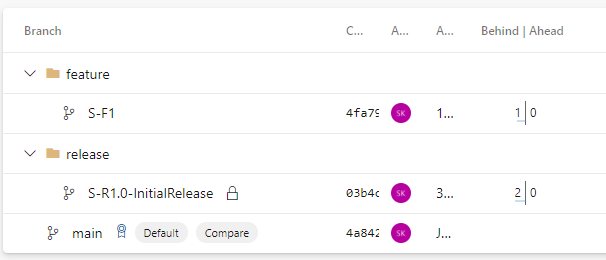
Switch to all branches, this is would be your branches view;
We can see that feature/S-F1 branch is 1 commit behind main. The commit is pull request commit that went into master. It’s ok.
Switch back to command prompt to refresh your local main branch;
git checkout main
git pull
Developer feature work is merged successfully in main branch.
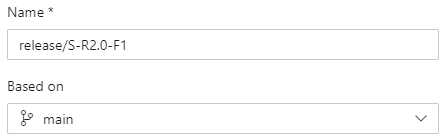
This is an administrative job. So, administrator will use UI and create a release branch off of main branch.
Put a lock on this branch. Hand this release over to change management.
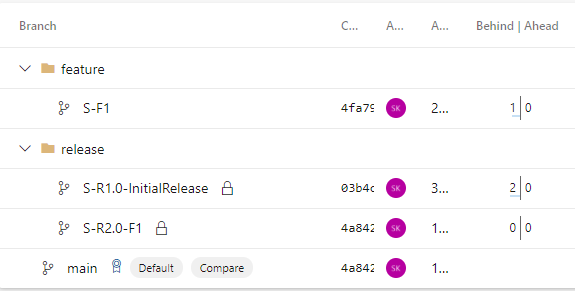
This would be your branch view at this stage;
# Task-5 – Development flow – add second code line (Role = Developer)
The steps are exactly the same as Task-3. We are going to add our second code line.
A standard practice is to create a new branch off of main branch to add new work. For the sake of demo, I am going to use same branch for new work.
Follow these git commands;
git checkout feature/S-F1
git pull
git status
Open visual studio. If you don’t see your branch in the lower right corner then click and select feature branch. Add a paragraph to About.cshtml file.
<p>Tell me and I forget. Teach me and I remember. Involve me and I learn</p>
run application. If everything looks good, save all and return to the command prompt.
git status
this will show you the status of your branch and changes;
git add .
This will add the file name that has changes into it.
git commit -m”second line of code added”
Add a description for your commit.
git push origin feature/S-F1
This will push our local branch to remote branch.
go to devops branches and go through pull request sequences.
Create, Approve and complete pull request as we did in Task #3. These changes will be merged into main branch.
This is how our branches will look like;
S-F1branch is two commit behind main branch. These two commits are PR commits. That’s fine.
git checkout main
git pull
# Task-6 – Bugfix flow – Need to fix first line of code (Role = Administrator and Developer)
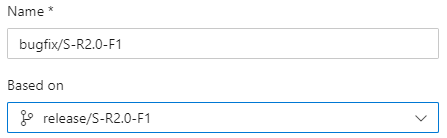
Administrator will create a bugfix branch from release branch.
Developer will checkout this branch and start working;
git pull
get remote branch
git checkout bugfix/S-R2.0-F1
Open visual studio. If you don’t see your branch in the lower right corner then click and select feature branch. Add a paragraph to About.cshtml file.
<p>Democracy dies in darkness – Light up the darkness</p>
run application. If everything looks good, save all and return to the command prompt.
git status
this will show you the status of your branch and changes;
git add .
This will add the file name that has changes into it.
git commit -m”bug fixed in code line 1”
Add a description for your commit.
git push origin bufix/S-R2.0-F1
This will push our local branch to remote branch.
go to devops branches and go through pull request sequences.
Make sure you are merging it into your target release branch not in main branch.
Create, Approve and complete pull request as we did in Task #3. These changes will be merged into release branch.
check you release branch
git checkout release/S-R2.0-F1
git pull
I opened About.cshtml page and can see the line is fixed. Send “release/S-R2.9-F1” out to customer.
It’s time to merge this change in main branch. follow these steps;
git checkout main
git pull
git status
git branch feature/bugfix-S-R2.0-F1
create a temporary branch from main branch to merge changes from
bugfix/S-R2.0-F1 branch.
git checkout feature/bugfix-S-R2.0-F1
git push origin feature/bugfix-S-R2.0-F1
push this branch to remote. We don’t need to make any changes to it. It’s temporary.
We wouldn’t go through Pull request here because it’s our internal function. Pull request doesn’t help to merge and resolve conflicts.
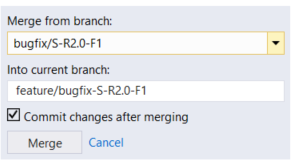
Go back to VS and merge your changes following these steps;
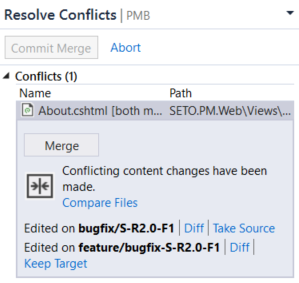
Click on manage branches, click on merge. You will see this view;
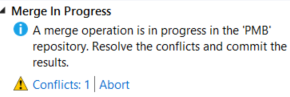
Click on Merge. If there are conflicts, you will see this view;
Click on conflicts and Compare Files;
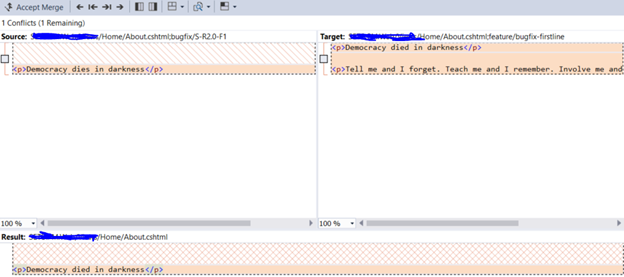
For some strange reasons, my merging is not working right. Here is demo output;
Source view;
Target view;
If I take source changes, it overwrites line 23. Not right.
If I take target changes, bugfix change gets lost. Not right.
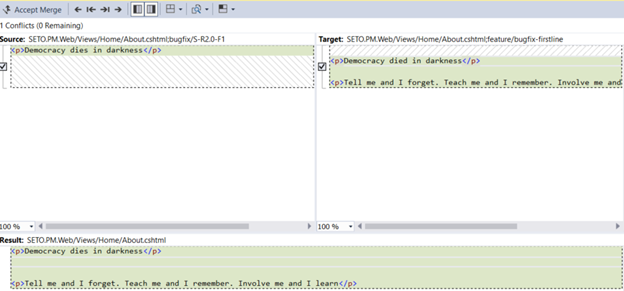
The work around is to click merge button, you will get a view like this;
Top left is source, right is target and bottom is the result view. Click on check box from left and right. You will see code from both sides in result view. Make changes here by deleting this line;
<p>Democracy died in darkness</p>
This would be your final view;
Click on Accept changes, Commit Merge, Commit staged and sync.
Create a pull request to merge feature/bugfix-firstline back into master.
git checkout main
git pull
the main branch has all changes and its up to date with developers work and bug fixes.
# Task-7 – Bugfix flow – Manually merge code into main (Role = Developer)
This is a manual option. You are already working on branch which I can call a working branch. Copy changes from your bugfix/S-R2.0-F1 branch into your working branch. Bugfix changes will be ported over to your main when you do a pull request.
This method doesn’t require creating additional branch from master just for merging bugfixes into main. The con is deviating from process flow and possibility of introducing additional bugs.
# Task-8 – create a branch for multi offices (Role = Administrator)
We will create a branch from our main branch for example “main-m”. This branch can be used as a long running branch for our all-offices work. Developer’s will create working branches out of this branch.
#9 – Key git command list
I prefer using Git bash command editor. Go to your working folder and open git bash command window through context. These are some of common git commands;
git clone <repo link from web site>
Cloned your repo in your desired folder.
git status
will show you which branch you are on, and any commits you have made locally
git branch
will show you your current branch
git log
will show all commits
git branch <branch name>
create a new branch for example git branch feature/feature1
git fetch
get remote branches to your local. Gets new data from a report repository – but it doesn’t integrate any of this new data into your working files. This one is used infrequently.
git pull
This will update your current HEAD branch with the latest changes from remote server. It will download new data and directly integrate into your current working copy. This one is used frequently.
git checkout <branch name>
switch to another branch name, for example git checkout feature/feature1
git add .
if you made a change in the code and you want to commit locally, use it
git commit -m”I hhave made a change”
add description to your commit
git push origin <branch name>
push your local changes to remote repo. For example git push origin feature/feature1
git reset –hard origin/<branch name>
git reset –hard origin/feature/bugfix-S-R2.0-F1
git fetch
If your commits are only visible to you, you can do this; this will move back to where the origin is. This will reset the state of the repository to the previous commit, and it will discard all local changes. It will reset the project configuration as well, so take care of this. This will reset .cfg file to default.
git branch -d <branch name>
delete your local branch
if you want to switch to another branch, and you started seeing that there are uncommitted changes here; simply run these commands;
git add .
git commit “unwanted commit”
now you will be able to switch branches.
git branch -D <branch name>
delete an unmerged branch from your local.
git push origin –delete <branch name>
delete your remote branch, for example “git push origin –delete feature/feature1. Remember, you will need the Git ‘ForcePush’ permission to perform this action. This permission can be granted through Project settings -> permission tab.
How to view changes before submitting a PR request?
Go to Team Explorer > Branches > Right click your branch > View History > click the latest commit > ctrl + click the latest commit from master > right click > Compare Commits
this only shows you the diff between commits.
if you want to see all the changes you made in a feature branch before submitting a PR, using command line you can do this:
git checkout master
git merge <branch-name> –no-commit –no-ff
and then look at Changes in Team Explorer to see all the changes you made in a branch before submitting a PR.
How to compare two branches for differences?
I couldn’t find an easier way. The old method is to copy the target branch on a different folder on your local. Run VSDiff utility. Source would be your git branch and target would be your other folder. You would be able to see all differences.
view your local commits that has not been pushed to remote
git log origin/master..HEAD
you can also view the diff of your local stagged and remote branch using this;
git diff origin/main..HEAD
If you want to see all commits on all branches that aren’t pushed yet, you might be looking for something like this:
git log –branches –not –remotes
And if you only want to see the most recent commit on each branch, and the branch names, this:
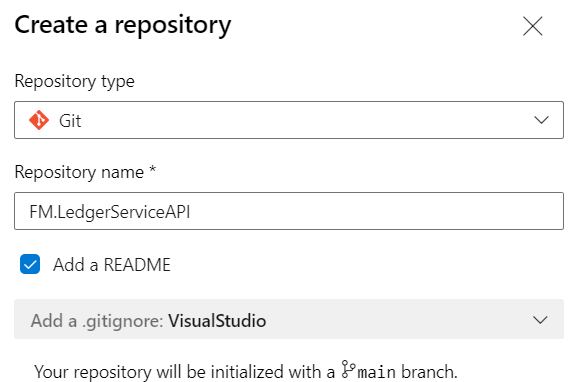
I am assuming that project already exists and we are adding a new repository. Got to Project Settings –> Repositories–> Create new repository.
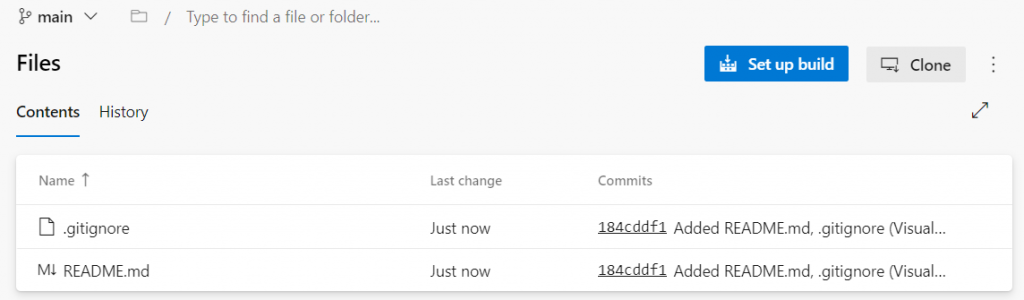
In the Create a new repository dialog, verify that Git is the repo type and enter a name for your new repo. You can also add a README and create a .gitignore for the type of code you plan to manage in the repo. A README contains information about the code in your repo. The .gitignore file tells Git which types of files to ignore, such as temporary build files from your development environment.
We will see this page;
The simple method is to clone this repository to your computer. Follow this;
Goto C:\Dev
git clone <repo name>
you will get a warning that you have cloned an empty repository. That’s ok
Goto C:\Dev\FM.LedgerServiceAPI
This is the folder that clone command has created
Copy your code into this folder. You can use file explorer or command line like this;
copy .. \source folder\*.* .
git add .
git commit -m”initial code pushed”
git push origin main
this will push your code to the main on remote server