Angular Development – Sample Server Side

Let’s get our hands in some code. This web app will act as a monitoring and reporting service that will check the health status of a target server.

We are going to use Micorosft.AspNetCore.Diagnositcs.HealthChecks package, a built-in feature of the .NET Core framework. This package is meant to be used to allow a monitoring service to check the status of another running service.

Add app.UseHalthChecks middleware in Program.cs file;
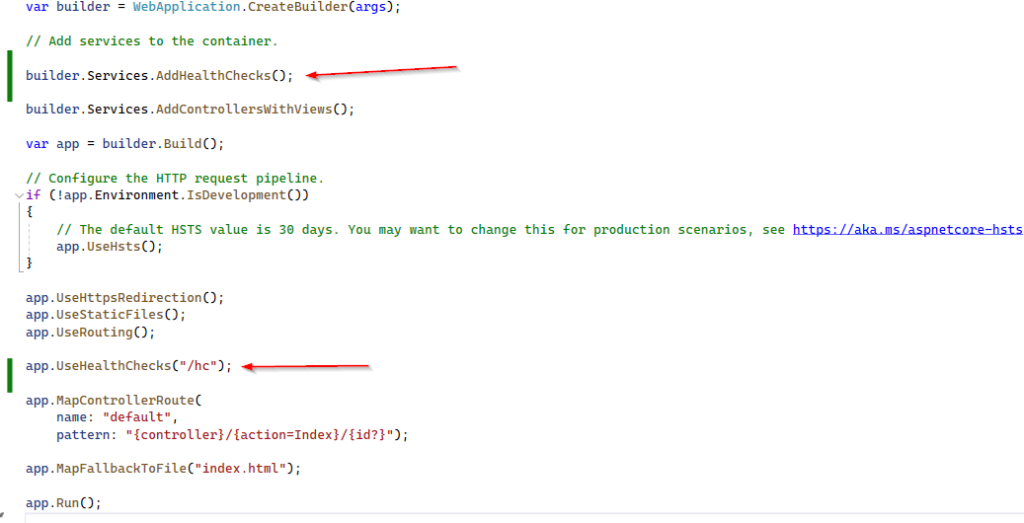
This middleware will create a server-side route for the health checks. Note that we have added this middleware before Endpoints so that this new route won’t be overriden by the general-purpose Controller route pattern.

Keep in mind, when we run application it uses two ports; one for server side and second one for angular side (in our case it’s 7031). For angular it creates a proxy and re-direct users there (in this case 44488).

If we run our application, we can see our system is healthy.

The system is healthy because we haven’t defined any checks yet.

Let’s add an Internet Control Message Protocol (ICMP) AKA Ping. PING request is a basic way to check the presence and therefore availability, of a server that we know we should be able to reach within a LAN / WAN connection.

In a nutshell, it works in following way; the machine that performs the PING sends one or more ICMP echo request packets to the target host and waits for a reply; if it receives it, it reports the round-trip time of the whole task; otherwise, it time outs and reports a “host not reachable” error.

The “host not reachable” error can be due to a number of possible reasons;

  • The target host is not available
  • The target host is available, but actively refuses TCP/IP connections of any kind
  • The target host is available and accepts TCP/IP incoming conections, but it has been configured to explicitly refuse ICMP requests and/or not send ICMP echo replies back.
  • The target host is available and properly configured to accept ICMP requests and send echo replies back, but the connection is very slow or hindered by unknown reasons (performance, heavy load etc), so the round-trip time takes too long, or even times out.

So what could be the possible outcomes of our implementation;

  • Healthy: We can consider the host Healthy whenever the PING succeeded with no errors and timeouts.
  • Degraded: We can consider the host Degraded whenever the PING succeeded, but the round-trip takes too long.
  • Unhealthy: We can consider the host Unhealthy whenever the PING failed, that is, the check times out before any reply.
    public class PingHealthCheck : IHealthCheck
    {
        private string Host = "www.does-not-exist.com";
        private int Timeout = 300;

        public async Task<HealthCheckResult> CheckHealthAsync(HealthCheckContext context, CancellationToken cancellationToken = default)
        {
            try
            {
                using (var ping = new Ping())
                {
                    var reply = await ping.SendPingAsync(Host);
                    switch (reply.Status)
                    {
                        case IPStatus.Success:
                            return (reply.RoundtripTime > Timeout) ? HealthCheckResult.Degraded() : HealthCheckResult.Healthy();
                        default:
                            return HealthCheckResult.Unhealthy();
                    }
                }
            }
            catch (Exception ex) 
            { 
                return HealthCheckResult.Unhealthy(); 
            }
        }
    }

Add PingHealthCheck to the pipeline by modifying Program.cs file;

builder.Services.AddHealthChecks()
    .AddCheck<PingHealthCheck>("ICMP");

So we are getting a response. that’s great, it works. Three are 3 major flaws;

  1. Hardcoded values: The Host and the Timeout variables should be passed as parameters
  2. Uninformative response: Healthy and Unhealthy are not that great, we should create a better output message
  3. Untyped output: The current response is being sent in plain text, if we want to fetch it with Angular, a JSON content-type be better.
    public class PingHealthCheck : IHealthCheck
    {
        private string Host { get; set; }
        private int Timeout { get; set; }   

        public PingHealthCheck(string host, int timeout)
        {
            Host = host;
            Timeout = timeout;
        }

        public async Task<HealthCheckResult> CheckHealthAsync(HealthCheckContext context, CancellationToken cancellationToken = default)
        {
            try
            {
                using (var ping = new Ping())
                {
                    var reply = await ping.SendPingAsync(Host);
                    switch (reply.Status)
                    {
                        case IPStatus.Success:
                            var msg = $"ICMP to {Host} took {reply.RoundtripTime} ms.";
                            return (reply.RoundtripTime > Timeout) ? HealthCheckResult.Degraded(msg) : HealthCheckResult.Healthy(msg);
                        default:
                            var err = $"ICMP to {Host} failed: {reply.Status}";
                            return HealthCheckResult.Unhealthy(err);
                    }
                }
            }
            catch (Exception ex) 
            {
                var err = $"ICMP to {Host} failed: {ex.Message}";                
                return HealthCheckResult.Unhealthy(err); 
            }
        }
    }

Update middleware in Program.cs file so that we can call it programmatically;

builder.Services.AddHealthChecks()
    .AddCheck("PING_01", new PingHealthCheck("www.msn.com", 100))
    .AddCheck("PING_02", new PingHealthCheck("www.google.com", 100))
    .AddCheck("PING_03", new PingHealthCheck("www.does-not-exist.com", 100));

The reason is obvious, if one of them failed the whole stack will be failed. The last one in our example is failure. We can avoid this sum behavior by implementing the resolution of third flaw (as mentioned before): JSON-structured output message.

Add a new class in project root, CustomHealthCheckOptions;

    public class CustomHealthCheckOptions : HealthCheckOptions
    {
        public CustomHealthCheckOptions() : base()
        {
            var jsonSerializerOptions = new JsonSerializerOptions()
            {
                WriteIndented = true
            };

            ResponseWriter = async (c, r) =>
            {
                c.Response.ContentType = MediaTypeNames.Application.Json;
                c.Response.StatusCode = StatusCodes.Status200OK;

                var result = JsonSerializer.Serialize(new
                {
                    checks = r.Entries.Select(e => new
                    {
                        name = e.Key,
                        responseTime = e.Value.Duration.TotalMilliseconds,
                        status = e.Value.Status.ToString(),
                        description = e.Value.Description
                    }),
                    totalStatus = r.Status,
                    totalResponseTime = r.TotalDuration.TotalMilliseconds,
                }, jsonSerializerOptions);

                await c.Response.WriteAsync(result);
            };
        }
    }

Modify Program.cs file;

app.UseHealthChecks("/hc", new CustomHealthCheckOptions());

Run the application and here is expected output;

{
  "checks": [
    {
      "name": "PING_01",
      "responseTime": 78.6889,
      "status": "Healthy",
      "description": "ICMP to www.msn.com took 12 ms."
    },
    {
      "name": "PING_02",
      "responseTime": 62.3402,
      "status": "Healthy",
      "description": "ICMP to www.google.com took 14 ms."
    },
    {
      "name": "PING_03",
      "responseTime": 144.9184,
      "status": "Unhealthy",
      "description": "ICMP to www.does-not-exist.com failed: An exception occurred during a Ping request."
    }
  ],
  "totalStatus": 0,
  "totalResponseTime": 181.1726
}

Each and every check is properly documented, as well as the total outcome data, in a structured JSON object. This is just what we need to feed some Angular Components.

See in next article.

Angular Development – Break and Fix

In our previous article, we have crated a health-check application. This time we would be trimming down the component list to see what could be impact and how we can fix it.

Go to the /ClientApp/src/app folder and delete the counter and the fetch-data folders, with all the files they contain.

Project build would be successful but when we run the project, we would see these errors;

If we open app.module.ts file inside /ClientApp/src/app, we can see these two offending lines;

We know this file has reference to all of the TypeScript files used by Angular application. Remove these two lines and try to compile.

App module is a way to organize and bootstrap Angular applications. This help developers consolidate their own set of Components, directives and pipes into reusable blocks.

Every application must have at least one module, which is conentionally called a root module and is give the AppModule class name.

As we can see; (1) has bunch of import statements, pointing to all the references. The root NgModule block (2) that server a common purpose: directives, components, pipes, modules, providers. The last one contains the Component we want to bootstrap, which is the main application component, the AppComponent.

This time our application will run without any problems. But when we click on Nav links (Counter and Fetchdata), it will throw errors. We need to fix those by removing them from /ClientApp/src/app/nav-menu/nav-menu.component.html.

We can also change home component html to our liking by getting into /ClientApp/src/app/home/home.component.html

We can remove back-end files becuase we don’t need them any more;

  • WeatherForecast.cs
  • Controllers/WeatherForecastController.cs

Now we don’t have any .NET Controller and model in our web applications but that’s ok since we don’t have Angular Components that need to fetch data either.

This concludes this section. Let’s get to our First Sample Drop.

Angular Development – Getting Started

These are short notes on Angular development using Visual Studio 2022.

To create Angular project;

dotnet new angular -o health-check

If you look at solution there are two projects in it, .NET Core and Angular. The .NET Core section relates to the backend while Angular relates to the front-end.

ClientApp folder has all of angular stuff in it.

The default ASP.NET MVC (/Controllers/ and /Pages/” folders, both has Server side Code

The /ClientApp/Src folder that has client side code

The /ClientApp/E2E folder has testing framework code

The /wwwroot/ folder has client side assets.

On a high level, .NET Core back-end stack is in these folders;

  1. The Dependencies virtual folder that contains all the internal, external, and third-party references to build and run our project. In fact all the references to NuGet.
  2. The /Controllers/ folder, which has been shipped with any MVC-based ASP.NET application
  3. The /Pages/ folder, which contains a single Razor Page – error.cshtml — to handle runtime and/or server errors.
  4. The root level files, program.cs and appsettings.json, which will determine our web application’s configuration, including the modules and middleware, compilation settings, and publishing rules.

The question is, where is the Views folder as we used to see in Razor domain? SPA has replaced them, such a page is the /ClientApp/Src/Folder/index.html file. It’s a static page. The only server-side rendered HTML page is the /Pages/Error.cshtml Razor Page which is used to handle runtime and/or server errors that could happen before the Angular Bootstrap phase.

A Razor page similar to a Razor view, with same syntax and function, but it also contains the controller source code. A Razor page is pretty similar to an old .aspx, .aspx.cs ASP.NET Web Form.

On a high level, Angular front-end has these folders;

  1. The /wwwroot/ folder, which will contain the compiled, ready-to-publish contents of our applications: HTML, JS, and CSS files and everything else we want users to have access to in terms of static files
  2. The /ClientApp/ root folder, which hosts the Angular configuration files
  3. The /Client/App/Src/ folder, which contains the Angular app source code files. If we look at them, all of them has .ts extension
  4. The /ClientApp/e2e/ folder, which has sample end-to-end tests

Angular uses the term workspace for its assets. The Angular workspace is the filesystem place contains the Angular files. This workspace is located within the /ClientApp/ folder, which is defined as workspace root. This workspace is usually created and initialized by CLI command used to create the app.

Any CLI commands operating on the app and/or their libraries (such as adding or updating new packages) will be executed from within the workspace folder.

Angular.json

The most important role within the workspace is played by this file, created by the CLI in the workspace root. This contains workspace-wide and project-specific configuration defaults for all build and development tools.

The first few properties at the top of the file define the workspace and project configuration options:

  • version: the configuration file version
  • newProjectRoot: The path where new projects are created
  • projects: A container item that host a sub-section for each project in the workspace.

Keep in mind that angular.json file follows a standard generic-to-specific cascading rule. All configuration values set at the workspace level will be the default value for any project, and can be overridden by those set at the project level.

Package.json

This is Node Package Manager (npm) configuration files; it basically contains a list of npm packages that developer wants to be restored before the project starts. Think about it as Nuget Package Manager. This file has key/value pairs of different libraries and their are some important prefixes that we should be aware of;

  • The Tilde (~): A value of “~1.1.4” will match all 1.1.x versions, excluding 1.2.0, 1.0.x and so on.
  • The Caret (^): A value of “^1.1.4” will match everything above 1.1.4, excluding 2.0.0 and above.

We can install/uninstall or view all these packages within json file in VS. Hover over the bar on the left of packages and it will show pop up menu for these actions.

npm-update can be used to upgrade / downgrade these packages.

tsconfig.json

This is typescript configuration file. Typescript is a programming language developed and maintained by Microsoft that acts as JavaScript superset; It offers built-in IntelliSense, which is a great benefit. Angular source code is written in TypeScript.

Typescript code files included in the /ClientApp/ folder. The most notable section in this file is;

"angularCompilerOptions": {
  "enableI18nLegacyMessageIdFormat": false,
  "strictInjectionParameters": true,
  "strictInputAccessModifiers": true,
  "strictTemplates": true
}

The /ClientApp/Src/ folder

Let’s look into this folder;

  • The /ClienApp/src/app/ folder, along with all its subfolders, contains all the TypeScript files related to our Angular app: in other words, the whole client-side application source code is meant to be put here.
  • The /ClientApp/src/app/assets/ folder is meant to store all the applications’ images and other asset files: these files will be copied and/or updated as-is in the /wwwroot/ folder whenever the application is built.
  • The /ClientApp/src/app/environment/ folder contains build configuration options that target specific environments: environment.ts for dev and environment.prod.ts for production.
  • index.html: The main HTML page that is served when someone visits your site. The CLI automatically adds all JavaScript and CSS files here (This is like layout file in MVC Core).
  • main.ts: The main entry point for your application (like a route declaration in program.cs file in MVC)

The /app/ folder

This folder follows Angular folder structure best practices and contains our projects logic and data, including all Angular Modules, Services, and Components, as well as templates and styles.

AppModule

The basic building block of an Angular application are Ng-Modules, which provides a compilation context for components. The role of NgModules is to collect related code into functional sets: therefore, the whole Angular app is defined by a set of one or more NgModules.

An Angular app requires a root module – conventionally called AppModule – that tells Angular how to assemble the application, thus enabling bootstrapping and starting the initialization life cycle. The remaining modules are known as feature-module and serve a different purpose. The root module also contains a reference list of all available components.

Here is a schema of the standard Angular Initialization Cycle to visualize how it works;

The main.ts file bootstraps app.module.ts (AppModule), which then loads the app.component.ts file (AppComponent); and at last it will load other components whenever the application needs them.

The root module can be found in /ClientApp/src/app/ folder and is defined within the app.module.ts file. It contains a bunch of import statements and some array referencing Components, other modules, providers and so on. The root module is just a reference file.

Server-side AppModule for SSR

The /ClientApp/src/app folder contains app.server.module.ts file, which is used to enable the Angular Universal Server-Side Rendering (SSR), a technology that renders Angular applications on the server, provided that back-end framework supports it. .NET has a native support for such convenient feature.

The following is the improved Angular initialization schema when using SSR.

For more detail on Angular Universal and SSR, Check out the following link;

https://web.dev/articles/rendering-on-the-web

AppComponent

If NgModules are Angular building blocks, Components can be defined as the bricks used to put the app together, to the extent that we can say that an Angular app is basically a tree of Components working together.

Components define views, which is HTML that use services, which provide specific functionality not directly related to views. Service providers can be injected into Components as dependencies, thus making the app code modular, reusable and efficient.

The cornerstone of these Components is conventionally called AppComponent, which is also the only Component that, according to the Angular folder structure conventions, should be placed in the /app/ root folder. All other components should be put in a sub-folder, which will act as dedicated namespaces.

Our AppComonent consists of two files;

  • app.comonent.ts: Defines the Component logic, that is, the Component class source code.
  • app.component.html: Defines the HTML template associated with the AppComponent. Any Angular Component can have an optional HTML file containing its UI layout structure instead of defining it within the Component file itself. This is almost always a good practice unless the Component comes with a very minimal UI.

AppComponent is often lightweight, it doesn’t have other optional files that could be found in other Components such as;

  • <*>.component.css: Defines the base CSS style sheet for a Component. Just like the .html file, this file is optional and should always be used unless the component doesn’t require UI styling.
  • – <*>.component.spec.ts: Define a unit test for the Component.

Other Components

Other than AppComponent, our template contains four more components, each one in a dedicated folder;

  • CounterComponent: Placed in the counter subfolder
  • FetchDataComponent: Placed in the fetch-data subfolder
  • HomeComponent: Placed in the home subfolder
  • NavMenuComponent: Placed in the nav-menu subfolder

Press F5 and see how these components work.

HomeComponent

The HomeComponent could be considered the home page of our app; Since we are dealing with SPA we would call them Views. This word refers to the combined HTML template generated by Angular Component that corresponds to a given navigation route.

NavMenuComponent

Do we have sub-components already? Yes, we do. The NavMenuComponent is a perfect example of that. Since it doesn’t have a dedicated route for itself but is rendered as part of other Components within their corresponding view. It is the top portion of each view.

It is where all first-level navigation routes are implemented that are defined in AppModule, all pointing to a given Angular Component.

First-level navigation routes are thos that we want our users to reach with a single click. In our sample app, there are three;

  • /home: Pointing to the HomeComponent
  • /counter: Pointing to the CounterComponent
  • /fetch-data: Pointing to the FetchDataComponent

These navigation routes have been implemented in the NavMenuComponent by using anchor links.

CounterComponent

This component shows an incrementing counter that we can increase by pressing an Increment button.

FetchDataComponent

This component is an interactive table populated with the JSON array generated by the server-side Web API via WeatherForecastController.

The specs.ts file(s)

If we take a look at the source files within the above Component’s subfolders, we can see that the CounterComponent comes with a counter.component.spec.ts file. Those files, as per Angular naming conventions, are meant to contain unit tests for the counter.component.ts source file and are run using the Jasmine Javascript test framework through the Karma test runner.

That’s enough theory. Let’s get to work. See next article.

Uninstall and Reinstall Angular

We are interested in a specific angular version and NOT in a specific angular-cli version (angular-cli is just a tool after all).

Here are the steps (All these steps are done in npm);

If you’re not sure of the angular-cli version installed in your environment, uninstall it.

npm uninstall -g @angular/cli

Then, run (–force flag might be required).

npm cache clean

or, if you’re using npm > 5.

npm cache verify

Install an angular-cli specific version.

npm install -g @angular/cli@wished.version.here

Create a project

ng new you-app-name

The resulting white app will be created in the desired angular version.

I have not found any page displaying the compatibility matrix of angular and angular-cli. So I guess the only way to know what angular-cli version should be installed is to try various versions, create a new project and checkout the package.json to see which angular version is used.

angular versions changelog Here is the changelog from github reposition, where you can check available versions and the differences.

Reference

https://stackoverflow.com/questions/43344600/how-to-install-a-specific-version-of-angular-with-angular-cli

Angular 17 Local Install

Follow Steps To Install Angular CLI locally.

Disclaimer: I have Angular 16 Installed Globally. and will be installing 17 Locally (To install globally, follow this)

Create a folder in your local drive, say AngularTest.

> mkdir AngularTest
> cd AngularTest

Install your angular version (Make sure while installation you are not using -g at the end of the installation command);

> npm install @angular/cli@  (for any other version)
> npm install @angular/cli   (for current version)

Type following command in your AngularTest folder to confirm your version

> ng version

This will list down version for Angular CLI, Node, Package Manager and OS. If Angular is not compatible with Node, you will see a yellow message at the bottom of window. In that case you need to figure out correct node version for Angular.

Cheers!

You may be interested in Angular Getting Started Guide.

If you want to uninstall angular, follow this