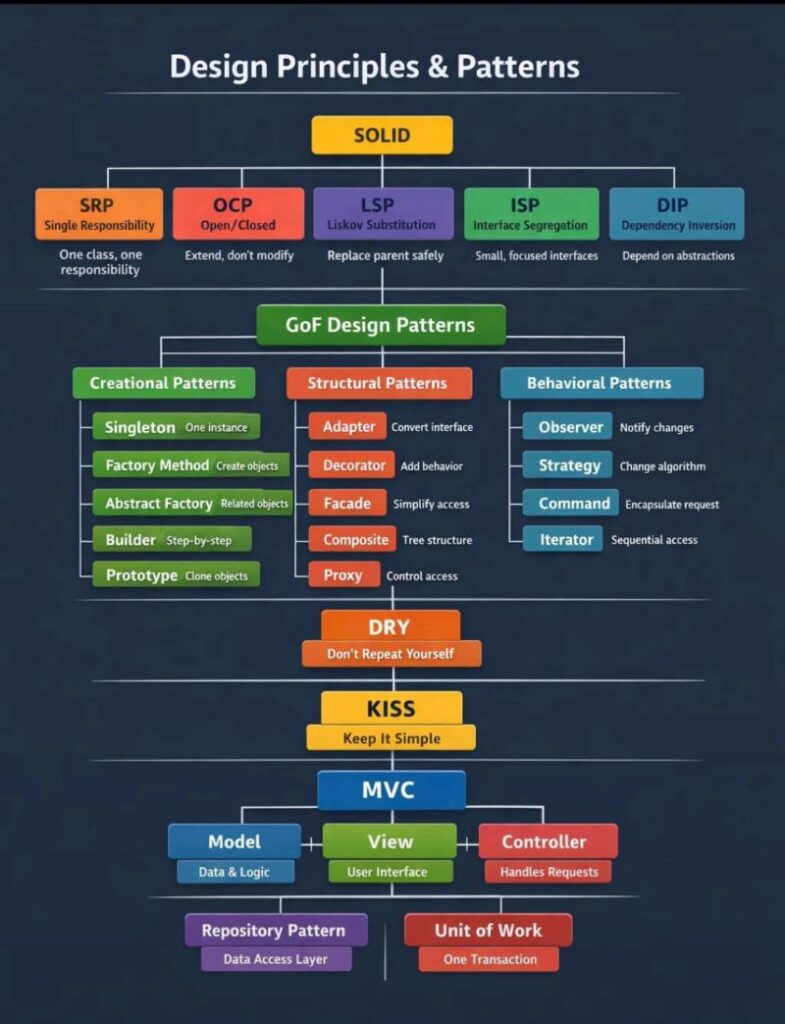
C# tip (Primary Constructor)

View this class;

public class Product
{
   public string Name {get; set;}
   public decimal Price {get; set;}

   public Product(string name, decimal price)
   {
       Name = name;
       Price = price;
   }
}

This can be re-written as;

public class Product(string name, decimal price)
{
   public string Name {get; set;} = name;
   public decimal Price {get; set;} = price;
}

Seems we can save some lines with this new pattern.

Copy live WordPress Site and Run inside Docker container

I am going to copy this site and run inside Docker Container.

STEPS

1-Pull WordPress and MySQL images using docker-compose, I am going to use docker-compose file.

version: '3.7'

services:
  db:
    # If you really want to use MySQL, uncomment the following line
    image: mysql:8.0.27
    command: '--default-authentication-plugin=mysql_native_password'
    container_name: wp-db
    volumes:
      - ./data/wp-db-data:/var/lib/mysql
    networks:
      - default
    restart: always
    environment:
      MYSQL_ROOT_PASSWORD: supersecretpassword
      MYSQL_DATABASE: db
      MYSQL_USER: dbuser
      MYSQL_PASSWORD: dbpassword

  wordpress:
    depends_on:
      - db
    image: wordpress:latest
    container_name: wordpress
    environment:
      WORDPRESS_DB_HOST: db:3306
      WORDPRESS_DB_NAME: db
      WORDPRESS_DB_USER: dbuser
      WORDPRESS_DB_PASSWORD: dbpassword
    volumes:
      - ./data/wp-content:/var/www/html/wp-content
      - ./data/wp-html:/var/www/html
    networks:
      - traefik-public
      - default
    restart: always
    labels:
      - "traefik.enable=true"
      - "traefik.http.routers.wordpress.entrypoints=http"
      - "traefik.http.routers.wordpress.rule=Host(`wp.dk.tanolis.com`)"
      - "traefik.http.middlewares.wordpress-https-redirect.redirectscheme.scheme=https"
      - "traefik.http.routers.wordpress.middlewares=wordpress-https-redirect"
      - "traefik.http.routers.wordpress-secure.entrypoints=https"
      - "traefik.http.routers.wordpress-secure.rule=Host(`wp.dk.tanolis.com`)"
      - "traefik.http.routers.wordpress-secure.tls=true"
      - "traefik.http.routers.wordpress-secure.service=wordpress"
      - "traefik.http.services.wordpress.loadbalancer.server.port=80"
      - "traefik.docker.network=traefik-public"

volumes:
  db-data:
    name: wp-db-data

networks:
  traefik-public:

3-Open container wordpress site and install “All-in-One WP Migration” plugin.

4-Go to source wordpress site and install “All-in-One WP Migration” plugin.

5-Create a File backup on source site.

6-Try to restore backup on target site

7-You will see following error;

<<ERROR>>

Increase size for All in one plugin;

8-We need to increase restore size. Search for .htaccess file in your linux root file system;

# find / -type f -name .htaccess*

9-Use nano editor to open this file;

# nano .htaccess

place the following code in it after # END WordPress commentd line:

php_value upload_max_filesize 2048M
php_value post_max_size 2048M
php_value memory_limit 4096M
php_value max_execution_time 0
php_value max_input_time 0

10-Save file. Open plugin and you will see that you are allowed to restore 2GB data.

11-Open WordPress container site. Do a comparison with online site.

Congratulations! You’ve done it. You can now easily import any file you’d like using this amazing plugin. Migrating your sites are not a hassle anymore!

Video

References

How to increase the all-in-one-wp-migration plugin upload import limit

https://github.com/Azure/wordpress-linux-appservice/blob/main/WordPress/wordpress_migration_linux_appservices.md

jQuery.param()

Create a serialized representation of an array, a plain object, or a jQuery object suitable for use in a URL query string or Ajax request. In case a jQuery object is passed, it should contain input elements with name/value properties.

// <=1.3.2:
$.param({ a: [ 2, 3, 4 ] }); // "a=2&a=3&a=4"
// >=1.4:
$.param({ a: [ 2, 3, 4 ] }); // "a[]=2&a[]=3&a[]=4"
 
// <=1.3.2:
$.param({ a: { b: 1, c: 2 }, d: [ 3, 4, { e: 5 } ] });
// "a=[object+Object]&d=3&d=4&d=[object+Object]"
 
// >=1.4:
$.param({ a: { b: 1, c: 2 }, d: [ 3, 4, { e: 5 } ] });
// "a[b]=1&a[c]=2&d[]=3&d[]=4&d[2][e]=5"

Reference

Read more on jQuery Web site

Upgrade Debian from bullseye to bookworm and PVE7 to PVE8

Here is a short checklist to upgrade Debian to latest bookworm version;

Proxmox update goes with Debian Latest stable version. I am running BullEye and need to upgrade to BookWorm.

Run checklist (a small script that comes with Proxmox):

pve7to8

Fix errors and warnings reported by above script.

Next change repositories for Debian and Proxmos;

1. update the configured APT repositories
   apt update
   apt dist-upgrade
   pveversion

   This should report at least 7.4-15 or newer version.

2. CEPH
   nano /etc/apt/sources.list.d/ceph.list
   make sure there is just one entry.
	

3. Bulleye to BookWorm
   nano /etc/apt/sources.list
   or better, run this command to search and replace bullye to
   bookworm

   sed -i 's/bullseye/bookworm/g' /etc/apt/sources.list
   Output
   ------
   # security updates
   #deb http://security.debian.org bookworm-security main contrib

   # My repo changes
   deb http://deb.debian.org/debian/ bookworm main contrib non-free
   deb http://deb.debian.org/debian/ bookworm-updates main non-free contrib
   # security updates
   deb http://security.debian.org/debian-security bookworm-security main contrib non-free

   # PVE pve-no-subscription repository provided by proxmox.com,
   # NOT recommended for production use
   deb http://download.proxmox.com/debian/pve bookworm pve-no-subscription

4. APT Repositorys
   I don't have special repositories here. so don't worry about this.

Install this package if using EFI to boot box;

apt install grub-efi-amd64

To clear CEPH warnings, reset Ceph monitor on VM.

Remove any used packages with this command;

apt autoremove

Re-run scan;

pve7to8

Make sure to disable enterprise library if using evaluation version;

modify enterprise repo;

nano /etc/apt/sources.list.d/pve-enterprise.list

and add a # at the beginning. Save this file 

Restart your nodes one by one.

References

https://pve.proxmox.com/wiki/Upgrade_from_7_to_8

https://pve.proxmox.com/wiki/Ceph_Nautilus_to_Octopus

What is a Pem file and how does it differ from other OpenSSL Generated Key File Formats?

SSL has been around for long enough you’d think that there would be agreed upon container formats. And you’re right, there are. Too many standards as it happens. In the end, all of these are different ways to encode Abstract Syntax Notation 1 (ASN.1) formatted data — which happens to be the format x509 certificates are defined in — in machine-readable ways.

  • .csr – This is a Certificate Signing Request. Some applications can generate these for submission to certificate-authorities. The actual format is PKCS10 which is defined in RFC 2986. It includes some/all of the key details of the requested certificate such as subject, organization, state, whatnot, as well as the public key of the certificate to get signed. These get signed by the CA and a certificate is returned. The returned certificate is the public certificate (which includes the public key but not the private key), which itself can be in a couple of formats.
  • .pem – Defined in RFC 1422 (part of a series from 1421 through 1424) this is a container format that may include just the public certificate (such as with Apache installs, and CA certificate files /etc/ssl/certs), or may include an entire certificate chain including public key, private key, and root certificates. Confusingly, it may also encode a CSR (e.g. as used here) as the PKCS10 format can be translated into PEM. The name is from Privacy Enhanced Mail (PEM), a failed method for secure email but the container format it used lives on, and is a base64 translation of the x509 ASN.1 keys.
  • .key – This is a (usually) PEM formatted file containing just the private-key of a specific certificate and is merely a conventional name and not a standardized one. In Apache installs, this frequently resides in /etc/ssl/private. The rights on these files are very important, and some programs will refuse to load these certificates if they are set wrong.
  • .pkcs12 .pfx .p12 – Originally defined by RSA in the Public-Key Cryptography Standards (abbreviated PKCS), the “12” variant was originally enhanced by Microsoft, and later submitted as RFC 7292. This is a password-protected container format that contains both public and private certificate pairs. Unlike .pem files, this container is fully encrypted. Openssl can turn this into a .pem file with both public and private keys: openssl pkcs12 -in file-to-convert.p12 -out converted-file.pem -nodes

A few other formats that show up from time to time:

  • .der – A way to encode ASN.1 syntax in binary, a .pem file is just a Base64 encoded .der file. OpenSSL can convert these to .pem (openssl x509 -inform der -in to-convert.der -out converted.pem). Windows sees these as Certificate files. By default, Windows will export certificates as .DER formatted files with a different extension. Like…
  • .cert .cer .crt – A .pem (or rarely .der) formatted file with a different extension, one that is recognized by Windows Explorer as a certificate, which .pem is not.
  • .p7b .keystore – Defined in RFC 2315 as PKCS number 7, this is a format used by Windows for certificate interchange. Java understands these natively, and often uses .keystore as an extension instead. Unlike .pem style certificates, this format has a defined way to include certification-path certificates.
  • .crl – A certificate revocation list. Certificate Authorities produce these as a way to de-authorize certificates before expiration. You can sometimes download them from CA websites.

In summary, there are four different ways to present certificates and their components:

  • PEM – Governed by RFCs, used preferentially by open-source software because it is text-based and therefore less prone to translation/transmission errors. It can have a variety of extensions (.pem, .key, .cer, .cert, more)
  • PKCS7 – An open standard used by Java and supported by Windows. Does not contain private key material.
  • PKCS12 – A Microsoft private standard that was later defined in an RFC that provides enhanced security versus the plain-text PEM format. This can contain private key and certificate chain material. Its used preferentially by Windows systems, and can be freely converted to PEM format through use of openssl.
  • DER – The parent format of PEM. It’s useful to think of it as a binary version of the base64-encoded PEM file. Not routinely used very much outside of Windows.

Reference

https://serverfault.com/questions/9708/what-is-a-pem-file-and-how-does-it-differ-from-other-openssl-generated-key-file