Practical insights from real-world engineering experience
Category: Dev Ops
All about code tracking and management for example, Azure DevOPS branching and merging, Release management, Continuous integration (CI) and Continuous deployment (CD).
Most systems don’t fail because of bad developers. They fail because of bad design decisions made early — and scaled blindly.
This is the foundation every serious engineer and tech leader must master 👇
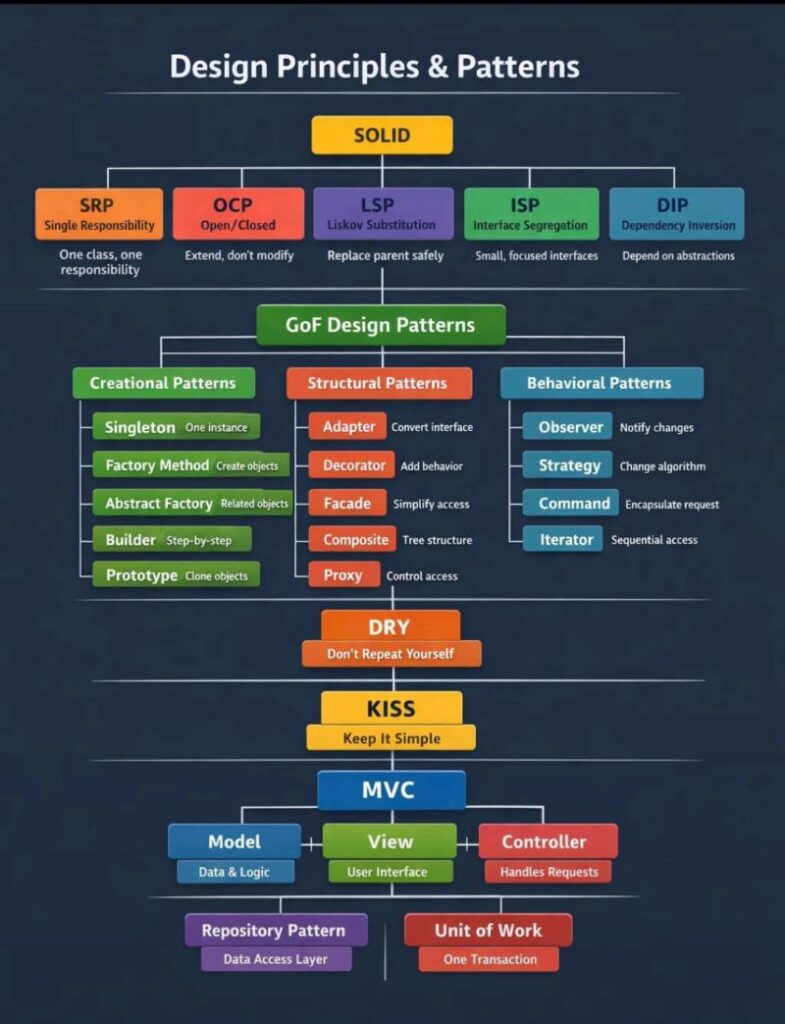
Design Principles & Patterns
🔹 SOLID
SRP – One class, one reason to change OCP – Extend, don’t modify LSP – Substitutions must be safe ISP – Small, focused interfaces DIP – Depend on abstractions, not concretes
SOLID isn’t theory. It’s how you avoid rewriting your system every 6 months.
🔹 GoF Design Patterns
1) Creational → Control how objects are created (Factory, Builder, Singleton) 2) Structural → Control how objects are composed (Adapter, Facade, Proxy) 3) Behavioral → Control how objects communicate (Strategy, Observer, Command)
Patterns are not “fancy code.” They are battle-tested solutions to recurring problems.
🔹 DRY – Don’t Repeat Yourself Duplication is a silent killer. It multiplies bugs and slows teams.
🔹 KISS – Keep It Simple Complexity is not intelligence. Simplicity is.
🔹 MVC + Repository + Unit of Work Clean separation of concerns. Predictable codebases. Scalable teams.
Reality check:
Frameworks change. Languages change. Trends change.
Principles don’t.
If you want to build:
Systems that scale Teams that move fast Products that survive years
In essence, a Git branch is a movable pointer to a specific commit in the repository’s history. When you create a new branch, you’re creating a new line of development that diverges from the main line. This allows you to make changes without directly affecting the stable codebase.
Let’s understand how this works. I assume you have Git installed and have basic working knowledge of Git.
Sonar is a popular open-source platform for continuous inspection of code quality. One of the easiest ways to install and use Sonar is to use Docker, a containerization platform that makes it easy to deploy and manage applications.
Prerequisites
Before getting started, you will need to have Docker installed on your machine. If you do not have Docker installed, you can download and install it from the Docker website.
Step 1: Pull the Sonar Docker Image
The first step in installing Sonar with Docker is to pull the Sonar Docker image from the Docker Hub repository. To do this, open a terminal or command prompt and run the following command:
docker pull sonarqube
This will download the latest version of the Sonar Docker image to your machine.
Step 2: Create a Docker Network
Next, we need to create a Docker network that will allow the Sonar container to communicate with the database container. To create a Docker network, run the following command:
docker network create sonar-network
Step 3: Start a Database Container
Sonar requires a database to store its data. In this example, we will use a PostgreSQL database, but you can also use a MySQL or Microsoft SQL Server database if you prefer. To start a PostgreSQL database container, run the following command:
Once the Sonar container is running, you can access the Sonar dashboard by opening a web browser and navigating to http://localhost:9000. The default username and password are admin and admin, respectively.
Cloud computing is the on-demand delivery of IT resources over a network. In traditional data centers, compute and storage resources used to be allocated manually by a dedicated IT team. In the cloud, this process is fully automated, leading to increased agility and significant cost savings.
Types of clouds
Cloud types vary depending on who owns or operates them. It is also possible to use more than one cloud at a time in a hybrid or multi-cloud architecture.
Public cloud
Public clouds are owned and managed by a cloud service provider. All resources are shared between multiple tenants. Even though the public cloud market is dominated by three major players, hundreds of smaller public cloud providers exist all over the world and run their public cloud infrastructure on Ubuntu.
A private cloud is owned by an organization or an individual. All resources are exclusively dedicated to a single entity or a service. It runs on the organization’s premises or in an external data center. It is managed by the organization’s operations team or a managed service provider.
Managed clouds are private clouds that are fully managed by a third-party organisation (aka managed service provider). The customer provides the hardware, but cloud operations and maintenance tasks are outsourced. The cloud can either run on the organisation’s premises or in the managed service provider’s data centre.
Micro clouds are a new class of infrastructure for on-demand computing at the edge. They differ from the internet-of-things (IoT), which uses thousands of single machines or sensors to gather data, yet they perform computing tasks. Micro clouds reuse proven cloud primitives but with the unattended, autonomous and clustering features that resolve typical edge computing challenges.
Hybrid cloud is a cloud computing architecture that consists of at least one public cloud, at least one private cloud and a hybrid cloud manager (HCM). It is one of the most popular trends in the IT industry, adopted by 82% of IT leaders, according to the Cisco 2022 Global Hybrid Cloud Trends Report.
Multi-cloud (also referred to as multi cloud or multicloud) is a concept that refers to using multiple clouds from more than one cloud service provider at the same time. The term is also used to refer to the simultaneous running of bare metal, virtualised and containerised workloads.
Cloud computing services are usually available to end users in the form of three primary models. Those include infrastructure-as-a-service (IaaS), platform-as-a-service (PaaS) and software-as-a-service (SaaS). Some more specific use cases exist too, such as container-as-a-service (CaaS). However, in essence, they are a subset of the main three.
IaaS
In the IaaS model, you provision resources. Those include the number of virtual CPUs (vCPUs), the amount of RAM, storage, etc. They come in the form of VMs or containers with a pre-installed operating system (OS). You manage everything up from there. IaaS is the most common cloud computing model as it allows for more freedom.
PaaS
In the PaaS model, you provision workloads. While you are still responsible for delivering application code and data management, the PaaS platform takes care of scheduling resources (usually containers) and manages them, including the OS, middleware and runtime. The PaaS model has never been widely adopted due to its overall complexity.
SaaS
In the SaaS model, you provision applications. They are deployed from pre-defined templates and can be configured according to your needs. Everything is managed by the cloud provider. Interest in the SaaS model is constantly increasing as it allows for full automation from the ground up.