Installing USWDS in Angular

USWDS is a U.S. Web Design System. The beauty of it is that it brings together Developers and Designers.

This is for public use and you can find it here;

https://designsystem.digital.gov/components/modal

On a technical note, you can think of it as Bootstrap implementation of USWDS though it’s not Bootstrap. It comes with its own CSS classes, themes, icons and JavaScript modules.

Installation instruction is straight forward for Web development tools that doesn’t require TypeScript to implement client side behavior, for example ASP.NET Core, PHP etc.

My challenge was to implement this in Angular v18.0. While searching for Typescript modules, I found Angular package in their documentation;

https://designsystem.digital.gov/documentation/implementations

This is the package link;

https://github.com/GSA/ngx-uswds

This seems to be well-maintained by developer’s community. Here is the demo link of these packages;

https://gsa.github.io/ngx-uswds/?path=/story/introduction–overview

Installation instructions are very simple. Run this;

npm install @gsa-sam/ngx-uswds

As of this writing this package targets Angular 17 and you might get an error installing this. Run this command to force it to install;

npm install @gsa-sam/ngx-uswds --force

You will see a folder under node_modules in your project.

Basic installation is done;

1 - npm install --save uswds@latest
2 - add "node_modules/uswds/dist/css/uswds.min.css" to the "styles"
    section of angular.json
3 - add "node_modules/uswds/dist/js/uswds.min.js" to the "scripts" 
    section of angular.json

How we are going to use it? In my case, I need to bring in individual component, for example a modal dialog box.

Create a component in your application;

ng g c my-modal

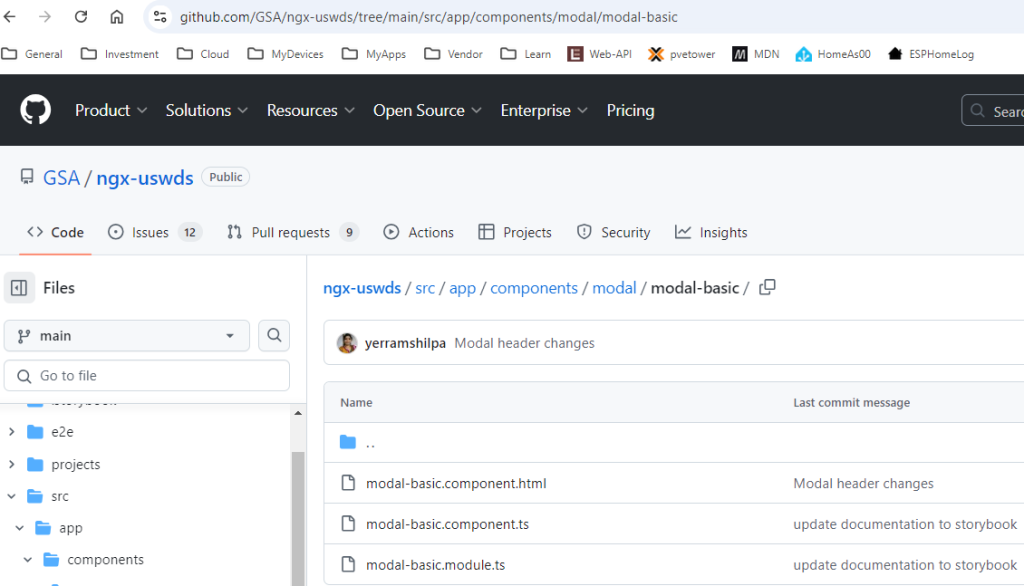
Open my-modal component. Open modal-basic.component.ts file from their github repo. see picture below;

Paste their code in your component and template file. You are good to go.

Their is another option that seems to be promising on GSA front;

https://buy.gsa.gov/style_guide/?path=/docs/components-date-picker–docs

This package has limited USWDS components but has more components available. We can use both. right 🙂

Enjoy!

Simple steps to replace your favicon icon in Angular

Favicon icon also known as a shortcut icon, website icon, tab icon, URL icon, or bookmark icon, is a file containing a small icon. associated with a particular website or web page. A web designer can create such an icon and upload it to a website or a web page.
Its associated with a website at address bar. In angular it is stored with a default name i.e favicon.ico which is angular logo, we can change it in simple steps as below.
So, let’s get started,
Step 1: copy your logo in src folder
Step 2: Navigate to src folder and remove the favicon.ico file.
Step 3: copy new png favicon inside src folder.
Step 4: Open the index.html file and change the favicon file name (with the newly added icon name).

Step 5: Inside the angular.json file change name of the favicon in assets array.
“assets”: [
“src/favicon.png”,
“src/assets”
],

That’s it, In these five steps we can easily replace favicon icon in Angular.

Capture child component click event in parent component

To capture a child component’s click event in the parent component in Angular, you can use the following steps:

  • In the child component:
    • Use the @Output decorator to create an event emitter.
    • Emit the event when the click occurs.
   import { Component, EventEmitter, Output } from '@angular/core';

   @Component({
     selector: 'app-child',
     template: `<button (click)="onClick()">Click me</button>`
   })
   export class ChildComponent {
     @Output() clickEvent = new EventEmitter<any>();

     onClick() {
       this.clickEvent.emit('Data from child');
     }
   }
  • In the parent component:
    • Listen to the event using the event binding syntax ((clickEvent)) in the child component’s template.
    • Call a method in the parent component to handle the event.
   import { Component } from '@angular/core';

   @Component({
     selector: 'app-parent',
     template: `
       <app-child (clickEvent)="handleChildClick($event)"></app-child>
     `
   })
   export class ParentComponent {
     handleChildClick(data: any) {
       console.log('Click event received from child:', data);
     }
   }

Explanation:

  • The @Output decorator in the child component creates a custom event that the parent component can listen to.
  • The EventEmitter class is used to emit the event.
  • The emit() method is used to send data along with the event.
  • The (clickEvent) syntax in the parent component’s template listens for the event emitted by the child component.
  • The handleChildClick() method in the parent component is called when the event is emitted.

This way, you can effectively capture and handle child component events in the parent component in Angular.

Serving data with Angular Material

To implement a table with paging, sorting, and filtering feature we can use Angular Material. Angular Material is a I Component library that implements Material Design. This UI design language is developed by Google in 2014 which focuses on using grid-based layouts, response animations, transitions, padding and depth effects such as lighting and shadows.

To install Angular Material, follow this;

  • Open Command Prompt
  • Navigate to /ClientApp/ folder
  • Type the following command
> ng add @angular/material

This will trigger the Angular Material command-line setup wizard, which will install following npm packages;

  • @angular/material
  • @angular/cdk (prerequisite)

Make sure to install same @angular/material version specified in the package.json.

During the installation process, you will be asked to pick prebuilt theme. I am picking up the first one (Indigo/Pink). Once done the setup process will update the following files;

- package.json
- /src/main.ts
- /src/app/app.module.ts
- angular.json
- src/index.html
- src/styles.css

Enjoy!