Angular Development – Sample Angular Side

This is a continuation of earlier article where we implemented monitoring output as JSON. We are going to build Angular Component that is capable of fetching and displying the JSON data.

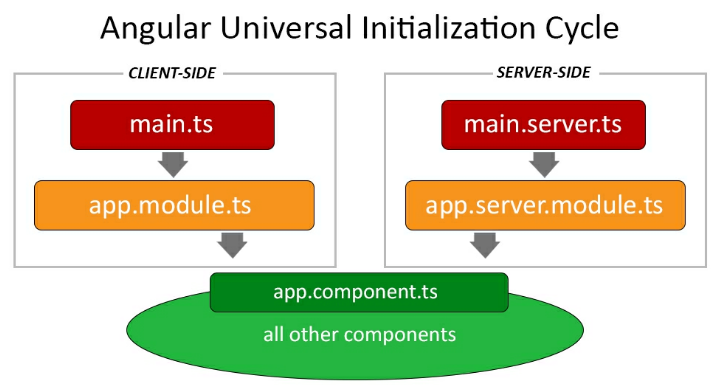
Angular component is commonly made of three separate files;

  • The Component(.ts) file, written in TypeScript and containing the Component class, together with all the module references, functions, variables, and so on.
  • The Template (.html) file, written in HTML extended with the Angular Template Syntax, which defines the UI layout architecture.
  • The Style (.css) file, written in CSS and containing the cascading style sheets rules and definitions for drawing the UI.

These three-files approach is the most practical one, the only required file is the Component one, as both the Template and the Style Files could also be embedded as inline elements within the Component file.

If we compare this with Model-View-Controller (MVC) pattern, we can say that, in Angular, The Component is the Controller/ViewModel and the template represents the view.

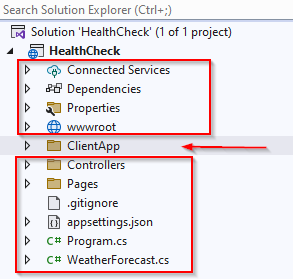
Navigate through the /ClientApp/src/app folder and create a new health-check folder.

Inside health-check folder, create following files;

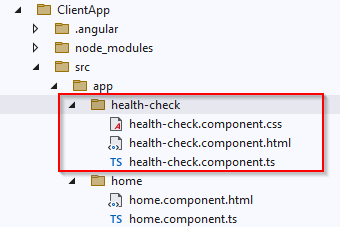
Once done, fill-in with these contents;

health-check.component.ts

This one is in /ClientApp/src/app/health-check/health-check.component.ts folder.

import { Component, Inject } from '@angular/core';
import { HttpClient } from '@angular/common/http';

@Component({
  selector: 'app-health-check',
  templateUrl: './health-check.component.html',
  styleUrls: ['./health-check.component.css'],
})

export class HealthCheckComponent {
  readonly baseUrl = 'https://localhost:7168/hc';

  public result!: Result;

  //constructor(
  //  private http: HttpClient,
  //  @Inject('BASE_URL') private baseUrl: string) {
  //}

  constructor(http: HttpClient, @Inject('BASE_URL') baseUrl: string) {
    baseUrl = "https://localhost:7168/hc";
    http.get<Result>(baseUrl).subscribe(remoteData => {
      console.log(remoteData);
      this.result = remoteData;
      console.log(this.result.checks);
    }, error => console.error(error));
  }
}

interface Result {
  checks: Check[];
  totalStatus: string;
  totalResponseTime: number;
}

interface Check {
  name: string;
  responseTime: number;
  status: string;
  description: string;
}

Here is the breakdown of most relevant stuff;

  • At file start, we import all the Angular directives, pipes, services and Components (single word modules) that we need throughout the whole class.
  • We instantiated a HttpClient service and a baseUrl variable using DI in the Component constructor. The baseUrl value is being set by making use of BASE_URL provider, defined in the /ClientApp/src/main.ts file. This will resolve to our application’s root URL. This value is required by the HttpClient service to build the URL that will be used to fetch the data from the server. (NOTE: I am using .NET CORE Server port to access /hc endpoint becuase Angular runs on proxy side and has no way to see server side except via API. We will use API later).
  • Last, we defined two interfaces to deal with the JSON request we’re expecting to receive from the HealthChecks middleware; Result and Check.

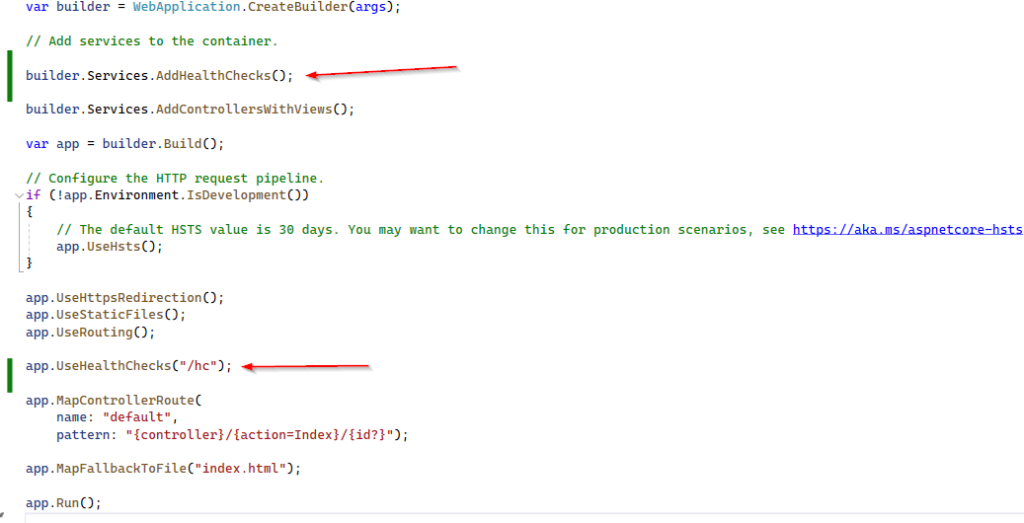
We need to make following changes to our Program.cs file so that we don’t get CORS issue;

builder.Services.AddCors(options =>
{
    options.AddPolicy("CorsPolicy", builder =>
    builder.AllowAnyOrigin()
    .AllowAnyMethod()
    .AllowAnyHeader()
    .WithExposedHeaders("X-Pagination"));
});

app.UseCors("CorsPolicy");

Let’s spend some time on some very important topics in Angular;

Imports and modules

The static import statement is used to import bindings that are exported by other JavaScript modules

A module is basically a collection of variables, functions, classes and so on, grouped within a class: each module is executed within its own scope, not in global scope, meaning all the elements declared within are not visible from the outside unless they are explicitly exported using the export statement. Conversely, to consume a variable, function, class, interface, and so on contained (and exported) within a module, the module has to be imported using the import statement.

This quite similar to what we do with namespaces in most programming languages (C# has using statement, for example).

IMPORTANT

Javascipt modules are different and Angular’s modularity system is different. Angular module are based upon the @NgModule decorator. Each Angular app has at least one NgModule class, called the root module, which is conventionally named AppModule and resides in the app.module.ts file in the application root.

DI

.NET core and Angular make extensive use of this design pattern. Think about dependencies in a class; these can be defined as service or objects that a class needs to instantiate into variables or properties, in order to perform one or more tasks.

In a classic coding pattern, those dependencies are instantiated on the fly within the class itself, for example;

public MyClass() {
    var myElement = new Element();
    myElement.doStuff();
}

In the preceding example, the myElement variable is an object instance of the Element type, and also a (local) dependency of MyClass: as we can see, it gets instantiated in the constructor because we most likely need to use it there. From there, we can either use it as a local variable (and let it die at the end of the constructor’s lifecycle) or assign it to a class property to further extend its life span and scope.

DI is an alternative software design pattern, in which a class asks for dependencies from external sources rather than creating them itself. To better understand such a concept, let’s try to rewrite the same code as before with a DI approach, like this:

public MyClass(Element myElement) {
    myElement.doStuff();
}

As we can see, there’s no need to instantiate the myElement variable because such a task is already handled by the Dependency Injector—an external code that is responsible for creating the injectable objects and injecting them into the classes.

The whole DI coding pattern is based upon the concept of Inversion of Control (IoC), to resolve dependencies. Such a concept revolves around the basic idea that, formally, if ObjectA depends on ObjectB, then ObjectA must not create or import ObjectB directly, but provide a way to inject ObjectB instead. In the preceding code block example, ObjectA is obviously MyClass, while ObjectB is the myElement instance.

ngOnInit (and other lifecycle hooks)

Each Angular Component has a lifecycle, which is managed by Angular. Each time a user visits a view within our app, the Angular framework creates and renders the required Components (and directives) along with their children, reacts to their changes whenever the user interacts with them, and eventually destroys and removes them from the Document Object Model (DOM) when the user navigates elsewhere. All these “key moments” trigger some lifecycle hook methods that Angular exposes to the developers so that they can perform something when each one of them actually occurs: as a matter of fact, they are very similar to the C# event handlers.

ngOnChanges(): Responds when Angular (re)sets data-bound input properties. The method receives a SimpleChanges object of current and previous property values. Called before ngOnInit(), and whenever one or more data-bound input properties changes.

ngOnInit(): Initializes the directive/Component after Angular first displays the data-bound properties and sets the directive/Component’s input properties. Called once, after the first ngOnChanges() method.

ngDoCheck(): Detects and acts upon changes that Angular can’t, or won’t, detect on its own. Called during every change detection run, immediately after ngOnChanges() and ngOnInit().

ngAfterContentInit(): Responds after Angular projects external content into the Component’s view/the view that a directive is in. Called once after the first ngDoCheck() method.

ngAfterContentChecked(): Responds after Angular checks the content projected into the directive/Component. Called after the ngAfterContentInit() method and every subsequent ngDoCheck() method.

ngAfterViewInit(): Responds after Angular initializes the Component’s views and child views/the view that a directive is in. Called once after the first ngAfterContentChecked() method.

ngAfterViewChecked(): Responds after Angular checks the Component’s views and child views/the view that a directive is in. Called after the ngAfterViewInit() method and every subsequent ngAfterContentChecked() method.

ngOnDestroy(): Cleans up just before Angular destroys the directive/Component. Unsubscribes Observables and detaches the event.

A good practice is to use Http-Client source code in the ngOnInit lifecycle method instead of using the Component’s constructor.

Constructor

All TypeScript classes have a constructor() method that will be called whenever we create an instance of that class: since TypeScript is, by all means, a superset of JavaScript, any TypeScript constructor() method will be transpiled into a JavaScript constructor() function. Let’s go with an example;

class MyClass() {
  constructor() {
    console.log("MyClass has been instantiated");
  }
}

This will be transpiled into the following Javascript function;

function MyClass() {
  console.log("MyClass has been instantiated");
}

If we omit the constructor in TypeScript, the JavaScript transpiled function will be empty; however, whenever the framework needs to instantiate it, it will still call it in the following way, regardless of whether it has the constructor or not:

var myClassInstance = new MyClass();

Understanding this is very important because it greatly helps us to understand the difference between the Component’s constructor() method and its ngOnInit() lifecycle hook, and it’s a huge difference, at least from the perspective of the Component initialization phase.

The whole Angular Bootstrap process can be split into two major (and subsequent) stages:

  • Instantiating the Components
  • Performing change detection

As we can easily guess, the constructor() method is called during the former phase, while all the lifecycle hooks—including the ngOnInit() method—are called throughout the latter.

If we look at these methods from this perspective, it’s pretty easy to understand the following key concepts:

  • If we need to create or inject some dependencies into an Angular Component, we should use the constructor() method; as a matter of fact, this is also the only way we can do that since the constructor is the only method that gets called in the context of the Angular injector.
  • Conversely, whenever we need to perform any Component initialization and/or update task—such as performing an HTTP request, updating the DOM, and so on— we should definitely do that by using one of the lifecycle hooks.

The ngOnInit() method, as its name implies, is often a great choice for the Component’s initialization tasks, since it happens right after the directive’s and/or Component’s input properties are set. That’s why we have used this to implement our HTTP request, using the Angular built-in HttpClient service.

HTTPClient

Being able to efficiently send and receive JSON data from our .NET Core Controllers is probably the most important requirement for our single page application (SPA). We chose to do that using the Angular HttpClient service.

HttpClient provides testability support and better error handling via APIs entirely based on Observables.

It’s worth noting that putting the HttpClient service within the Component itself is not good practice because it will often lead to unnecessary code repetitions among the various Components that need to perform HTTP calls and handle their results. This is a known issue that greatly affects production-level apps, which will likely require post-processing of the received data, handling errors, adding retry logic to deal with intermittent connectivity, and so on.


To better deal with those scenarios, it’s strongly advisable to separate the data access logic and the data presentation role by encapsulating the former in a separate service, which can be then injected into all the Components that require it, in a standardized and centralized way.

Observables

Observables are a powerful feature for managing async data; they are the backbone of the ReactiveX JavaScript (RxJS) library, which is one of the Angular required dependencies.

An Observable can be configured to send literal values, structured values, messages, and events, either synchronously or asynchronously: the values can be received by subscribing to the Observable itself using the subscribe method hook, meaning that the whole data flow is handled within it—until we programmatically choose to unsubscribe. The great thing about this approach is that, regardless of the chosen approach (sync or async), streaming frequency, and data type, the programming interface for listening to values and stopping listening is the same.

The great advantages of Observables are the reason why Angular makes extensive use of them when dealing with data. If we take a good look at our HealthCheckComponent source code, we can see how we use them as well when our HttpClient service fetches the data from the server and stores the result in the this.result local variable. Such a task is performed by calling two consecutive methods: get() and subscribe().

Let’s try to summarize what they do, as follows:

  • get(): As the name suggests, this method issues a standard HTTP request to our .NET Core HealthChecks middleware to fetch the Result JSON response object. This method needs a URL parameter, which we create on the fly by adding the hc literal string (the same string that we set early on, within the Configure method of the Startup.cs file) to the Angular app’s BASE_URL.
  • subscribe(): This method instantiates an Observable object that will execute two very different actions right after a result and/or in case of an error. Needless to say, all this will be done asynchronously, meaning that it will run in a separate thread (or scheduled for later execution) while the rest of the code continues to execute.

ReactiveX Library—Observables guide:
http://reactivex.io/rxjs/class/es6/Observable.js~Observable.html

Angular.io—Observables guide:
https://angular.io/guide/observables

Interfaces

Now that we know how the Angular HttpClient service works, we have every right to ask ourselves a couple of questions: why are we even using those interfaces? Can’t we just use the raw JSON data sent by the .NET Core HealthChecks middleware that we defined early on, consuming them as anonymous JavaScript objects?

Theoretically speaking, we can, just as much as we can output raw JSON from the Controllers, instead of creating all the ViewModel classes like we did instead. In a well-written app, though, we should always resist the temptation to handle raw JSON data and/or to use anonymous objects for a number of good reasons:

We have chosen TypeScript over JavaScript because we want to work with type definitions: Anonymous objects and properties are the exact opposite; they lead to the JavaScript way of doing things, which is something we wanted to avoid in the first place.

Anonymous objects (and their properties) are not easy to validate: We don’t want our data items to be error-prone or forced to deal with missing properties.

Anonymous objects are hardly reusable, and won’t benefit from many Angular handy features —such as object mapping—that require our objects to be actual instances of an interface and/or a type.

The first two arguments are very important, especially if we’re aiming for a production-ready application; no matter how easy our development task might seem at first, we should never think that we can afford to lose that level of control over our application’s source code.

The third reason is also crucial, as long as we want to use Angular to its full extent. If that’s the case, using an undefined array of properties—such as raw JSON data—is basically out of the question; conversely, using a structured TypeScript interface is arguably the most lightweight way to work with structured JSON data in a strongly typed fashion.

It’s worth noting that we’ve not added the export statement to our interface: we did that on purpose since we’re only going to use this within the HealthCheckComponent class. Should we need to change such behavior in the future—for example, to create an external Data Service—we’ll have to add such a statement (and, arguably, move each one of them into a separate file) to enable us to import them into other classes.

health-check.component.html

Located in /ClientApp/src/app/health-check/health-check.component.html folder;


<!DOCTYPE html>
<html>
<head>
    <meta charset="utf-8" />
    <title>Health Check</title>
</head>
<body>
  <h1>Health Check</h1>

  <p>Here are the results of our health check</p>

  <p *ngIf="!result"><em>Loading...</em></p>

  <table class="table table-striped" aria-labelledby="tableLabel" *ngIf="result">
    <thead>
      <tr>
        <th>Name</th>
        <th>Response Time</th>
        <th>Status</th>
        <th>Description</th>
      </tr>
    </thead>

    <tbody>
      <tr *ngFor="let check of result.checks">
        <td>{{ check.name }}</td>
        <td>{{ check.responseTime }}</td>
        <td class="status {{ check.status }}">{{ check.status }}</td>
        <td>{{ check.description }}</td>
      </tr>
    </tbody>
  </table>
</body>
</html>

As we can see, the template part of our Angular Component is basically an HTML page, containing a table with some Angular directive. Before moving on, let’s have a closer look, as follows:

ngIf: This is a structural directive that conditionally includes the container HTML element, based on the Boolean expression value specified after the equals (=) sign: when such an expression evaluates to true, Angular renders the element; otherwise, it doesn’t. It can be chained with an else block that—if present—will be shown when the expression evaluates to false or null. In the preceding code block, we use it within the element so that it only appears when the result internal variable (which we defined in the Component class earlier on) stops being null, which will happen after the data has been fetched from the server.

ngFor: Another structural directive that renders a template for each item contained in a given collection. The directive is placed on an element, which becomes the parent of the cloned templates. In the preceding code block, we use it inside the main element to create and show a  element (a row) for each check item within the result.checks array.

  • {{ check.name }}, {{ check.responseTime }}, and so on: These are called interpolations and can be used to incorporate calculated strings into the text between HTML element tags and/or within attribute assignments. In other words, we can use them as placeholders for our class variables’ property values. As we can see, the interpolation default delimiters are the double curly braces, {{ and }}.

health-check.component.css

This file location is /ClientApp/src/app/health-check/health-check.component.css;

body {
}
.status {
  font-weight: bold;
}

.Healthy {
  color: green;
}

.Degraded {
  color: orange;
}

.Unhealthy {
  color: red;
}

There’s not much to say here; just some vanilla CSS to style out the Component template.

Adding the Component to the Angular app

Our Component is ready, we need to add it to our Angular app. In order to do that, we need to make some minimal changes to the following files;

  • app.module.ts
  • nav-menu.component.ts
  • nav-menu.component.html

AppModule

Each new component must be referenced in the AppModule so that it can be registered within our app. On top of that, we need to create the relevant entry within our RoutingModule configuration so that our users wil be able to navigate to that page.

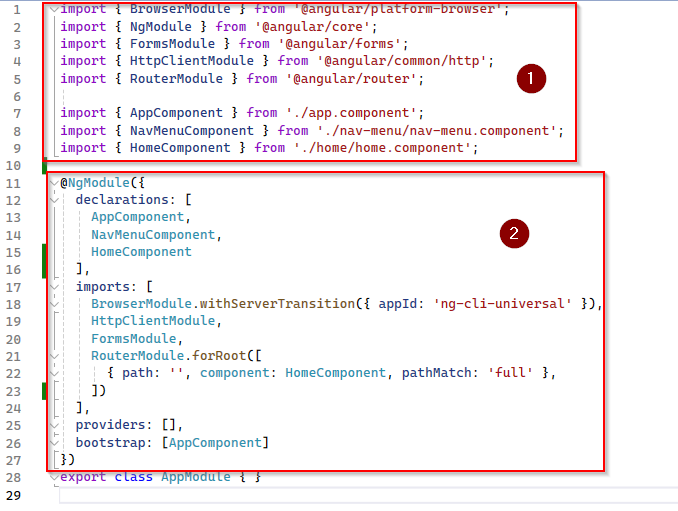
Open the /Client/App/src/app/app.module.ts file and add following highlighted lines;

import { BrowserModule } from '@angular/platform-browser';
import { NgModule } from '@angular/core';
import { FormsModule } from '@angular/forms';
import { HttpClientModule } from '@angular/common/http';
import { RouterModule } from '@angular/router';

import { AppComponent } from './app.component';
import { NavMenuComponent } from './nav-menu/nav-menu.component';
import { HomeComponent } from './home/home.component';
import { CounterComponent } from './counter/counter.component';
import { FetchDataComponent } from './fetch-data/fetch-data.component';

import { HealthCheckComponent } from './health-check/health-check.component';

@NgModule({
  declarations: [
    AppComponent,
    NavMenuComponent,
    HomeComponent,
    CounterComponent,
    FetchDataComponent,
    HealthCheckComponent
  ],
  imports: [
    BrowserModule.withServerTransition({ appId: 'ng-cli-universal' }),
    HttpClientModule,
    FormsModule,
    RouterModule.forRoot([
      { path: '', component: HomeComponent, pathMatch: 'full' },
      { path: 'counter', component: CounterComponent },
      { path: 'fetch-data', component: FetchDataComponent },
      { path: 'health-check', component: HealthCheckComponent },
    ])
  ],
  providers: [],
  bootstrap: [AppComponent]
})
export class AppModule { }

NavMenuComponent

We are done with the required step of add new component navigation path to the RoutingModule; however we also need to add a link for our users to click;

Open the ClientApp/src/app/nav-menu/nav-menu.component.ts file and add highlighted text;

<header>
  <nav
    class="navbar navbar-expand-sm navbar-toggleable-sm navbar-light bg-white border-bottom box-shadow mb-3"
  >
    <div class="container">
      <a class="navbar-brand" [routerLink]="['/']">health_check</a>
      <button
        class="navbar-toggler"
        type="button"
        data-toggle="collapse"
        data-target=".navbar-collapse"
        aria-label="Toggle navigation"
        [attr.aria-expanded]="isExpanded"
        (click)="toggle()"
      >
        <span class="navbar-toggler-icon"></span>
      </button>
      <div
        class="navbar-collapse collapse d-sm-inline-flex justify-content-end"
        [ngClass]="{ show: isExpanded }"
      >
        <ul class="navbar-nav flex-grow">
          <li class="nav-item"
              [routerLinkActive]="['link-active']"
              [routerLinkActiveOptions]="{ exact: true }">
            <a class="nav-link text-dark" [routerLink]="['/']">Home</a>
          </li>
          <li class="nav-item" [routerLinkActive]="['link-active']">
            <a class="nav-link text-dark" [routerLink]="['/counter']">Counter</a>
          </li>
          <li class="nav-item" [routerLinkActive]="['link-active']">
            <a class="nav-link text-dark" [routerLink]="['/fetch-data']">Fetch data</a>
          </li>
          <li class="nav-item" [routerLinkActive]="['link-active']">
            <a class="nav-link text-dark" [routerLink]="['/health-check']">Health Check</a>
          </li>
        </ul>
      </div>
    </div>
  </nav>
</header>
        

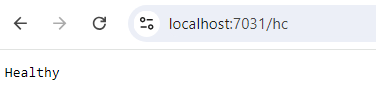
Our new component is added, let’s test this by pressing F5;

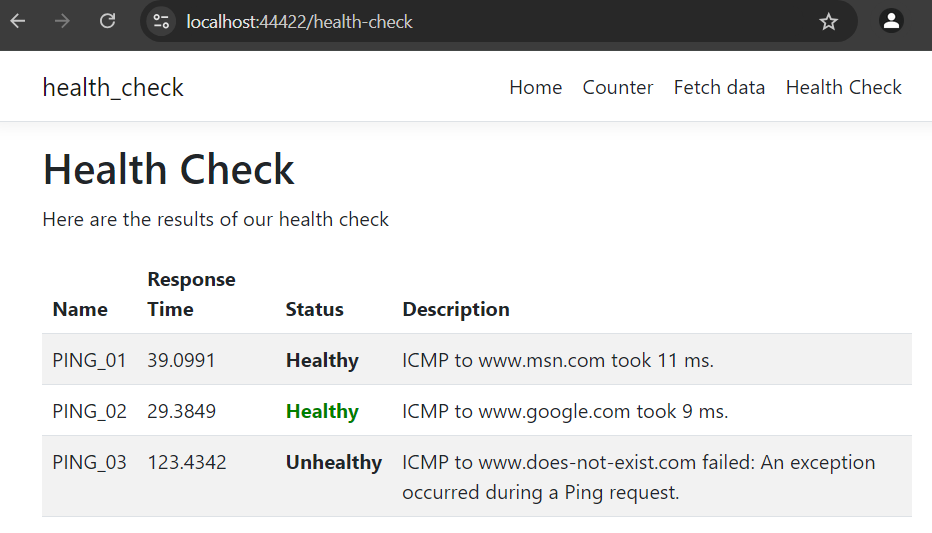
Our health check is up and running.

Property ‘…’ has no initializer and is not definitely assigned in the constructor

stuck with this compilation error for a while. Suppose we have this property defined;

public result = Result

If we want to initialize above property only, we can write it like this;

public result! = Result

Second alternative is to open sconfig.json and set

"compilerOptions": {
    "strictPropertyInitialization": false,
    ...
}

This will be a project wide change and you don’t need to initialize all your variables.

https://stackoverflow.com/questions/49699067/property-has-no-initializer-and-is-not-definitely-assigned-in-the-construc

Angular Development – Sample Server Side

Let’s get our hands in some code. This web app will act as a monitoring and reporting service that will check the health status of a target server.

We are going to use Micorosft.AspNetCore.Diagnositcs.HealthChecks package, a built-in feature of the .NET Core framework. This package is meant to be used to allow a monitoring service to check the status of another running service.

Add app.UseHalthChecks middleware in Program.cs file;

This middleware will create a server-side route for the health checks. Note that we have added this middleware before Endpoints so that this new route won’t be overriden by the general-purpose Controller route pattern.

Keep in mind, when we run application it uses two ports; one for server side and second one for angular side (in our case it’s 7031). For angular it creates a proxy and re-direct users there (in this case 44488).

If we run our application, we can see our system is healthy.

The system is healthy because we haven’t defined any checks yet.

Let’s add an Internet Control Message Protocol (ICMP) AKA Ping. PING request is a basic way to check the presence and therefore availability, of a server that we know we should be able to reach within a LAN / WAN connection.

In a nutshell, it works in following way; the machine that performs the PING sends one or more ICMP echo request packets to the target host and waits for a reply; if it receives it, it reports the round-trip time of the whole task; otherwise, it time outs and reports a “host not reachable” error.

The “host not reachable” error can be due to a number of possible reasons;

  • The target host is not available
  • The target host is available, but actively refuses TCP/IP connections of any kind
  • The target host is available and accepts TCP/IP incoming conections, but it has been configured to explicitly refuse ICMP requests and/or not send ICMP echo replies back.
  • The target host is available and properly configured to accept ICMP requests and send echo replies back, but the connection is very slow or hindered by unknown reasons (performance, heavy load etc), so the round-trip time takes too long, or even times out.

So what could be the possible outcomes of our implementation;

  • Healthy: We can consider the host Healthy whenever the PING succeeded with no errors and timeouts.
  • Degraded: We can consider the host Degraded whenever the PING succeeded, but the round-trip takes too long.
  • Unhealthy: We can consider the host Unhealthy whenever the PING failed, that is, the check times out before any reply.
    public class PingHealthCheck : IHealthCheck
    {
        private string Host = "www.does-not-exist.com";
        private int Timeout = 300;

        public async Task<HealthCheckResult> CheckHealthAsync(HealthCheckContext context, CancellationToken cancellationToken = default)
        {
            try
            {
                using (var ping = new Ping())
                {
                    var reply = await ping.SendPingAsync(Host);
                    switch (reply.Status)
                    {
                        case IPStatus.Success:
                            return (reply.RoundtripTime > Timeout) ? HealthCheckResult.Degraded() : HealthCheckResult.Healthy();
                        default:
                            return HealthCheckResult.Unhealthy();
                    }
                }
            }
            catch (Exception ex) 
            { 
                return HealthCheckResult.Unhealthy(); 
            }
        }
    }

Add PingHealthCheck to the pipeline by modifying Program.cs file;

builder.Services.AddHealthChecks()
    .AddCheck<PingHealthCheck>("ICMP");

So we are getting a response. that’s great, it works. Three are 3 major flaws;

  1. Hardcoded values: The Host and the Timeout variables should be passed as parameters
  2. Uninformative response: Healthy and Unhealthy are not that great, we should create a better output message
  3. Untyped output: The current response is being sent in plain text, if we want to fetch it with Angular, a JSON content-type be better.
    public class PingHealthCheck : IHealthCheck
    {
        private string Host { get; set; }
        private int Timeout { get; set; }   

        public PingHealthCheck(string host, int timeout)
        {
            Host = host;
            Timeout = timeout;
        }

        public async Task<HealthCheckResult> CheckHealthAsync(HealthCheckContext context, CancellationToken cancellationToken = default)
        {
            try
            {
                using (var ping = new Ping())
                {
                    var reply = await ping.SendPingAsync(Host);
                    switch (reply.Status)
                    {
                        case IPStatus.Success:
                            var msg = $"ICMP to {Host} took {reply.RoundtripTime} ms.";
                            return (reply.RoundtripTime > Timeout) ? HealthCheckResult.Degraded(msg) : HealthCheckResult.Healthy(msg);
                        default:
                            var err = $"ICMP to {Host} failed: {reply.Status}";
                            return HealthCheckResult.Unhealthy(err);
                    }
                }
            }
            catch (Exception ex) 
            {
                var err = $"ICMP to {Host} failed: {ex.Message}";                
                return HealthCheckResult.Unhealthy(err); 
            }
        }
    }

Update middleware in Program.cs file so that we can call it programmatically;

builder.Services.AddHealthChecks()
    .AddCheck("PING_01", new PingHealthCheck("www.msn.com", 100))
    .AddCheck("PING_02", new PingHealthCheck("www.google.com", 100))
    .AddCheck("PING_03", new PingHealthCheck("www.does-not-exist.com", 100));

The reason is obvious, if one of them failed the whole stack will be failed. The last one in our example is failure. We can avoid this sum behavior by implementing the resolution of third flaw (as mentioned before): JSON-structured output message.

Add a new class in project root, CustomHealthCheckOptions;

    public class CustomHealthCheckOptions : HealthCheckOptions
    {
        public CustomHealthCheckOptions() : base()
        {
            var jsonSerializerOptions = new JsonSerializerOptions()
            {
                WriteIndented = true
            };

            ResponseWriter = async (c, r) =>
            {
                c.Response.ContentType = MediaTypeNames.Application.Json;
                c.Response.StatusCode = StatusCodes.Status200OK;

                var result = JsonSerializer.Serialize(new
                {
                    checks = r.Entries.Select(e => new
                    {
                        name = e.Key,
                        responseTime = e.Value.Duration.TotalMilliseconds,
                        status = e.Value.Status.ToString(),
                        description = e.Value.Description
                    }),
                    totalStatus = r.Status,
                    totalResponseTime = r.TotalDuration.TotalMilliseconds,
                }, jsonSerializerOptions);

                await c.Response.WriteAsync(result);
            };
        }
    }

Modify Program.cs file;

app.UseHealthChecks("/hc", new CustomHealthCheckOptions());

Run the application and here is expected output;

{
  "checks": [
    {
      "name": "PING_01",
      "responseTime": 78.6889,
      "status": "Healthy",
      "description": "ICMP to www.msn.com took 12 ms."
    },
    {
      "name": "PING_02",
      "responseTime": 62.3402,
      "status": "Healthy",
      "description": "ICMP to www.google.com took 14 ms."
    },
    {
      "name": "PING_03",
      "responseTime": 144.9184,
      "status": "Unhealthy",
      "description": "ICMP to www.does-not-exist.com failed: An exception occurred during a Ping request."
    }
  ],
  "totalStatus": 0,
  "totalResponseTime": 181.1726
}

Each and every check is properly documented, as well as the total outcome data, in a structured JSON object. This is just what we need to feed some Angular Components.

See in next article.

Angular Development – Break and Fix

In our previous article, we have crated a health-check application. This time we would be trimming down the component list to see what could be impact and how we can fix it.

Go to the /ClientApp/src/app folder and delete the counter and the fetch-data folders, with all the files they contain.

Project build would be successful but when we run the project, we would see these errors;

If we open app.module.ts file inside /ClientApp/src/app, we can see these two offending lines;

We know this file has reference to all of the TypeScript files used by Angular application. Remove these two lines and try to compile.

App module is a way to organize and bootstrap Angular applications. This help developers consolidate their own set of Components, directives and pipes into reusable blocks.

Every application must have at least one module, which is conentionally called a root module and is give the AppModule class name.

As we can see; (1) has bunch of import statements, pointing to all the references. The root NgModule block (2) that server a common purpose: directives, components, pipes, modules, providers. The last one contains the Component we want to bootstrap, which is the main application component, the AppComponent.

This time our application will run without any problems. But when we click on Nav links (Counter and Fetchdata), it will throw errors. We need to fix those by removing them from /ClientApp/src/app/nav-menu/nav-menu.component.html.

We can also change home component html to our liking by getting into /ClientApp/src/app/home/home.component.html

We can remove back-end files becuase we don’t need them any more;

  • WeatherForecast.cs
  • Controllers/WeatherForecastController.cs

Now we don’t have any .NET Controller and model in our web applications but that’s ok since we don’t have Angular Components that need to fetch data either.

This concludes this section. Let’s get to our First Sample Drop.

Angular Development – Getting Started

These are short notes on Angular development using Visual Studio 2022.

To create Angular project;

dotnet new angular -o health-check

If you look at solution there are two projects in it, .NET Core and Angular. The .NET Core section relates to the backend while Angular relates to the front-end.

ClientApp folder has all of angular stuff in it.

The default ASP.NET MVC (/Controllers/ and /Pages/” folders, both has Server side Code

The /ClientApp/Src folder that has client side code

The /ClientApp/E2E folder has testing framework code

The /wwwroot/ folder has client side assets.

On a high level, .NET Core back-end stack is in these folders;

  1. The Dependencies virtual folder that contains all the internal, external, and third-party references to build and run our project. In fact all the references to NuGet.
  2. The /Controllers/ folder, which has been shipped with any MVC-based ASP.NET application
  3. The /Pages/ folder, which contains a single Razor Page – error.cshtml — to handle runtime and/or server errors.
  4. The root level files, program.cs and appsettings.json, which will determine our web application’s configuration, including the modules and middleware, compilation settings, and publishing rules.

The question is, where is the Views folder as we used to see in Razor domain? SPA has replaced them, such a page is the /ClientApp/Src/Folder/index.html file. It’s a static page. The only server-side rendered HTML page is the /Pages/Error.cshtml Razor Page which is used to handle runtime and/or server errors that could happen before the Angular Bootstrap phase.

A Razor page similar to a Razor view, with same syntax and function, but it also contains the controller source code. A Razor page is pretty similar to an old .aspx, .aspx.cs ASP.NET Web Form.

On a high level, Angular front-end has these folders;

  1. The /wwwroot/ folder, which will contain the compiled, ready-to-publish contents of our applications: HTML, JS, and CSS files and everything else we want users to have access to in terms of static files
  2. The /ClientApp/ root folder, which hosts the Angular configuration files
  3. The /Client/App/Src/ folder, which contains the Angular app source code files. If we look at them, all of them has .ts extension
  4. The /ClientApp/e2e/ folder, which has sample end-to-end tests

Angular uses the term workspace for its assets. The Angular workspace is the filesystem place contains the Angular files. This workspace is located within the /ClientApp/ folder, which is defined as workspace root. This workspace is usually created and initialized by CLI command used to create the app.

Any CLI commands operating on the app and/or their libraries (such as adding or updating new packages) will be executed from within the workspace folder.

Angular.json

The most important role within the workspace is played by this file, created by the CLI in the workspace root. This contains workspace-wide and project-specific configuration defaults for all build and development tools.

The first few properties at the top of the file define the workspace and project configuration options:

  • version: the configuration file version
  • newProjectRoot: The path where new projects are created
  • projects: A container item that host a sub-section for each project in the workspace.

Keep in mind that angular.json file follows a standard generic-to-specific cascading rule. All configuration values set at the workspace level will be the default value for any project, and can be overridden by those set at the project level.

Package.json

This is Node Package Manager (npm) configuration files; it basically contains a list of npm packages that developer wants to be restored before the project starts. Think about it as Nuget Package Manager. This file has key/value pairs of different libraries and their are some important prefixes that we should be aware of;

  • The Tilde (~): A value of “~1.1.4” will match all 1.1.x versions, excluding 1.2.0, 1.0.x and so on.
  • The Caret (^): A value of “^1.1.4” will match everything above 1.1.4, excluding 2.0.0 and above.

We can install/uninstall or view all these packages within json file in VS. Hover over the bar on the left of packages and it will show pop up menu for these actions.

npm-update can be used to upgrade / downgrade these packages.

tsconfig.json

This is typescript configuration file. Typescript is a programming language developed and maintained by Microsoft that acts as JavaScript superset; It offers built-in IntelliSense, which is a great benefit. Angular source code is written in TypeScript.

Typescript code files included in the /ClientApp/ folder. The most notable section in this file is;

"angularCompilerOptions": {
  "enableI18nLegacyMessageIdFormat": false,
  "strictInjectionParameters": true,
  "strictInputAccessModifiers": true,
  "strictTemplates": true
}

The /ClientApp/Src/ folder

Let’s look into this folder;

  • The /ClienApp/src/app/ folder, along with all its subfolders, contains all the TypeScript files related to our Angular app: in other words, the whole client-side application source code is meant to be put here.
  • The /ClientApp/src/app/assets/ folder is meant to store all the applications’ images and other asset files: these files will be copied and/or updated as-is in the /wwwroot/ folder whenever the application is built.
  • The /ClientApp/src/app/environment/ folder contains build configuration options that target specific environments: environment.ts for dev and environment.prod.ts for production.
  • index.html: The main HTML page that is served when someone visits your site. The CLI automatically adds all JavaScript and CSS files here (This is like layout file in MVC Core).
  • main.ts: The main entry point for your application (like a route declaration in program.cs file in MVC)

The /app/ folder

This folder follows Angular folder structure best practices and contains our projects logic and data, including all Angular Modules, Services, and Components, as well as templates and styles.

AppModule

The basic building block of an Angular application are Ng-Modules, which provides a compilation context for components. The role of NgModules is to collect related code into functional sets: therefore, the whole Angular app is defined by a set of one or more NgModules.

An Angular app requires a root module – conventionally called AppModule – that tells Angular how to assemble the application, thus enabling bootstrapping and starting the initialization life cycle. The remaining modules are known as feature-module and serve a different purpose. The root module also contains a reference list of all available components.

Here is a schema of the standard Angular Initialization Cycle to visualize how it works;

The main.ts file bootstraps app.module.ts (AppModule), which then loads the app.component.ts file (AppComponent); and at last it will load other components whenever the application needs them.

The root module can be found in /ClientApp/src/app/ folder and is defined within the app.module.ts file. It contains a bunch of import statements and some array referencing Components, other modules, providers and so on. The root module is just a reference file.

Server-side AppModule for SSR

The /ClientApp/src/app folder contains app.server.module.ts file, which is used to enable the Angular Universal Server-Side Rendering (SSR), a technology that renders Angular applications on the server, provided that back-end framework supports it. .NET has a native support for such convenient feature.

The following is the improved Angular initialization schema when using SSR.

For more detail on Angular Universal and SSR, Check out the following link;

https://web.dev/articles/rendering-on-the-web

AppComponent

If NgModules are Angular building blocks, Components can be defined as the bricks used to put the app together, to the extent that we can say that an Angular app is basically a tree of Components working together.

Components define views, which is HTML that use services, which provide specific functionality not directly related to views. Service providers can be injected into Components as dependencies, thus making the app code modular, reusable and efficient.

The cornerstone of these Components is conventionally called AppComponent, which is also the only Component that, according to the Angular folder structure conventions, should be placed in the /app/ root folder. All other components should be put in a sub-folder, which will act as dedicated namespaces.

Our AppComonent consists of two files;

  • app.comonent.ts: Defines the Component logic, that is, the Component class source code.
  • app.component.html: Defines the HTML template associated with the AppComponent. Any Angular Component can have an optional HTML file containing its UI layout structure instead of defining it within the Component file itself. This is almost always a good practice unless the Component comes with a very minimal UI.

AppComponent is often lightweight, it doesn’t have other optional files that could be found in other Components such as;

  • <*>.component.css: Defines the base CSS style sheet for a Component. Just like the .html file, this file is optional and should always be used unless the component doesn’t require UI styling.
  • – <*>.component.spec.ts: Define a unit test for the Component.

Other Components

Other than AppComponent, our template contains four more components, each one in a dedicated folder;

  • CounterComponent: Placed in the counter subfolder
  • FetchDataComponent: Placed in the fetch-data subfolder
  • HomeComponent: Placed in the home subfolder
  • NavMenuComponent: Placed in the nav-menu subfolder

Press F5 and see how these components work.

HomeComponent

The HomeComponent could be considered the home page of our app; Since we are dealing with SPA we would call them Views. This word refers to the combined HTML template generated by Angular Component that corresponds to a given navigation route.

NavMenuComponent

Do we have sub-components already? Yes, we do. The NavMenuComponent is a perfect example of that. Since it doesn’t have a dedicated route for itself but is rendered as part of other Components within their corresponding view. It is the top portion of each view.

It is where all first-level navigation routes are implemented that are defined in AppModule, all pointing to a given Angular Component.

First-level navigation routes are thos that we want our users to reach with a single click. In our sample app, there are three;

  • /home: Pointing to the HomeComponent
  • /counter: Pointing to the CounterComponent
  • /fetch-data: Pointing to the FetchDataComponent

These navigation routes have been implemented in the NavMenuComponent by using anchor links.

CounterComponent

This component shows an incrementing counter that we can increase by pressing an Increment button.

FetchDataComponent

This component is an interactive table populated with the JSON array generated by the server-side Web API via WeatherForecastController.

The specs.ts file(s)

If we take a look at the source files within the above Component’s subfolders, we can see that the CounterComponent comes with a counter.component.spec.ts file. Those files, as per Angular naming conventions, are meant to contain unit tests for the counter.component.ts source file and are run using the Jasmine Javascript test framework through the Karma test runner.

That’s enough theory. Let’s get to work. See next article.