How to run SonarQube Analysis in Visual Studio Console

To generate a SonarQube token (required for authentication when running analyses from the command line or CI/CD pipelines), follow these steps:


Steps to Generate a SonarQube Token

  1. Log in to your SonarQube server (e.g., http://localhost:9000 for local setups).
  2. Click your profile icon (top-right corner) → “My Account”.
  3. Go to the “Security” tab.
  4. Under “Tokens”, enter a name for your token (e.g., vs-console-token).
  5. Click “Generate”.
  6. Copy the token immediately (it won’t be shown again!).
    Example token format: sqp_1234567890abcdef

How to Use the Token

  • In dotnet-sonarscanner commands, pass the token via:shCopyDownloaddotnet sonarscanner begin /k:”your-project-key” /d:sonar.host.url=”http://localhost:9000″ /d:sonar.login=”sqp_1234567890abcdef”
  • For security, never hardcode the token in scripts. Use:
    • Environment variables (e.g., SONAR_TOKEN).
    • Secret management tools (e.g., Azure Key Vault, GitHub Secrets).

Important Notes

  • 🔒 Treat tokens like passwords (they grant access to your SonarQube projects).
  • 🔄 Regenerate tokens periodically or revoke old ones (under “Security”).
  • 🚫 No token? You’ll get errors like Not authorized or Authentication failed.

Example Workflow

# Set token as an environment variable (optional)
set SONAR_TOKEN=sqp_1234567890abcdef

# Run analysis (Windows CMD)
dotnet sonarscanner begin /k:"my-project" /d:sonar.host.url="http://localhost:9000" /d:sonar.login="%SONAR_TOKEN%"
dotnet build
dotnet sonarscanner end /d:sonar.login="%SONAR_TOKEN%"

Get the SonarQube Project URL

The project URL is the web address of your project in SonarQube. It typically follows this format:

http://<sonarqube-server-url>/dashboard?id=<project-key>
  • <sonarqube-server-url>: The host where SonarQube is running (e.g., http://localhost:9000 if running locally).
  • <project-key>: The unique key assigned to your project in SonarQube.

How to Find the Project Key?

  1. Log in to your SonarQube server.
  2. Navigate to your project.
  3. Check the URL in the browser’s address bar (e.g., http://localhost:9000/dashboard?id=my-project-key).
  4. Alternatively, go to Project Settings → General Settings → Key.

2. Run SonarQube Analysis in Visual Studio Console

To analyze a .NET project in Visual Studio Developer Command Prompt (or terminal), use the SonarScanner for .NET (dotnet-sonarscanner).

Prerequisites

  • Install Java (required for SonarQube scanner).
  • Install SonarScanner for .NET:shCopyDownloaddotnet tool install –global dotnet-sonarscanner

Steps to Run Analysis

  1. Start the SonarQube Analysis:shCopyDownloaddotnet sonarscanner begin /k:”” /d:sonar.host.url=”” /d:sonar.login=”
    • Replace:
      • <project-key> with your SonarQube project key.
      • <sonarqube-server-url> with your SonarQube server URL (e.g., http://localhost:9000).
      • <token> with a SonarQube user token.
  2. Build Your Project:shCopyDownloaddotnet build
  3. Complete & Publish Results to SonarQube:shCopyDownloaddotnet sonarscanner end /d:sonar.login=”<token>”
  4. Check Results:
    • Open the SonarQube project URL (e.g., http://localhost:9000/dashboard?id=my-project-key) in a browser.

Example

# Start analysis
dotnet sonarscanner begin /k:"my-dotnet-app" /d:sonar.host.url="http://localhost:9000" /d:sonar.login="sqp_1234567890abcdef"

# Build the project
dotnet build

# End analysis & upload results
dotnet sonarscanner end /d:sonar.login="sqp_1234567890abcdef"

After running these commands, your analysis results will appear in the SonarQube dashboard.

How to prevent Visual Studio from compiling TypeScript

If you are building a Single Page Application / JavaScript Web application using Visual Studio, you’ve probably already run into the overlap between tooling that surrounds npm and the tooling within Visual Studio.

One of these tasks is preventing Visual Studio from being responsible for building TypeScript and allowing your tooling (i.e. Webpack, Gulp, Grunt) to be in charge instead. The idea here is that your tooling has been configured to lint, minify, build, concat, bundle, copy, whatever all of your project files exactly as you desire. At this point you don’t really need MSBuild involved in transpiling your JavaScript to TypeScript as it would be redundant and often times problematic. To prevent Visual Studio from doing any compilation of TypeScript preform the following steps:

Ensure a tsconfig file is added to the project and configured correctly

TypeScript and any build process you are using will work together based on the configuration in tsconfig.json. This file can be hand-rolled from scratch, or may have been generated for your project from a process like ng new and the Angular CLI. You can also generate a default tsconfig file (recommended approach as opposed to creating from scratch) using the following command:
tsc --init

This will generate a default configuration file for TypeScript compilation. Your web-client’s code build process will need to point to this file and using it as a driver for the TypeScript compilation behavior.

2. Modify the .csproj project file to prevent TypeScript from compiling

Within Visual Studio, right-click your project and select the option to edit the .csproj file. These options are in a XML format and the following needs to be added:
<PropertyGroup>
   <TypeScriptCompileBlocked>true</TypeScriptCompileBlocked>
</PropertyGroup>

If you still want MSBuild to handle your TypeScript compilation there are several options that will change the behavior: 

Reference

https://www.typescriptlang.org/docs/handbook/compiler-options-in-msbuild.html

Bringing Code Cleanup on Save To Visual Studio 2022 

evelopers can now perform Code Cleanup automatically when a file is being saved! Code Cleanup automatically on Save is a new feature integrated into Visual Studio 2022 that can clean up your code file to make sure it is formatted correctly and that your coding style preferences are applied. Some customizable preferences include: format document, sort usings, remove unnecessary usings, and more. This feature can help minimize stylistic violations within PRs and more to allow developers to spend less time fixing code not meeting specific standards and more time doing what they do best.

How to enable Code Cleanup on Save

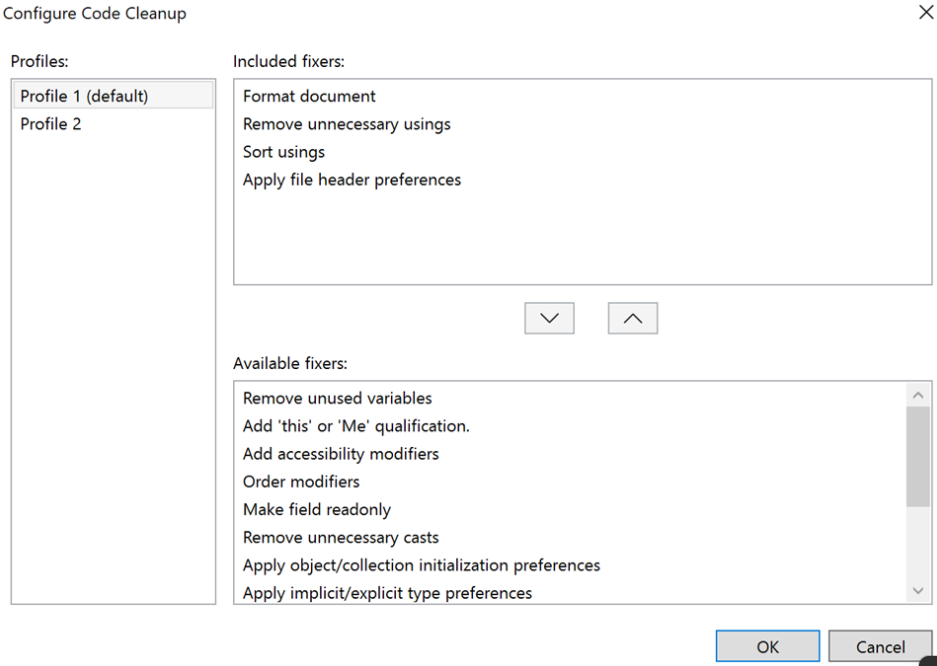
First, navigate to Analyze > Code Cleanup > Configure Code Cleanup to personalize desirable customizations to your code cleanup profile(s).

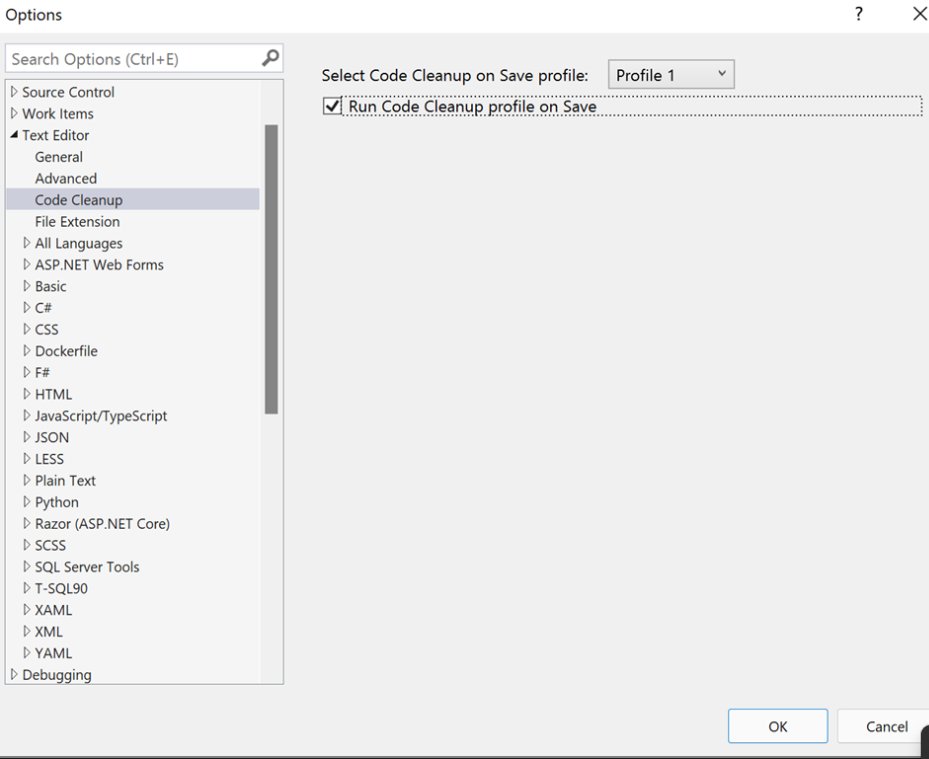
Next, navigate to Tools > Options > Text Editor > Code Cleanup. Add a check in the “Run Code Cleanup profile on Save”. Be sure to select the appropriate profile you want to execute automatically whenever you save!

Try it out and share your feedback!

We would love to get your feedback on Code Cleanup on Save so please give it a try and let us know what you think! You can share any feedback via Developer Community to help us make Visual Studio better for you!

Development-time IIS support in Visual Studio for ASP.NET Core

Prerequisites

  • Visual Studio for Windows
  • ASP.NET and web development workload
  • .NET Core cross-platform development workload
  • X.509 security certificate (for HTTPS support)

Enable IIS

  1. In Windows, navigate to Control Panel > Programs > Programs and Features > Turn Windows features on or off (left side of the screen).
  2. Select the Internet Information Services checkbox. Select OK.

The IIS installation may require a system restart.

Configure IIS

IIS must have a website configured with the following:

  • Host name: Typically, the Default Web Site is used with a Host name of localhost. However, any valid IIS website with a unique host name works.
  • Site Binding
    • For apps that require HTTPS, create a binding to port 443 with a certificate. Typically, the IIS Express Development Certificate is used, but any valid certificate works.
    • For apps that use HTTP, confirm the existence of a binding to port 80 or create a binding to port 80 for a new site.
    • Use a single binding for either HTTP or HTTPS. Binding to both HTTP and HTTPS ports simultaneously isn’t supported.

Read more here

Download .NET Core Windows Server Hosting bundle

Self-Signed Certificate Error when installing jQuery Types for Typescript

If you are trying to use this command in Visual Studio 2022;

npm install --save-dev @types/jquery

and hit by self-signed certificate error in certificate chain. Try to use this command in a Terminal window on the root of Presentation project;

npm set strict-ssl false
npm install --save-dev @types/jquery
npm install --save-dev @types/jqueryui

This will create Package-lock.json file with the following content;

{
  "requires": true,
  "lockfileVersion": 1,
  "dependencies": {
    "@types/jquery": {
      "version": "3.5.20",
      "resolved": "https://registry.npmjs.org/@types/jquery/-/jquery-3.5.20.tgz",
      "requires": {
        "@types/sizzle": "*"
      }
    },
    "@types/jqueryui": {
      "version": "1.12.18",
      "resolved": "https://registry.npmjs.org/@types/jqueryui/-/jqueryui-1.12.18.tgz",
      "dev": true,
      "requires": {
        "@types/jquery": "*"
      }
    },
    "@types/sizzle": {
      "version": "2.3.4",
      "resolved": "https://registry.npmjs.org/@types/sizzle/-/sizzle-2.3.4.tgz"
    }
  }
}

Start typing $ and you will immediately start seeing jQuery methods. Now, You can use Typescript with jQuery and jQuery UI.