We are going to learn how to pass data in ASP.NET Core using Model binding for HTTP GET request. The GET method is generally used for less complex and non-sensitive data transfer.
The model binding refers to converting the HTTP request data (from the query string or form collection) to an action methods parameter. These parameters can be of primitive type or complex type.
We will be using Visual Studio 2022 for this test. We are going to use following modal in this exercise;
    public class Project
    {
        public int Id { get; set; }

        public ProjectIdentity? ProjectIdentity { get; set; }
    }

    public class ProjectIdentity
    {
        public int Id { get; set; }

        public int ModificationId { get; set; }
    }
First test case – Primitive Type
The HTTP GET request embeds data into a query string. MVC framework automatically converts a query string to the action method parameters provided their names are matching.
For example;
Create a new project using MVC template in Visual Studio. Don’t make any changes to the default; Make sure jQuery works. Add following to index.cshtml page;
@section scripts {
    <script type="text/javascript">
    var sample;

    $(function () {
        console.log("ready!");
    });
    }
    </script>
}
Run the project. You should be seeing “ready!” in browser console window. We are ready to do our Get Tests now using jQuery Ajax.
Add an HTML button with onclick event;
<div><button type="button" class="btn btn-primary" onclick="sample.OnButtonClick();">Get Request</button></div>Create Sample class with onclick event and an instance of Sample class in jQuery ready function;
class Sample
 {
     constructor() { }

     OnButtonClick()
     {
             $.ajax({
                 type: 'GET',
                 url: "@Url.Action("GetInfoPrimitive", "Home")",
                 dataType: 'json',
                 contentType: 'application/json',
                 data: {"ProjectId":"1"},

                 success: function (result) {
                     alert('Data submitted.');
                     console.log(result);
                 },
                 failure: function (result) {
                     alert("Something went wrong. Plese contact System Administrator.");
                     console.log(result);
                 }
             });
     }
 }
Our complete jQuery function would look like this;
@section scripts {
    <script type="text/javascript">
    var sample;

    $(function () {
        console.log("ready!");
        sample = new Sample();
    });

    class Sample
    {
        constructor() { }

        OnButtonClick()
        {
                $.ajax({
                    type: 'GET',
                    url: "@Url.Action("GetInfoPrimitive", "Home")",
                    dataType: 'json',
                    contentType: 'application/json',
                    data: {"ProjectId":"1"},

                    success: function (result) {
                        alert('Data submitted.');
                        console.log(result);
                    },
                    failure: function (result) {
                        alert("Something went wrong. Plese contact System Administrator.");
                        console.log(result);
                    }
                });
        }
    }
    </script>
}
We need to create a method on server side that will be called by Ajax method;
[HttpGet]
        public int GetInfoPrimitive(int projectId)
        {
            Console.WriteLine($"Incoming parameter value: {JsonSerializer.Serialize(projectId)}");
            return projectId;
        }
Put a breakpoint on “return projectId” line. Run the app and click on Get Request button.

The debugger should stop on “return projectId” statement and console results would be like this;

Click continue to resume the application. There is no problem with this method.
Second test case – Binding to Complex Type
Model binding also works on complex types. It will automatically convert the input fields data on the view to the properties of a complex type parameter of an action method in HttpGet request if the properties’ names match with the fields on the view.
For example;
The only change in earlier example code is that we are going to pass an object to the view and would use that object to submit Get request;
        public IActionResult Index()
        {
            var request = new ProjectIdentity();
            return View(request);
        }
       [HttpGet]
       public ProjectIdentity GetInfoComplex(ProjectIdentity request)
       {
           Console.WriteLine($"Incoming parameter value: {JsonSerializer.Serialize(request)}");
           return request;
       }
This is the change on Javascript side;
OnButtonClick()
 {
         $.ajax({
             type: 'GET',
             url: "@Url.Action("GetInfoComplex", "Home")",
             dataType: 'json',
             contentType: 'application/json',
             data: {"Id":"1", "ModificationId": "100"},

             success: function (result) {
                 alert('Data submitted.');
                 console.log(result);
             },
             failure: function (result) {
                 alert("Something went wrong. Plese contact System Administrator.");
                 console.log(result);
             }
         });
 }
Put a breakpoint on “return request;” and run the app. Here is the output;

Third test case – Binding to nested Complex Type
Let’s add a nested class inside parent class and run the same method;
//here is the problem. GET request will ignore nested object mapping
        [HttpGet]
        public Project GetInfo(Project request)
        {
            Console.WriteLine($"Incoming parameter value: {JsonSerializer.Serialize(request)}");
            return request;
        }
Change on client side;
OnButtonClick()
       {
               $.ajax({
                   type: 'GET',
                   url: "@Url.Action("GetInfo", "Home")",
                   dataType: 'json',
                   contentType: 'application/json',
                   data: { "Id": "1", "ProjectIdentity": { "Id": "11", "ModificationId": "100" } },

                   success: function (result) {
                       alert('Data submitted.');
                       console.log(result);
                   },
                   failure: function (result) {
                       alert("Something went wrong. Plese contact System Administrator.");
                       console.log(result);
                   }
               });
       }
The output would be;

So how we can fix this problem in GET request? Auto mapping will not work and in this case we need to be implicit to map the properties. Here is how;
       //this is how to solve for GET request
       [HttpGet]
       public Project GetInfoFixed(
               [FromQuery(Name = "Id")] int ProjectId,
               [FromQuery(Name = "ProjectIdentity[Id]")] int ProjectIdentityId,
               [FromQuery(Name = "ProjectIdentity[ModificationId]")] int? ProjectModificationId)
       {
           var response = new Project() { Id = ProjectId, ProjectIdentity = new ProjectIdentity() { Id = ProjectIdentityId, ModificationId = ProjectModificationId.Value } };
           Console.WriteLine($"Incoming parameter value: {JsonSerializer.Serialize(response)}");
           return response;
       }
Client side change;
OnButtonClick()
        {
                $.ajax({
                    type: 'GET',
                    url: "@Url.Action("GetInfoFixed", "Home")",
                    dataType: 'json',
                    contentType: 'application/json',
                    data: { "Id": "1", "ProjectIdentity": { "Id": "11", "ModificationId": "100" } },

                    success: function (result) {
                        alert('Data submitted.');
                        console.log(result);
                    },
                    failure: function (result) {
                        alert("Something went wrong. Plese contact System Administrator.");
                        console.log(result);
                    }
                });
        }
Here is the result;

We are able to create full object graph this time.
Conclusion
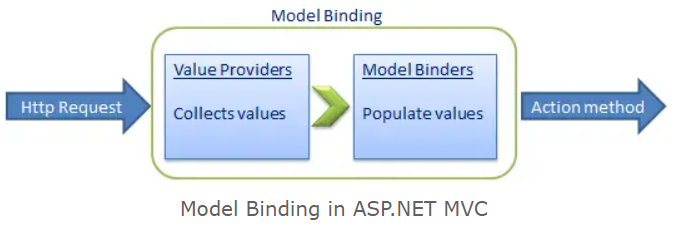
As you have seen, that the ASP.NET MVC framework automatically converts request values into a primitive or complex type object. Model binding is a two-step process. First, it collects values from the incoming HTTP request, and second, it populates primitive type or a complex type with these values.
Value providers are responsible for collecting values from requests, and Model Binders are responsible for populating values.
By default, the HTTP methods GET, HEAD, OPTIONS, and DELETE do not bind data implicitly from the request body. To bind data explicitly from the request body, marked as JSON, for these methods, we can use the [FromBody] attribute. Also, we can use the [FromQuery] attribute.
Use POST for destructive actions such as creation (I’m aware of the irony), editing, and deletion, because you can’t hit a POST action in the address bar of your browser. Use GET when it’s safe to allow a person to call an action. So a URL like:
http://myblog.org/admin/posts/delete/357
Should bring you to a confirmation page, rather than simply deleting the item. It’s far easier to avoid accidents this way.
Resources
https://learn.microsoft.com/en-us/aspnet/core/mvc/models/model-binding?view=aspnetcore-7.0#simp7