public class EnumModel
{
    public int Value { get; set; }
    public string Name { get; set; }
}

public enum MyEnum
{
    Name1=1,
    Name2=2,
    Name3=3
}

public class Test
{
        List<EnumModel> enums = ((MyEnum[])Enum.GetValues(typeof(MyEnum))).Select(c => new EnumModel() { Value = (int)c, Name = c.ToString() }).ToList();

        // A list of Names only, does away with the need of EnumModel
        List<string> MyNames = ((MyEnum[])Enum.GetValues(typeof(MyEnum))).Select(c => c.ToString()).ToList();

        // A list of Values only, does away with the need of EnumModel
        List<int> myValues = ((MyEnum[])Enum.GetValues(typeof(MyEnum))).Select(c => (int)c).ToList();

        // A dictionnary of <string,int>
        Dictionary<string,int> myDic = ((MyEnum[])Enum.GetValues(typeof(MyEnum))).ToDictionary(k => k.ToString(), v => (int)v);
}
EditForm comes with built-in anti-forgery token support. Blazor automatically secures the EditForm instances, saving you the hassle of explicitly handling CSRF protection.
Blazor WebAssembly apps run entirely in the browser and do not have a server-side processing pipeline where you would typically configure a middleware such as app.UseAntiforgery(). If your Blazor WebAssembly app interacts with server-side APIs, you should manage anti-forgery at the API level. However, if you already use token-based authentication to secure communication, anti-forgery tokens are generally not necessary. Token-based authentication, by its nature, mitigates the risks associated with CSRF, making additional anti-forgery tokens redundant.
Delegating handlers are like ASP.NET Core middleware. Except they work with the HttpClient. The ASP.NET Core request pipeline allows you to introduce custom behavior with middleware. You can solve many cross-cutting concerns using middleware — logging, tracing, validation, authentication, authorization, etc.
But, an important aspect here is that middleware works with incoming HTTP requests to your API. Delegating handlers work with outgoing requests.
This JSON is basically a serialization of our entity, with some built-in conventions such as;
CamelCase instead of PascalCase: We got levelName instead of LevelName and son, meaning that all our PascalCase .NET class names and properties will be automatically converted into camelCase when they are serialized to JSO,
No indentation and no line feed / carriage return (LF/CR): Everything is stacked within a single line of text.
These conventions are the default options set by .NET core when dealing with JSON outputs.
To change the default behavior for readability and no PascalCase to CamelCase switching, add these to Program.cs file;
builder.Services.AddControllersWithViews()
    .AddJsonOptions(options =>
    {
        // set this option to TRUE to indent hte JSON output
        options.JsonSerializerOptions.WriteIndented = true;
        // set this option to NULL to use PascalCase instead of camelCase (default)
        options.JsonSerializerOptions.PropertyNamingPolicy = null;
    });
Let’s get our hands in some code. This web app will act as a monitoring and reporting service that will check the health status of a target server.
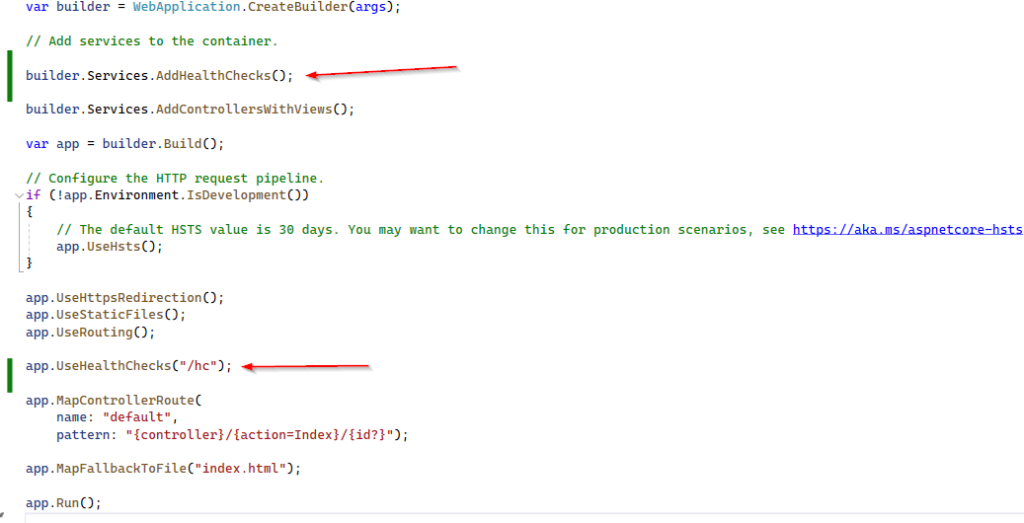
We are going to use Micorosft.AspNetCore.Diagnositcs.HealthChecks package, a built-in feature of the .NET Core framework. This package is meant to be used to allow a monitoring service to check the status of another running service.
Add app.UseHalthChecks middleware in Program.cs file;
This middleware will create a server-side route for the health checks. Note that we have added this middleware before Endpoints so that this new route won’t be overriden by the general-purpose Controller route pattern.
Keep in mind, when we run application it uses two ports; one for server side and second one for angular side (in our case it’s 7031). For angular it creates a proxy and re-direct users there (in this case 44488).
If we run our application, we can see our system is healthy.
The system is healthy because we haven’t defined any checks yet.
Let’s add an Internet Control Message Protocol (ICMP) AKA Ping. PING request is a basic way to check the presence and therefore availability, of a server that we know we should be able to reach within a LAN / WAN connection.
In a nutshell, it works in following way; the machine that performs the PING sends one or more ICMP echo request packets to the target host and waits for a reply; if it receives it, it reports the round-trip time of the whole task; otherwise, it time outs and reports a “host not reachable” error.
The “host not reachable” error can be due to a number of possible reasons;
The target host is not available
The target host is available, but actively refuses TCP/IP connections of any kind
The target host is available and accepts TCP/IP incoming conections, but it has been configured to explicitly refuse ICMP requests and/or not send ICMP echo replies back.
The target host is available and properly configured to accept ICMP requests and send echo replies back, but the connection is very slow or hindered by unknown reasons (performance, heavy load etc), so the round-trip time takes too long, or even times out.
So what could be the possible outcomes of our implementation;
Healthy: We can consider the host Healthy whenever the PING succeeded with no errors and timeouts.
Degraded: We can consider the host Degraded whenever the PING succeeded, but the round-trip takes too long.
Unhealthy: We can consider the host Unhealthy whenever the PING failed, that is, the check times out before any reply.
    public class PingHealthCheck : IHealthCheck
    {
        private string Host = "www.does-not-exist.com";
        private int Timeout = 300;

        public async Task<HealthCheckResult> CheckHealthAsync(HealthCheckContext context, CancellationToken cancellationToken = default)
        {
            try
            {
                using (var ping = new Ping())
                {
                    var reply = await ping.SendPingAsync(Host);
                    switch (reply.Status)
                    {
                        case IPStatus.Success:
                            return (reply.RoundtripTime > Timeout) ? HealthCheckResult.Degraded() : HealthCheckResult.Healthy();
                        default:
                            return HealthCheckResult.Unhealthy();
                    }
                }
            }
            catch (Exception ex)
            {
                return HealthCheckResult.Unhealthy();
            }
        }
    }
Add PingHealthCheck to the pipeline by modifying Program.cs file;
So we are getting a response. that’s great, it works. Three are 3 major flaws;
Hardcoded values: The Host and the Timeout variables should be passed as parameters
Uninformative response: Healthy and Unhealthy are not that great, we should create a better output message
Untyped output: The current response is being sent in plain text, if we want to fetch it with Angular, a JSON content-type be better.
    public class PingHealthCheck : IHealthCheck
    {
        private string Host { get; set; }
        private int Timeout { get; set; }

        public PingHealthCheck(string host, int timeout)
        {
            Host = host;
            Timeout = timeout;
        }

        public async Task<HealthCheckResult> CheckHealthAsync(HealthCheckContext context, CancellationToken cancellationToken = default)
        {
            try
            {
                using (var ping = new Ping())
                {
                    var reply = await ping.SendPingAsync(Host);
                    switch (reply.Status)
                    {
                        case IPStatus.Success:
                            var msg = $"ICMP to {Host} took {reply.RoundtripTime} ms.";
                            return (reply.RoundtripTime > Timeout) ? HealthCheckResult.Degraded(msg) : HealthCheckResult.Healthy(msg);
                        default:
                            var err = $"ICMP to {Host} failed: {reply.Status}";
                            return HealthCheckResult.Unhealthy(err);
                    }
                }
            }
            catch (Exception ex)
            {
                var err = $"ICMP to {Host} failed: {ex.Message}";
                return HealthCheckResult.Unhealthy(err);
            }
        }
    }
Update middleware in Program.cs file so that we can call it programmatically;
builder.Services.AddHealthChecks()
    .AddCheck("PING_01", new PingHealthCheck("www.msn.com", 100))
    .AddCheck("PING_02", new PingHealthCheck("www.google.com", 100))
    .AddCheck("PING_03", new PingHealthCheck("www.does-not-exist.com", 100));
The reason is obvious, if one of them failed the whole stack will be failed. The last one in our example is failure. We can avoid this sum behavior by implementing the resolution of third flaw (as mentioned before): JSON-structured output message.
Add a new class in project root, CustomHealthCheckOptions;
    public class CustomHealthCheckOptions : HealthCheckOptions
    {
        public CustomHealthCheckOptions() : base()
        {
            var jsonSerializerOptions = new JsonSerializerOptions()
            {
                WriteIndented = true
            };

            ResponseWriter = async (c, r) =>
            {
                c.Response.ContentType = MediaTypeNames.Application.Json;
                c.Response.StatusCode = StatusCodes.Status200OK;

                var result = JsonSerializer.Serialize(new
                {
                    checks = r.Entries.Select(e => new
                    {
                        name = e.Key,
                        responseTime = e.Value.Duration.TotalMilliseconds,
                        status = e.Value.Status.ToString(),
                        description = e.Value.Description
                    }),
                    totalStatus = r.Status,
                    totalResponseTime = r.TotalDuration.TotalMilliseconds,
                }, jsonSerializerOptions);

                await c.Response.WriteAsync(result);
            };
        }
    }
Modify Program.cs file;
app.UseHealthChecks("/hc", new CustomHealthCheckOptions());
Run the application and here is expected output;
{
  "checks": [
    {
      "name": "PING_01",
      "responseTime": 78.6889,
      "status": "Healthy",
      "description": "ICMP to www.msn.com took 12 ms."
    },
    {
      "name": "PING_02",
      "responseTime": 62.3402,
      "status": "Healthy",
      "description": "ICMP to www.google.com took 14 ms."
    },
    {
      "name": "PING_03",
      "responseTime": 144.9184,
      "status": "Unhealthy",
      "description": "ICMP to www.does-not-exist.com failed: An exception occurred during a Ping request."
    }
  ],
  "totalStatus": 0,
  "totalResponseTime": 181.1726
}
Each and every check is properly documented, as well as the total outcome data, in a structured JSON object. This is just what we need to feed some Angular Components.