static void CopyObject(SampleClass original)
{
    if (original == null)
    {
        throw new System.ArgumentException("Parameter cannot be null", "original");
    }
}
This is how we can throw an exception in SQL;
BEGIN TRY
	SET NOCOUNT ON;

	SELECT 1/0;

END TRY
BEGIN CATCH
    --SELECT
    --    ERROR_NUMBER() AS ErrorNumber
    --    ,ERROR_SEVERITY() AS ErrorSeverity
    --    ,ERROR_STATE() AS ErrorState
    --    ,ERROR_PROCEDURE() AS ErrorProcedure
    --    ,ERROR_LINE() AS ErrorLine
    --    ,ERROR_MESSAGE() AS ErrorMessage;
    THROW;
END CATCH;
If you don’t want to throw exception, comment “THROW” keyword. This will stop propagating exception to calling method and “catch(SqlException ex)” block will never be able to see it.
Uncomment all other lines. You have to use data reader to get result back and handle exception manually.
Using SmtpClient to send email .NET core is obsolete. The current recommendation is to use the MailKit library . Here is how to use it with the office 365 SMTP servers.
var message = new MimeMessage();
message.From.Add(new MailboxAddress("{from name}", "{from email address}"));
message.To.Add(new MailboxAddress("{to name}", "{to email address}"));
message.Subject = "{subject}";

message.Body = new TextPart("plain")
{
    Text = "{body}"
};

using (var client = new SmtpClient())
{
    await client.ConnectAsync("smtp.office365.com", 587, SecureSocketOptions.StartTls);
    await client.AuthenticateAsync("{from email address}", "{from password}");
    await client.SendAsync(message);
    await client.DisconnectAsync(true);
}
I am assuming that you already have an Excel file with one “Sheet1” data table in it. Microsoft ACE driver is already installed;
Standard syntax to query Excel table is “SELECT * FROM [Sheet1$]”. Here is the code that does the magic.
// Connect EXCEL sheet with OLEDB using connection string
 using (OleDbConnection conn = new OleDbConnection(connectionString))
    {
        conn.Open();
        OleDbDataAdapter objDA = new System.Data.OleDb.OleDbDataAdapter
        ("select * from [Sheet1$]", conn);
        DataSet excelDataSet = new DataSet();
        objDA.Fill(excelDataSet);
        dataGridView1.DataSource = excelDataSet.Tables[0];
    }

	//In above code '[Sheet1$]' is the first sheet name with '$' as default selector,
        // with the help of data adaptor we can load records in dataset

	//write data in EXCEL sheet (Insert data)
 using (OleDbConnection conn = new OleDbConnection(connectionString))
    {
        try
        {
            conn.Open();
            OleDbCommand cmd = new OleDbCommand();
            cmd.Connection = conn;
            cmd.CommandText = @"Insert into [Sheet1$] (month,mango,apple,orange)
            VALUES ('DEC','40','60','80');";
            cmd.ExecuteNonQuery();
        }
        catch (Exception ex)
        {
            //exception here
        }
        finally
        {
             conn.Close();
             conn.Dispose();
        }
    }

//update data in EXCEL sheet (update data)
using (OleDbConnection conn = new OleDbConnection(connectionString))
	{
        try
        {
            conn.Open();
            OleDbCommand cmd = new OleDbCommand();
            cmd.Connection = conn;
            cmd.CommandText = "UPDATE [Sheet1$] SET month = 'DEC' WHERE apple = 74;";
            cmd.ExecuteNonQuery();
        }
        catch (Exception ex)
        {
            //exception here
        }
        finally
        {
            conn.Close();
            conn.Dispose();
        }
    }
$ in select statement means that table already exists in Excel File. If we are going to create a new worksheet then we will not use $ sign. OLEDB does not support DELETE query.
How to keep a separation between domain models and view models and let them exchange data in an easier and simple way? We write code that allows us to map domain model into view model. As we add more views and domain models, we end up writing more mappers. We write mappers to map domain transfer objects from database layer into domain objects.
This practice is repetitive. AutoMapper solve this problem. It’s a convention-based object-to-object mappers.
We are going to use these NuGet packages for ASP.NET Core 2.1;
For ASP.NET Core V2.1, we will need at least V3..0.1 of AutoMapper.Extensions.Microsoft.DependencyInjection. This package will install AutoMapper package automatically.
Configure AutoMapper in Startup.cs class under ConfigureServices method;
The above single line works fine but If we want to explicit in configuration, the alternative is;
var mapperConfig = new MapperConfiguration(mc =>
{
    mc.AddProfile(new MappingProfile());
});
IMapper mapper = mapperConfig.CreateMapper();
services.AddSingleton(mapper);
services.AddMvc().SetCompatibilityVersion(CompatibilityVersion.Version_2_1);
AutoMapper in Action
Create a user model in Model folder.
public class User
{
  public User(int id, string firstName, string lastName, string emailAddress)
  {
            Id = id;
            FirstName = firstName;
            LastName = lastName;
            EmailAddress = emailAddress;
  }

        public int Id { get; }
        public string FirstName { get; }
        public string LastName { get; }
        public string EmailAddress { get; }
}
Create a view model in Model folder that will be used to display User data.
public class UserViewModel

{
        public int Id { get; set; }
        public string FirstName { get; set; }
        public string LastName { get; set; }
        public string EmailAddress { get; set; }
 }
We need to tell AutoMapper to map from User Model to User View Model. For that we will use Profile. Profiles in AutoMapper are a way of organizing mapping collections. To create Profile, We create a new class and inherit from Profile. This class will hold mapping configuration of new classes.
public class MappingProfile : Profile
{
        public MappingProfile()
        {
            CreateMap<User, UserViewModel>();
            CreateMap<UserViewModel, User>();
        }
}
The same profile can be created like this;
public class MappingProfile : Profile
{
        public MappingProfile()
        {
            CreateMap<User, UserViewModel>().ReverseMap();
        }
}
We now have a MappingProfile class that creates the mapping between our User Model and User ViewModel. But how does AutoMapper know about our UserProfile class? Well, towards the start of this example we added this line of code to our ConfigureServices method in Startup.cs:
services.AddAutoMapper();
When our application starts up and adds AutoMapper, AutoMapper will scan our assembly and look for classes that inherit from Profile, then load their mapping configurations. I also have an alternative explicit implementation in startup class if you prefer.
Let’s create a new UserController in the Controllers folder and inject the IMapper interface into the constructor:
public class UserController : Controller
{
        private readonly IMapper _mapper;
        public UserController(IMapper mapper)
        {
            _mapper = mapper;
        }

        public IActionResult Index()
        {
            return View();
        }
}
As with Profiles, by calling AddAutoMapper in our Startup.csConfigureServices method, it’s taken care of registering IMapper for us. In Index Action method, let’s create a User object and use IMapper interface to call the Map method:
We give the Map method the type we want to map to and the object we would like to map from:
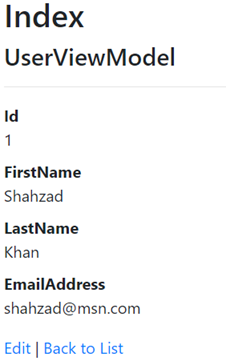
public IActionResult Index()
{
            var user = new User(1, "Shahzad", "Khan", "shahzad@msn.com");
            UserViewModel viewModel = _mapper.Map<UserViewModel>(user);
            return View(viewModel);
}
We just scratched the surface of what AutoMapper has to offer in terms of mapping objects from one to another.
Summary
First, you need both a source and destination type to work with. The destination type’s design can be influenced by the layer in which it lives, but AutoMapper works best as long as the names of the members match up to the source type’s members. If you have a source member called “FirstName”, this will automatically be mapped to a destination member with the name “FirstName”. AutoMapper also supports Flattening, which can get rid of all those pesky null reference exceptions you might encounter along the way.
Once you have your types, and a reference to AutoMapper, you can create a map for the two types.
CreateMap<User, UserViewModel>().ReverseMap();
The type on the left is the source type, and the type on the right is the destination type. To perform a mapping, use the Map method.
var userEntity = await _unitOfWork.GetAllUsersAsync();
List<UserViewModel> vm = Mapper.Map<List<UserViewModel>>(userEntity.Result);