Builder Design Pattern allows us to separate the construction of a complex object from its representation so that we can use the same construction code to produce different types and representations of an object. It is used to construct a complex object step by step and return the complete object after the final step.
Create an ASP.NET Core MVC Web Application and inside Models folder create the following Product class.
public class Product
{
    public int Id { get; set; }
    public string Name { get; set; }
    public decimal Price { get; set; }
}
Create the folder Services and add an interface IProductService with a single GetProducts method.
public interface IProductService
{
    List<Product> GetProducts();
}
Next, create a class with the name AmazonProductService and Implement IProductService interface on this class. For this tutorial, I am not using any backend repository or service to load products from the database so to keep things simple, Let’s just return some hard-coded products from the GetProducts method as follows:
public class AmazonProductService : IProductService
{
public List<Product> GetProducts()
{
return new List<Product>()
{
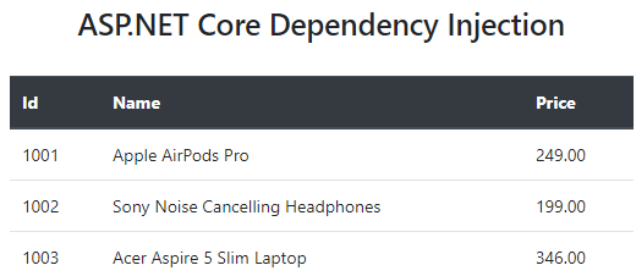
new Product() { Id = 1001, Name = "Apple AirPods Pro", Price = 249.00m },
new Product() { Id = 1002, Name = "Sony Noise Cancelling Headphones", Price = 199.00m },
new Product() { Id = 1003, Name = "Acer Aspire 5 Slim Laptop", Price = 346.00m }
};
}
}
Next, we need to register our service in Startup class as follows:
public class Startup
{
    public void ConfigureServices(IServiceCollection services)
    {
        services.AddTransient<IProductService, AmazonProductService>();
    }
}
Next, we need to inject our service into the controller. We can inject services inside the constructor of the controller as shown below:
public class HomeController : Controller
{
    private readonly IProductService _productService;
    public HomeController(IProductService productService)
    {
        _productService = productService;
    }
    public IActionResult Index()
    {
        var products = _productService.GetProducts();
        return View(products);
    }
}
Finally, we can display products in our Index.cshtml razor view file as follows:
Run the application and you should be able to see all the products returned from AmazonProductService. This is because at runtime when our Home Controller has requested the instance of the class implementing IProductService, the dependency injection framework resolved it to the AmazonProductService registered in Startup.cs class.
Let’s say your application requirements change and you suddenly decided that the products should load from Ebay instead of Amazon. You can create another class EbayProductService that is implementing the same IProductService interface and has its own implementation of GetProducts method.
public class EbayProductService : IProductService
{
public List<Product> GetProducts()
{
return new List<Product>()
{
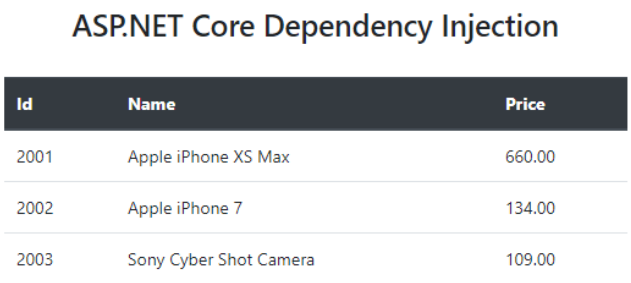
new Product() { Id = 2001, Name = "Apple iPhone XS Max", Price = 660.00m },
new Product() { Id = 2002, Name = "Apple iPhone 7", Price = 134.00m },
new Product() { Id = 2003, Name = "Sony Cyber Shot Camera", Price = 109.00m }
};
}
}
You don’t have to change a single line of code in your application. You just have to register EbayProductService in Startup.cs file and you are done.
public class Startup
{
    public void ConfigureServices(IServiceCollection services)
    {
        services.AddTransient<IProductService, EbayProductService>();
    }
}
Controllers and Views that have a dependency on IProductService will automatically start displaying Ebay Products instead of Amazon products.
Dynamically Register Services in DI Container
Let’s say you are in a situation where you want to use two different services based on the environment. You want to test Amazon service when you are in the development environment but you want to use Ebay service in the production environment. You can easily achieve this by injecting the IWebHostEnvironment inside the constructor of Startup class and then you can register services dynamically as shown below.
public class Startup
{
    private IWebHostEnvironment _env;

    public Startup(IWebHostEnvironment env)
    {
        _env = env;
    }

    public void ConfigureServices(IServiceCollection services)
    {
        if (_env.IsProduction())
        {
            services.AddTransient<IProductService, EbayProductService>();
        }
        else
        {
            services.AddTransient<IProductService, AmazonProductService>();
        }
    }
}
Reference
This article has good explanation of dependency injection in general.
public class UGroupVM
{
    public string? Key { get; set; }
    public string? IsMember { get; set; }
}
We will user JSON Deserialization to get group object (try to use IList or List otherwise deserialization will fail because json is formatted as key/value pair);
var userGroup = JsonSerializer.Deserialize<List<UserGroupVM>>(groupObject);
For Newtonsoft, this is the syntax
var userAdGroup =
 JsonConvert.DeserializeObject<List<UserGroupVM>>(groupObject);
Windows 98 had some tricks using ALT+some integer to add invisible characters. These are normally called Control Characters.
The control characters U+0000–U+001F and U+007F come from ASCII. Additionally, U+0080–U+009F were used in conjunction with ISO 8859 character sets (among others). They are specified in ISO 6429 and often referred to as C0 and C1 control codes respectively. Most of these characters play no explicit role in Unicode text handling. The characters U+0000 , U+0009 (HT), U+000A (LF), U+000D (CR), and U+0085 (CR+LF) are commonly used in text processing as formatting characters.
This is how we can identify and remove them in a string;
string input; // this is your input string
string output = new string(input.Where(c => !char.IsControl(c)).ToArray());
Console.write(output.Trim());
For testing,
Excel can be used.
Click on the Cell where you want to add character. Click Insert -> Symbols;
Select “Basic Latin” in Subset and add empty space;
This will add a special character in selected cell before or after the value depending on the position.
Notepad++ is another alternative and can be used to add special characters in a string.
Go to Edit > Character Panel to show the ASCII Insertion Panel.
Put the cursor where you want to insert the character.
Double-click the character (in the Character column) to insert.
For more info on NotePad++ special character handling, click here.