A common use of a bootable USB flash drive is to use it to boot into Windows. Booting from removable media such as a USB drive allows you to perform diagnostics on a computer that is having trouble booting from the hard drive. You can also use the flash drive to install Windows, instead of using the Windows installation CD.
Windows vista and Windows 7 steps are applicable to Windows 10
This guide will outline making a bootable USB flash drive with Windows XP, Vista, or 7. Before we begin, it is important to note that the computer you want to use your bootable USB drive must be able to use a USB drive as a boot device. Most computers built since Windows Vista was released are capable of booting to a USB device. Prior to the Windows Vista time frame, it’s hit or miss with motherboards.
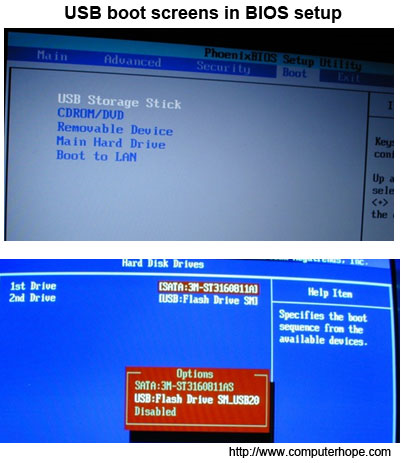
To determine if a computer is capable of booting to a USB device, access the computer’s BIOS and check the bootable device list. If a USB device is listed, set the USB drive to be the first boot device. If you do not see a USB device in the list of bootable devices, your BIOS is not capable of booting to a USB device.
Note: You may need to have your USB flash drive plugged in when you access the BIOS).
To make a bootable USB drive for Windows Vista or Windows 7, you need to have Windows Vista or 7 installed on your computer. It is recommended that you have a flash drive of at least 4 GB in size, to store all the necessary files.
Tip: Before you start, plug in the USB drive and backup any files you have stored on the USB drive. The drive will be formatted during this process and all files on it will be deleted.
Note: You need to have a Windows Vista or Windows 7 DVD for these instructions to be successful.
1. Open an elevated Windows command line window by clicking Start, typing in cmd in the search text field, then pressing CTRL + Shift + Enter on your keyboard (at the same time). You can also access this by navigating to Start, All Programs, Accessories, right-click with your mouse on the Command Prompt menu item and select Run as Administrator.
2. At the command prompt, type cd c:\windows\system32 to change the directory to the Windows system32 directory. Ensure your USB drive is plugged in, type DISKPART, then press Enter. Type LIST DISK and press Enter.
See our diskpart command page for additional information on this command.
3. You will see a listing of the disk drives connected to your computer. Find the disk number of your USB drive and type SELECT DISK [USB disk #], where “[USB disk #]” is the disk # for your USB drive. It should now state that your USB drive is the selected disk. If you’re not sure what disk is the USB disk, eject the USB drive, perform step number 2 again, connect the USB drive again, and compare the results. Usually the USB drive will be the last drive.
4. Type in the following commands, one by one, pressing Enter after each command.
CLEAN
CREATE PARTITION PRIMARY
SELECT PARTITION 1
ACTIVE
FORMAT FS=NTFS (may take a couple minutes, depending on the USB drive size)
ASSIGN
EXIT
Keep the command prompt window open, but you can minimize it for a little bit.
5. You will now need your Windows Vista or 7 Installation DVD. Put the DVD in your computer’s DVD drive. Open up My Computer and note which drive letter is assigned to your DVD Drive and your USB flash drive.
6. Go back to the command prompt window and type in D: CD BOOT (substitute your DVD drive letter for “D:”, if necessary) and press Enter. Type CD BOOT again and press Enter. Lastly, type BOOTSECT.EXE /NT60 H: (substitute your USB flash drive letter for “H:”, if necessary) and press Enter.
7. The last step is to copy the entire contents of the Windows DVD to your USB flash drive. To do this, in the My Computer window (opened in step 5 above), right-click on the DVD drive and select Open to view the contents of the DVD. Copy all the files and folders on the DVD to the USB flash drive.
Your USB flash drive is now set up to be a bootable USB drive for Windows Vista or 7.
Windows XP users
To make the bootable USB drive for Windows XP, it is recommended that you have a flash drive of at least 4 GB in size, to store all the necessary files. You also need to download Windows Server 2003 SP1 and a program called PE Builder (also known as Bart PE).
Tip: Before you start, plug in the USB drive and backup any files you have stored on the USB drive. The drive will be formatted during this process and all files on it will be deleted.
Note: You need to have a Windows XP Professional CD for these instructions to be successful. Windows XP Home Edition does not work.
1. Install PE Builder on your computer. For the sake of ease, install the program to a C:\PEBuilder folder. After you’ve installed PE Builder, create a folder titled SRSP1 in the PEBuilder folder.
2. Now you need to extract two files from Windows Server 2003 SP1. The file name is quite long, so it is recommended that you rename the file to something shorter, like WS-SP1.exe. Open a command prompt (Start > Run, type cmd and press Enter) and use the cd command to change to the folder where you downloaded the Windows Server 2003 SP1 file to (i.e. cd c:\downloads to change to the c:\downloads folder). Then, type WS-SP1.exe -x to extract the files. A window should open asking where to extract the files. You can enter the same folder where the file was downloaded.
3. A new folder titled i386 will be created by the extraction process. Type cd i386 to change to that folder. You now need to copy the setupldr.bin file to the SRSP1 folder you created in the PE Builder folder. Type copy setupldr.bin c:\PEBuilder\SRSP1 to copy the file.
4. You also need to expand the ramdisk.sys file to the SRSP1 folder. Type expand -r ramdisk.sy_ c:\PEBuilder\SRSP1
5. Open My Computer and navigate to the c:\PEBuilder\SRSP1 folder and verify the two files are there.
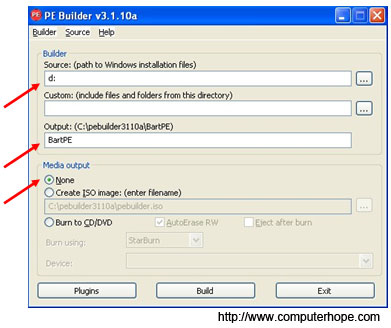
6. Next, you need to create a compressed version of Windows XP using PE Builder. Make sure the Windows XP Professional CD is in your computer’s CD drive, then launch the PE Builder program. In the Source field, type in the drive letter assigned to your CD Drive (you can check in My Computer if you are not sure) (e.g. “d:“). In the Output field, type BartPE. Make sure the None option is selected in the Media output section. Then click the Build button.
A progress report shows the progress of the bootable image build. When the build process is complete, click the Close button.
7. Now, you can create the bootable USB flash drive. Open a command prompt again and type cd c:\PEBuilder to change to the PEBuilder folder. Make sure your USB drive is plugged in to your computer and type pe2usb -f e: (change “e:” to the drive letter assigned to your USB flash drive, if necessary) to create the bootable drive. When prompted to begin the process, type YES. When the process is complete, press any key to exit the program.
Your USB flash drive is now set up to be a bootable USB drive for Windows XP using the Bart PE interface.
We can capture the screen and use a program, for example Greeshot, to open captured image.
Here are the tips to capture screen;
Print Screen
The easiest way to take a screenshot on Windows 10 is the Print Screen (PrtScn) key. To capture your entire screen, simply press PrtScn on the upper-right side of your keyboard.
The screenshot will be saved to your Clipboard.
Windows + Print Screen
To take a screenshot on Windows 10 and automatically save the file, press the Windows key + PrtScn.
Your screen will go dim and a screenshot of your entire screen will save to the Pictures > Screenshots folder.
Alt + Print Screen
To capture only the active window you’re working in and copy it to your Clipboard, press Alt + PrtScn
Snip & Sketch tool
To activate Snip & Sketch, use the keyboard shortcut Windows Key + Shift + S. Your screen will dim and a mini menu will appear at the top of your screen, giving you the option to take a rectangular, free-form, window, or full-screen capture.
Game Bar
The Game Bar is an overlay you can use within most Windows 10 apps and games to take screenshots and record video. To open the Game Bar, press Windows Key + G.
Power + Volume Up
To take a screenshot on Windows 10 with a Microsoft Surface device, press the Power Button + Volume Up Button. The screen will dim, and your screenshot will save to the Pictures > Screenshots folder.
Third-party screenshot apps for Windows
If you’re unsatisfied with any of the built-in Windows methods, there are third-party screenshot tools worth considering.;
GIFs, take full-page screenshots, and more. The downside? The premium version costs $50. There’s also a 30-day free trial, although any picture you capture during this trial will be watermarked.
Lightshot is a free screenshot tool designed for quick social sharing. When you download and install Lightshot on Windows 10, it replaces the Print Screen function and offers more editing capabilities.
Greenshot is another free tool that allows you to edit and customize screenshots, as well as the option to capture a complete scrolling web page.
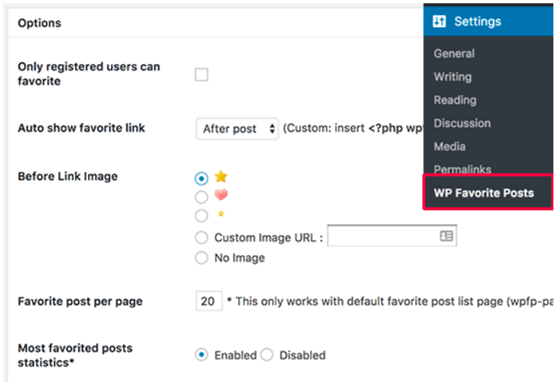
Upon activation, you need to visit Settings » WP Favorite Posts to configure plugin settings.
First option on the settings page is to enable ‘Add to favorite’ option for registered users only. You need to leave this unchecked if you want all visitors to see the ‘Add to favorite’ button.
Next, you need to choose where to show the ‘add to favorite’ link. The plugin can automatically show it before or after the post content. Advanced users can also choose custom method and use <?php wpfp_link() ?> template tag inside WordPress theme files.
Now you need to choose the image icon you want to show next to ‘Add to favorite’ link. The plugin comes with a few images that you can use. You can also upload your own image or don’t show any image at all.
After that you can choose the number of posts you would like to show on your favorite posts page. The default option is 20, you can change that if you want.
Lastly, you can enable or disable statistics. You will need to keep it enabled if you want to show most favorited posts in the sidebar widget.
Don’t forget to click on the ‘Update Options’ button to store your settings.
You can now visit any single post on your website and you will see the Add to Favorite link.
Showing Most Favorited Posts in WordPress
You may want to show your most favorited posts in your blog’s sidebar. Here is how you would do that.
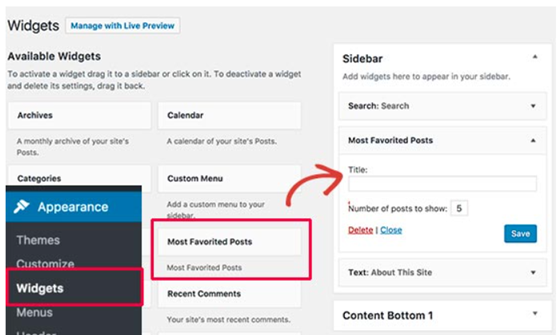
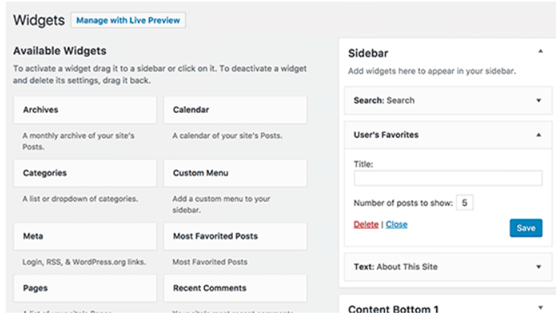
Head over to Appearance » Widgets page. Under the list of available widgets you will notice ‘Most Favorited Posts’ widget. You will need to drag and drop this widget to a sidebar. If you need help adding widget, then check out our guide on how to add and use widgets in WordPress.
You can select the number of posts you want to show in the widget. Don’t forget to click on the save button to store your widget settings.
You can now visit your website to see the most favorited posts in your blog’s sidebar.
Showing a User’s Favorite Posts in WordPress
This plugin stores favorite posts for non-registered users in cookies. For registered users, it saves their favorite posts in your WordPress database.
Here is how you can show each user their favorite posts on your site.
Head over to Appearane » Widgets page and add ‘Users Favorite Posts’ widget to a sidebar.