If you created your Microsoft 365 tenant years ago, your SharePoint URL probably looks something like this:
youroldname.sharepoint.com
The problem? That name is tied to your original .onmicrosoft.com domain — and it becomes part of every SharePoint and OneDrive URL.
If you’re building a professional business presence, especially for government or enterprise clients, you may want to rename your SharePoint tenant domain.
This guide walks through how to rename a SharePoint Online tenant using PowerShell safely and correctly.
Why Rename Your SharePoint Tenant Domain?
Renaming your SharePoint Online domain helps:
- Align URLs with your legal business name
- Improve branding consistency
- Present professional collaboration links
- Avoid technical debt later
- Separate dev and production tenants
Microsoft allows a SharePoint tenant rename only once, so it’s important to do it carefully.
Important Limitations Before You Start
Before renaming your Microsoft 365 tenant domain:
- You must be a Global Administrator
- Rename must be scheduled at least 24 hours in advance
- Not supported in GCC High or DoD environments
- Large tenants may experience longer processing time
- Existing links will redirect for 1 year only
If your tenant is new or lightly used, this is the safest time to perform the rename.
Step 1: Add a New .onmicrosoft.com Domain
You cannot rename SharePoint directly to a custom domain like yourcompany.com.
Instead, you must create a new Microsoft-managed domain:
- Go to Microsoft 365 Admin Center
- Navigate to Settings → Domains
- Select Add onmicrosoft.com domain (preview)
- Enter your desired name
Example:
tanolisllc.onmicrosoft.com
Make sure:
- Status shows “Healthy”
- Do not remove the original domain
- Do not set it as fallback
Step 2: Install SharePoint Online Management Shell
Tenant rename must be executed from Windows PowerShell (5.1).
Do NOT use:
- Azure Cloud Shell
- WSL (Ubuntu)
- PowerShell 7
Install the module:
Install-Module -Name Microsoft.Online.SharePoint.PowerShell
Step 3: Connect to SharePoint Admin
Use the existing admin URL (before rename):
Connect-SPOService -Url https://youroldtenant-admin.sharepoint.com
Login using Global Admin credentials.
Step 4: Validate the Rename with WhatIf
Always test first:
Start-SPOTenantRename -DomainName "tanolisllc" -ScheduledDateTime "2026-02-13T23:30:00" -WhatIf
If there are no blocking errors, you are ready to proceed.
Step 5: Schedule the SharePoint Tenant Rename
Remove -WhatIf:
Start-SPOTenantRename -DomainName "tanolisllc" -ScheduledDateTime "2026-02-13T23:30:00"
If successful, you will see:
Success
RenameJobID : <GUID>
This confirms the rename job has been scheduled.
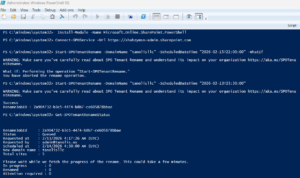
Here is a working snapshot of Powershell commands;
Step 6: Monitor Rename Status
You can check status anytime:
Get-SPOTenantRenameStatus
Possible states:
- Scheduled
- InProgress
- Success
Small tenants typically complete within 30–90 minutes.
What Changes After Renaming?
Old URL:
https://youroldtenant.sharepoint.com
New URL:
https://newtenantname.sharepoint.com
Old links will automatically redirect for one year.
Important:
- Email addresses are NOT affected
- Custom domains are NOT changed
- Azure subscriptions are NOT impacted
Post-Rename Checklist
After completion:
- Test SharePoint homepage
- Test OneDrive access
- Test Microsoft Teams
- Update bookmarks
- Validate external sharing links
If OneDrive was locally synced, you may need to reconnect it.
Best Practices for Microsoft 365 Tenant Rename
- Rename before scaling usage
- Keep dev and production tenants separate
- Align tenant name with legal entity
- Schedule rename during off-hours
- Document the RenameJobID for audit purposes
Tenant naming is part of cloud governance and identity architecture — not just branding.
Final Thoughts
Renaming your SharePoint Online tenant is a one-time decision that affects every collaboration link your organization generates.
If you’re early in your Microsoft 365 lifecycle, it’s worth doing right.
Clean identity structure today prevents technical debt tomorrow.

 Add to favorites