One of the most obvious and useful set of window functions are ranking functions where rows from the data set are ranked accordingly. There are three ranking functions:
ROW_NUMBER()
RANK()
DENSE_RANK()
The difference is easy to remember. For the examples, let’s assume we have this stocks data set.
IF OBJECT_ID('tempdb..#stocks') IS NOT NULL DROP TABLE #stocks;
;With Stocks AS
(
    SELECT 'MSFT' Symbol UNION ALL
    SELECT 'MSFT' Symbol UNION ALL
    SELECT 'MSFT' Symbol UNION ALL
    SELECT 'AAPL' Symbol UNION ALL
    SELECT 'GOOG' Symbol UNION ALL
    SELECT 'GOOG' Symbol UNION ALL
    SELECT 'YHOO' Symbol UNION ALL
    SELECT 'T' Symbol
)
SELECT * INTO #stocks FROM Stocks;
--SELECT * FROM #stocks
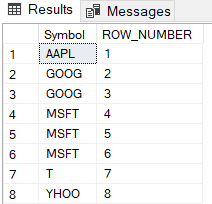
ROW_NUMBER()
This will assigns unique numbers to each row within the PARTITION given to the ORDER BY clause. SQL Server require an explicit ORDER BY clause in the OVER() clause for string data type. ORDER BY is not mandatory in monetary columns (INT, DECIMAL, FLOAT …).
SELECT Symbol, ROW_NUMBER() OVER(ORDER BY Symbol) [ROW_NUMBER]
FROM #stocks
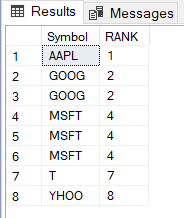
RANK()
This behaves like ROW_NUMBER(), except that “equal” rows are ranked the same. If we substitute RANK() from previous query:
SELECT Symbol, RANK() OVER(ORDER BY Symbol) [RANK]
FROM #stocks
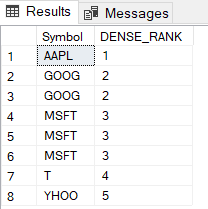
As you can see, we have gaps between different ranks. We can avoid those gaps by using following;
DENSE_RANK()
DENSE_RANK() is a rank with no gaps, i.e. it is “dense”. We can write:
SELECT Symbol, DENSE_RANK() OVER(ORDER BY Symbol) [DENSE_RANK]
FROM #stocks
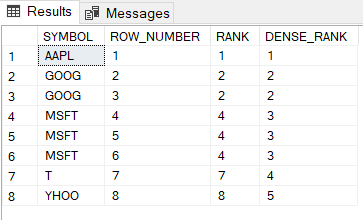
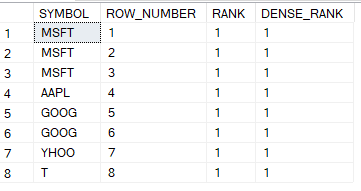
To get a good understanding of these three ranking functions is to see them all in action side-by-side. Run this query
SELECT
    SYMBOL,
    ROW_NUMBER() OVER(ORDER BY Symbol) [ROW_NUMBER],
    RANK() OVER(ORDER BY Symbol) [RANK],
    DENSE_RANK() OVER(ORDER BY Symbol) [DENSE_RANK]
FROM #stocks
Sometimes we don’t have order by column and we simple want to return row numbers using Row_Number function. Here is the same query with changes;
SELECT
    SYMBOL,
    ROW_NUMBER() OVER(ORDER BY Symbol) [ROW_NUMBER],
    RANK() OVER(ORDER BY Symbol) [RANK],
    DENSE_RANK() OVER(ORDER BY Symbol) [DENSE_RANK]
FROM #stocks
SELECT
	SYMBOL,
    ROW_NUMBER() OVER(ORDER BY (SELECT 1)) [ROW_NUMBER],
    RANK() OVER(ORDER BY (SELECT 1)) [RANK],
    DENSE_RANK() OVER(ORDER BY (SELECT 1)) [DENSE_RANK]
FROM #stocks
If you compare this result with earlier, you can see that RANK and DENSE_Rank functions doesn’t like the constant, so the values are 1 in respective columns.
You can use any literal value in Order by clause;
order by (select 0)
order by (select 1)
order by (select null)
order by (select 'test')
The above means that when you are using constant ordering is not performed by query optimizer.
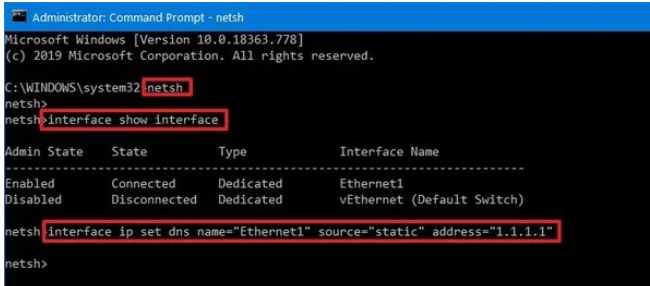
Use Command Prompt to change the DNS settings on Windows 10.
Open Start.
Search for Command Prompt, right-click the top result, and select the Run as administrator option.
Type the following command to launch the tool to change the networking settings and press Enter:netsh
Type the following command to identify the names of the network adapters and press Enter:interface show interface
Type the following command to set the primary DNS IP address and press Enter:interface ip set dns name="ADAPTER-NAME" source="static" address="X.X.X.X"In the command, remember to change ADAPTER-NAME with the name of your network adapter you identified on step No. 4, and change X.X.X.X with the IP address of the DNS server that you want to use.If you want to use Cloudflare, Google Public DNS, or Cisco OpenDNS, you can use these settings:
Cloudflare: 1.1.1.1 and 1.0.0.1
Google Public DNS: 8.8.8.8 and 8.8.4.4
OpenDNS: 208.67.222.222 and 208.67.220.220For example, this command sets the primary DNS addres to 1.1.1.1:interface ip set dns name="Ethernet1" source="static" address="1.1.1.1"
Type the following command to add an alternative DNS IP address and press Enter:
interface ip add dns name="ADAPTER-NAME" addr="X.X.X.X" index=2
In the command, remember to change ADAPTER-NAME with the name of your network adapter you queried on step No. 4, and change X.X.X.X with the secondary address that you want to use.
For example, this command sets the secondary DNS addres to 1.0.0.1:
interface ip add dns name="Ethernet1" addr="1.0.0.1" index=2
Quick tip: If you need to add even more DNS addresses, you can repeat the above steps, but increase the number of the index option by 1. For instance, interface ip add dns name="Ethernet1" addr="8.8.8.8" index=3
Once you complete the steps, Windows 10 will start using the new DNS server addresses to resolve domain names to numeric addresses that your device can understand.
You’ll need a new app to open this microsoft-edge – server 2019 – Microsoft Community Wasted a lot of time on this. Fresh install all patches applied and opened IE and was asked to update to Edge, Download> accept, continue install> accept and then “You’ll need a new app ……” Most of the posts I found show a resolution approach with a premise that edge is installed. I don’t know why but Edge is not installed in my case and trying sites with a link to install fail is a similar fashion. To resolve I needed to download from
I have upgraded cloud key with UDMPro. UDMPro don’t have a DNS. I plan to use Cloud Key as DNS and wanted to install PI-HOLE on it.
Followed these steps.
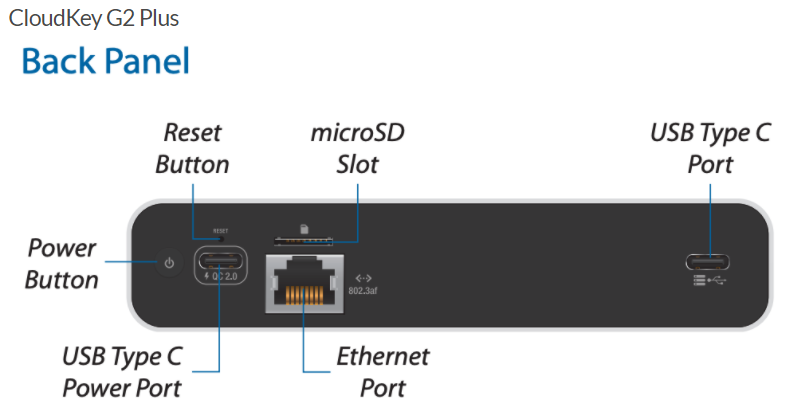
a) Factory Restore Cloud Key Power off the system.
b) Press and hold the reset button and then power on the Cloud Key by connecting it to the power source.
CloudKey G2 Plus
Keep the reset button pressed for about 10 seconds, or until you see the recovery LED pattern in a loop (blue – off – white). The LCD screen on the front panel will also read “RECOVERY MODE.”
Once the LED is flashing in the recovery mode pattern, open your browser and type the IP address for the Cloud Key, visible on the device’s screen. The IP address comes from your DHCP server, if you can’t access DHCP, the fallback IP will work: 192.168.1.30. However, keep in mind that if your Cloud Key does have a IP address assigned by the DHCP server, the fallback IP will not work.
You should be taken to the Recovery Mode screen. From here you can reset, reboot, power off and most importantly you can upload an updated firmware bin file.
Click ton Reset to Factory Defaults and then Reboot. It would take 2-3 minutes to come back with a steady white light. You would see information on the LCD that its ready to be configured.
2) Open your browser and type the IP address for the Cloud Key, Disable update/diagnostic in wizard
Let it set up. After update, I can see UniFi OS Version2.3.10 on Cloud Key.
Uninstall All applications, Settings -> Update. There are three dots on the right of application icon, click and uninstall.
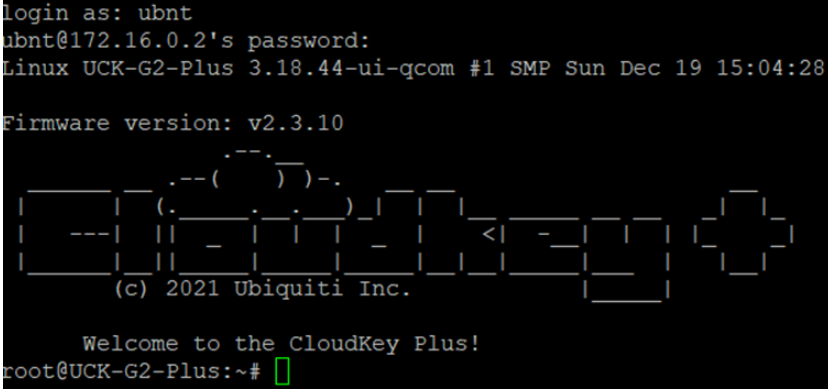
Enable SSHS by going into Settings -> Advanced and SSH.
Open Putty and SSH into Cloud key;
User = ubnt
Password = your password
We are in console. If for some strange reasons, Web URL doesn’t work but SSH works, then cloud key can be reset to factory defaults by running this command;
/sbin/ubnt-systool reset2defaults
It’s time to re-purpose cloud key. I have found this sequence on unifi forum. Follow step by step;
#go superuser
sudo –i
#Let’s install nano to make conf edit easier
apt-get install nano
#Install dnsmasq
apt-get update
apt-get install dnsmasq
#(Answer Y to replace the files as keeping the existing will point to 01-pihole.conf which does not work until pi-hole is installed)
# Ubiquiti switched the resolver to systemd-resolved which reserves the port 53
# dnsmasq install will fail to start dnsmasq so lets resolve that
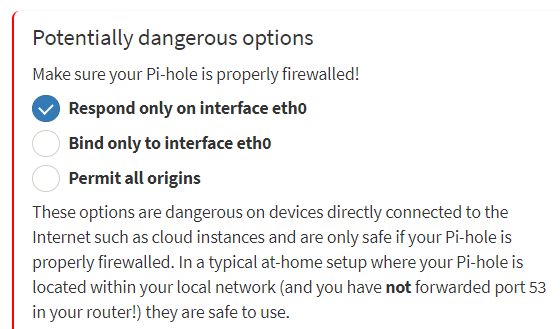
# Pi-Hole related
# Command to see if the database exists:
stat /etc/pihole/pihole-FTL.db

#If it does, then run these commands:
sudo service pihole-FTL stop
sudo rm /etc/pihole/pihole-FTL.db
sudo service pihole-FTL start

# Pi-Hole stores its 24 hour log here:
/var/log/pihole.log

# debian related
dpkg --list
systemctl status lighttpd
systemctl start lighttpd
systemctl stop lighttpd
systemctl restart lighttpd
# List of ports that are in use
sudo lsof -l -P -n | grep LISTEN
One last thing, you can install this tool on a different device but you’ll probably have to;
chown "user" /usr/local/bin/
“temporarily” on the terminal of your different device to make it work. The tool just pulls the current docker image from dockerhub so it doesn’t need to be ran on the same machine if you don’t want to.